

You can make a rain gauge from a clear 2-litre plastic bottle or a straight-sided jar, a ruler, tape and a permanent marker. If you don’t have a bottle, a clear jar works just as well. Set it in an open spot, mark a clear zero point, and read it at the same time each day. One quick safety note: cutting plastic needs an adult with scissors, not small hands.
Key Takeaways
Building a reliable homemade rain gauge depends on a flat zero point, an open placement site, and consistent daily readings taken at the same time.
| Point | Details |
|---|---|
| Core build | Cut a 2-litre bottle two-thirds up, invert the top as a funnel, and tape it securely. |
| Zero point | Pour in 100 ml of water on curved bases and mark that flat level as your starting line. |
| Placement | Set the gauge in an open area away from trees, walls, and roof runoff, on level ground. |
| Stability | Bury the base slightly or weight it with stones so wind or curious hands can’t tip it. |
| Avoid jelly | Use paraffin wax or a flat-bottomed container instead, since jelly attracts slugs and rots. |
| Routine matters | Read and empty the gauge at the same time daily and log results to build real observational data. |
Table of Contents
- What you’ll need to make a rain gauge
- Step-by-step: how to build a rain gauge
- How do you read and record rainfall correctly?
- Where should you place a rain gauge?
- Turning the rain gauge into a mini science project
- What goes wrong, and quick fixes
- Why the simplest rain gauge is usually the right one
- Sources
What you’ll need to make a rain gauge
Most of these materials are already in a kitchen drawer or recycling bin.
- A 2-litre clear plastic bottle or a straight-sided clear jar
- Scissors
- A permanent marker
- A ruler (marked in mm or cm)
- Tape (clear tape or duct tape)
- Small stones or clay, for weighting
- A jug of water, for setting the zero point
No 2-litre bottle handy? A clean jam jar or a straight-sided glass vase works, and a straight-sided transparent jar with a taped scale is genuinely one of the simplest child-friendly designs going. Bamboo skewers or a wooden lolly stick make a decent scale backing if your tape won’t sit flat.
Pro Tip: Skip glass jars for under-fives. A plastic bottle survives a knock on the patio; a jar doesn’t.
Step-by-step: how to build a rain gauge
Building one takes about 15 minutes, most of it spent making the funnel sit straight.
- Cut the bottle two-thirds of the way up. This gives you a deep collecting body and a spare top section to reuse as a funnel.
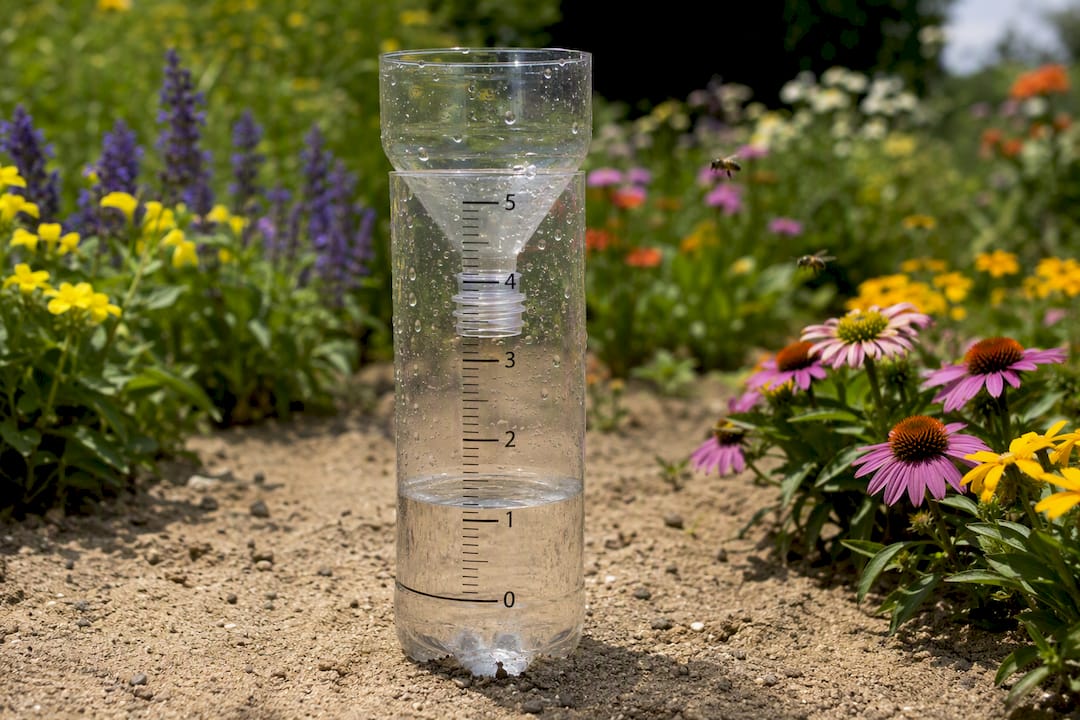
- Turn the top section upside down and slot it into the base like a funnel. This directs rain straight into the container instead of letting it splash out.
- Tape the funnel join securely. A loose join lets water escape between the two sections, which throws off every reading you take afterwards.
- Create a flat zero point. If your bottle base is curved, pour in 100 ml of water and mark that level with your permanent marker. That mark becomes your starting line, not zero on the ruler itself.
- Tape a ruler or a marked strip vertically from that zero point upwards. Line the ruler up carefully. Even a couple of millimetres of tilt will skew every measurement above it.
- Weight the base with stones, or bury the bottle a few centimetres into soil. A rain gauge that tips over in wind gives you nothing to record the next morning.
This build follows the same basic method MetLink uses in its schools resource: a 2-litre bottle, a flat zero point, and a calibrated scale read at the same time daily.
Pro Tip: Some classroom guides suggest lining the base with jelly to get a flat surface. Skip it. Jelly attracts slugs and rots within days — paraffin wax, or simply choosing a flat-bottomed container, keeps things clean for weeks.
Watch fingers around the cut edge of the bottle top. Freshly cut plastic can be surprisingly sharp, and it’s worth running a strip of tape along the rim before handing the gauge to a child.
How do you read and record rainfall correctly?
Your zero point is whatever flat surface you created, whether that’s the bottle’s natural base or the level you marked after adding water. Every ruler reading is measured from that line upwards, in millimetres or centimetres, since metric units line up with standard precipitation measurements used in classroom lesson plans. If a ruler only shows inches, remember 1 inch equals 25.4 mm, so conversions stay simple for older pupils.
Read at the same time every day, ideally first thing in the morning, then empty the gauge straight after. That habit alone is what turns a craft project into genuine observational data rather than a guess.
A simple log might look like this:
Where should you place a rain gauge?
Placement matters as much as the build itself. A gauge tucked under a tree or beside a wall will give you rubbish numbers no matter how carefully you marked the scale.
- Choose an open area, well clear of trees, fences, or buildings.
- Keep it away from roof edges and gutters, where dripping water inflates readings.
- Set it on level ground, not a slope where water runs off before it collects.
- Bury the base slightly, or weight it with stones, to stop wind knocking it flat.
- A large plant pot filled with soil, with the bottle nestled inside, adds extra stability in gardens that catch a lot of wind.
The Met Office’s own schools guidance backs this up: open placement and a stable base are the two things that most affect accuracy, far more than the container you choose.
Pro Tip: A narrow gap between two buildings can funnel wind and splash into the gauge, inflating readings well above what actually fell. If in doubt, move it further into the open.
Turning the rain gauge into a mini science project
A rain gauge earns its keep once it becomes a routine rather than a one-off craft afternoon. Take readings daily for two weeks, log them, then compare the totals against your local weather forecast or a nearby official station. The comparison is where the real learning happens: pupils start to notice the gap between direct observation and a forecast covering a wider area.
For KS1 to KS2 classes, this maps neatly onto existing learning goals:
- Reading a scale accurately, in mm or cm
- Building a simple bar graph from a fortnight’s data
- Using vocabulary like precipitation and measurement correctly in context
Split roles across the group so nobody’s left standing around: one child measures, one records, one compares the week’s totals against the forecast. A simple data sheet with date, time, and rainfall columns is all you need to keep everyone on task. For more outdoor learning built around a single ongoing project, Thezoofamily’s guide to DIY weather stations for kids covers thermometers and wind vanes that pair naturally with a rain gauge.
What goes wrong, and quick fixes
Even a well-built gauge runs into a handful of predictable snags.
- Evaporation on hot days. Add a funnel to reduce water loss, though a funnel changes the ratio between what’s collected and actual rainfall, so measure the funnel and container diameters and apply that ratio when converting your reading.
- Slugs or insects in the collecting jar. This is almost always the jelly method at fault. Switch to paraffin wax or a flat-bottomed container instead.
- Readings that don’t match neighbouring gauges. Check your zero point alignment first. A ruler taped a few millimetres off the true zero throws every subsequent reading out.
- Faded markings after a few weeks outside. Re-mark with a fresh permanent marker and replace tape that’s lifted or gone cloudy in the sun.
For low-rainfall areas or older pupils, a funnel feeding into a narrow measuring cylinder amplifies small amounts of rain into readable numbers, provided you correct for the funnel-to-cylinder ratio each time.
Why the simplest rain gauge is usually the right one
The temptation with any classroom science project is to over-engineer it, and rain gauges are no exception. Parents and teachers searching for the “best” design often end up comparing funnel ratios and cylinder diameters before they’ve even placed a bottle outside. That’s backwards. The research behind school weather projects consistently points the same way: clarity of the scale and a consistent daily routine matter more than laboratory precision.
Where most guides fall short is treating placement as an afterthought. It isn’t. A beautifully calibrated gauge shoved under a tree produces worse data than a rough one sitting in open ground. Get the site right before worrying about millimetre precision.
If there’s one thing to prioritise, it’s the routine, not the build. A gauge read at a different time each day, then abandoned after a fortnight, teaches nothing. The same bottle, checked every morning at eight for two weeks, teaches a child what a graph actually means.
Sources
- Met Office – Learn about: rain gauge (schools resources)
- MetLink – Make a rain gauge
- Nature Alberta – Rain gauge
- Science Buddies – Make a rain gauge to study precipitation
- Whipple Museum / Cambridge museums – How to make a rain gauge (PDF)