
TL;DR:
- Using cameras to teach shapes transforms passive lessons into active exploration, increasing engagement and real-world observation.
- Activities like shape hunts, composition, and storytelling deepen recognition, creativity, and cross-disciplinary learning.
Teaching shapes to young children sounds straightforward until you are actually doing it. Flash cards get ignored, worksheets disappear under the sofa, and pointing at a stop sign for the hundredth time loses its magic fast. Learning shapes with cameras changes that entirely. Photography turns a passive lesson into an active hunt, giving children a genuine reason to look closely at the world around them. This guide walks you through everything: the right equipment, step-by-step activities, common pitfalls, and ways to confirm that the learning is actually sticking.
Table of Contents
- Key takeaways
- Learning shapes with cameras: why it works
- Getting set up for shape activities
- Three activities that actually deliver results
- Troubleshooting common problems
- Checking understanding and going further
- My honest take on cameras and shape learning
- Explore Thezoofamily’s cameras for shape learning
- FAQ
Key takeaways
| Point | Details |
|---|---|
| Cameras boost engagement | Photography gives children an active reason to observe and identify shapes in real environments. |
| Preparation matters | Good lighting and correct camera distance make shape photos clear enough to discuss and learn from. |
| Three core activities work best | Shape hunts, shape composition, and photo storytelling cover recognition, creativity, and recall. |
| Troubleshooting saves sessions | Knowing how to fix blurry images and flagging interest keeps activities running smoothly. |
| Photography extends across subjects | Shape photos connect naturally to art, maths, and nature study, deepening learning beyond a single lesson. |
Learning shapes with cameras: why it works
Children learn best when they are moving, choosing, and making something. Visual diversity and active observation are fundamental to developing accurate shape perception, which means sitting still and staring at a diagram is about the least effective approach available. A camera solves this by turning the child into the expert. They are not receiving information; they are gathering it.
Shape recognition with cameras also builds a skill that matters well beyond early education: the ability to see structure in everyday objects. A window is a rectangle. A pizza slice is a triangle. A wheel is a circle. Once children start photographing these connections, they cannot stop noticing them. That shift in attention is the real win.
Research into first-person camera views confirms that varied, movement-linked perspectives are what build strong shape understanding. Encouraging children to crouch down, step back, or tilt the camera is not just fun. It is exactly the kind of visual experience that cements recognition. Cameras that inspire learning in young minds do so precisely because they hand control to the child.
Getting set up for shape activities
Choosing the right camera
You do not need anything expensive. A dedicated kids’ camera, a tablet, or a smartphone all work well for camera-based shape activities. The priority is that the child can hold it comfortably and press the shutter independently. Webcams work for classroom table-top activities where the camera stays fixed, but they limit the exploratory movement that makes photography so effective for shape learning.
| Camera type | Best for | Key consideration |
|---|---|---|
| Kids’ digital camera | Outdoor hunts, independent use | Durable, easy grip, simple controls |
| Tablet | Classroom table-top activities | Larger screen aids group discussion |
| Smartphone | Quick home activities | Familiar to children, high image quality |
| Webcam | Fixed overhead shape composition | Consistent framing, no portability |
Lighting and positioning
This is where most beginners go wrong. Diffuse, even lighting significantly improves contrast and makes geometric shapes far easier to identify in photos. Near a window on an overcast day is ideal. Avoid harsh direct sunlight, which creates shadows that obscure edges.
For table-top activities, a consistent working distance of 15 to 50 centimetres produces reliably clear images of objects. Stick a small piece of tape on the table to mark where the camera should sit. It sounds overly simple, but it eliminates most blurry photo problems instantly.
Additional materials to gather
- Printed shape reference cards (circle, square, triangle, rectangle, hexagon)
- A small basket or tray for collecting objects during indoor hunts
- Sticky labels or a whiteboard for naming shapes after photographing them
- A simple photo-viewing app or a connected screen for group review sessions
Pro Tip: Print shape cards at A5 size and laminate them. Children can hold the card next to the object they photograph, which makes the comparison concrete and satisfying.
Three activities that actually deliver results
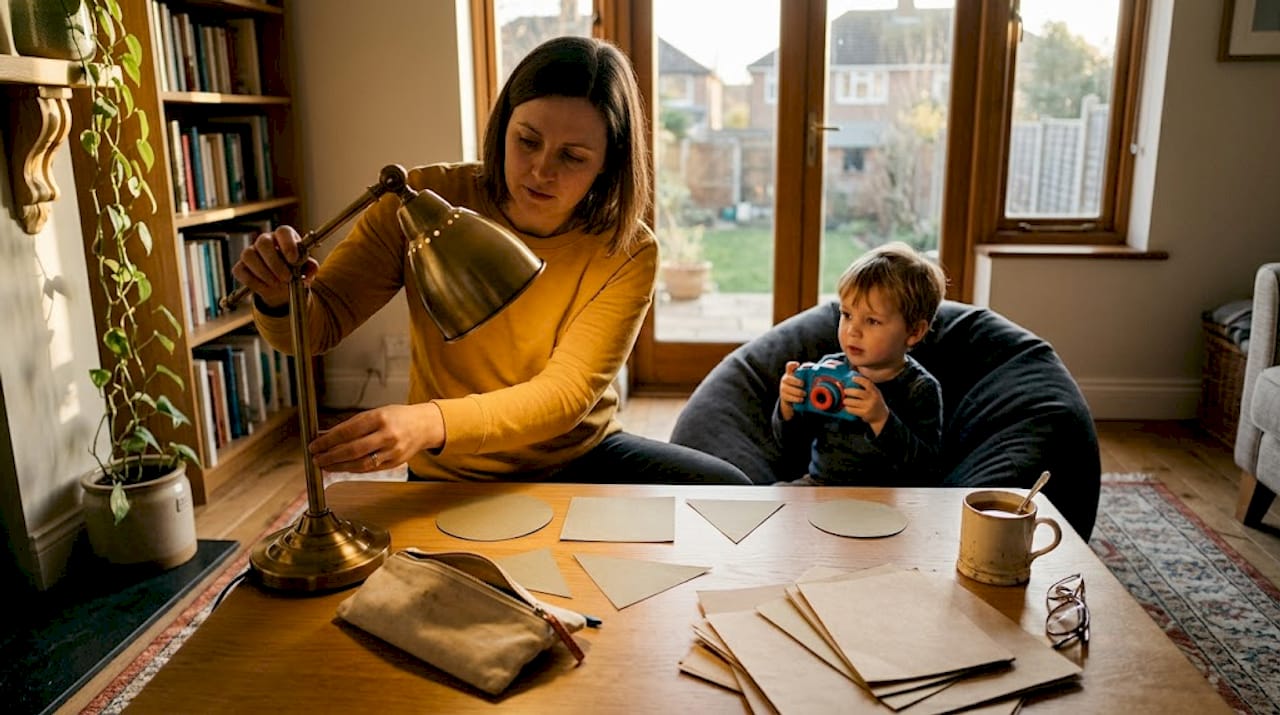
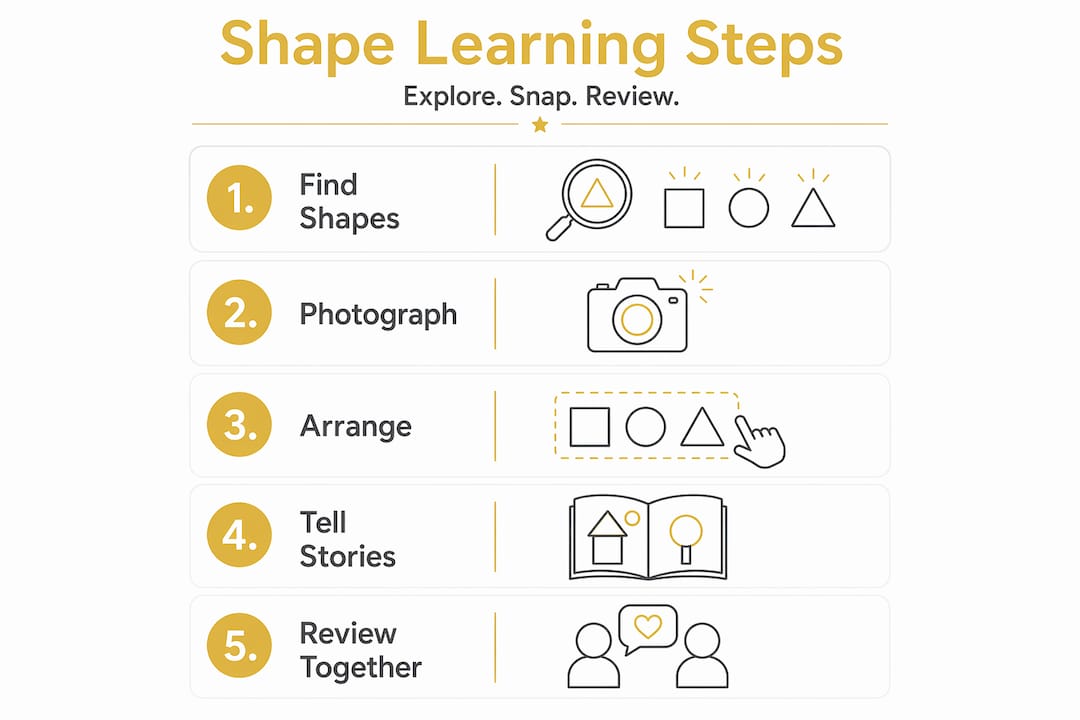
Activity 1: the shape photo scavenger hunt
This is the entry point for most children and the one that generates the most excitement. Give each child a printed shape card or a simple checklist: find and photograph one circle, one square, one triangle, and so on. Set a timer for fifteen minutes and let them loose around the room, garden, or classroom.
The key is to resist the urge to guide too much. Let them photograph the wrong thing, then talk about why it does or does not match. A child who photographs an oval and argues it is a circle is doing exactly the right kind of thinking. That conversation is the lesson.
- Hand out shape reference cards before starting.
- Set clear boundaries for where children can explore.
- Give each child their own camera or take turns in small groups.
- Call everyone back and review photos together on a shared screen.
- Ask each child to explain why their photo matches the shape on their card.
Activity 2: shape composition
This activity shifts from finding shapes to building them. Children arrange household or classroom objects, such as pencils, blocks, books, or leaves, into a shape outline on a flat surface, then photograph the result from above. Simplifying objects into basic shapes builds confidence and foundational creative skills, and this activity does exactly that in a tactile, satisfying way.
The overhead angle is important here. Position the camera directly above the arrangement, looking straight down. A chair or a step stool helps children achieve this without adult intervention, which keeps their sense of ownership intact.
Activity 3: shape storytelling with photos
Once children have a collection of shape photos, use them as the raw material for a story. A circle becomes the sun, a rectangle becomes a door, a triangle becomes a mountain. Children arrange their printed or on-screen photos into a scene and narrate what is happening.
This activity connects photography for learning shapes to language development and creative thinking. It also gives you a natural way to introduce more complex shapes. Ask: “What shape would a house roof be? Can you find one to photograph?” The story provides the motivation; the shape hunt provides the learning.
Pro Tip: Create a simple shape story template with blank spaces: “The [shape] was a [object] in a land where everything was made of shapes.” Children fill in the blanks using their photos, which makes the activity work for a wide range of reading levels.
Troubleshooting common problems
Even well-planned sessions hit snags. Here is how to handle the most frequent ones.
Blurry images. This is almost always a distance or movement problem. Remind children to hold the camera still for a count of two before pressing the shutter. If the problem persists, check the lighting. Poor light forces the camera to use a slower shutter speed, which makes motion blur worse.
Children losing interest mid-activity. Introduce a competitive element carefully. A gentle race to find the most shapes in ten minutes works well for some groups. For others, adding a creative constraint works better: “Only photograph shapes you find outside.” Novelty resets attention more reliably than pressure.
Shape misidentification. Children frequently confuse rectangles and squares, or ovals and circles. Rather than correcting immediately, ask questions. “How many sides does your shape have? Are they all the same length?” Guiding recognition through questions builds far more durable understanding than simply providing the answer.
“The goal is not a perfect photo of a perfect shape. The goal is a child who looks at a door and automatically thinks: rectangle.”
Adapting for different ages and abilities. Younger children (ages three to five) work best with just two or three shapes and a very short time limit. Older children can handle six or more shapes and benefit from being asked to find the same shape in two completely different contexts, such as a circle in nature and a circle made by humans. This comparison deepens visual shape identification with cameras considerably.
Checking understanding and going further
Reviewing photos together
After any camera-based shape activity, the review session is where consolidation happens. Display photos on a screen and ask children to sort them by shape. This works brilliantly as a group activity because disagreements, handled well, produce the richest discussions.
You can also create a simple quiz by showing a photo and asking: “What shape is hiding in this picture?” Children who took the photo often know immediately, which gives them a moment of genuine expertise to share with peers.
Pro Tip: Create a physical “shape gallery” by printing the best photos and labelling them. Displaying children’s work on a classroom or bedroom wall reinforces learning every time they walk past it.
Extending into other subjects
| Subject | Extension activity |
|---|---|
| Maths | Count sides and corners from photos; introduce area by comparing shape sizes |
| Art | Use shape photos as reference for drawing or collage projects |
| Nature study | Create a “shapes in nature” photo book: spirals, hexagons in honeycombs, circles in tree rings |
| Literacy | Write captions or short descriptions for each shape photo |
Interactive shape learning does not have to stay in its own box. A hexagon spotted in a beehive photograph connects geometry to biology in a way that no worksheet can replicate. Encouraging children to look for shapes in nature specifically is one of the most powerful extensions available, and it aligns beautifully with the kind of outdoor curiosity that benefits children far beyond the classroom.
My honest take on cameras and shape learning
I have watched a lot of shape lessons over the years, and the ones that use traditional methods almost always share the same problem. The child is passive. They receive the shape, label it, and move on. Nothing about that process requires them to actually look.
What I have found with educational camera shape exercises is that the camera creates genuine accountability. You cannot photograph a triangle without first deciding that what you are looking at is actually a triangle. That decision, made independently, is worth ten repetitions of a flash card.
The trial and error matters too. I have seen children photograph something confidently, show it to the group, and realise mid-explanation that they got it wrong. That moment of self-correction is far more powerful than being told the answer. It sticks.
My one caution: do not over-structure the activity. The temptation is to turn every session into a formal lesson with clear right and wrong answers. Resist it. The best camera-based shape activities I have observed look more like play than school. The learning is happening, but the child does not feel like they are being assessed. That distinction changes everything about how they engage.
Combine technology with movement, keep the stakes low, and let children surprise you with what they notice. They almost always do.
— ALAIN
Explore Thezoofamily’s cameras for shape learning
If you are ready to put these activities into practice, the right camera makes a genuine difference. Thezoofamily designs kids’ cameras built specifically for young explorers: durable, simple to use, and sized for small hands.

Every camera sold through Thezoofamily plants one tree, so your child’s shape hunt contributes to something bigger than the classroom. Browse the full range of kids’ cameras for learning and find the one that fits your child’s age and curiosity. You will also find a growing library of creative activity ideas on the Thezoofamily blog, covering everything from nature photography to interactive games that make early learning genuinely enjoyable.
FAQ
What cameras work best for shape learning activities?
Kids’ digital cameras, tablets, and smartphones all work well. The priority is that the child can operate the camera independently, which keeps the activity child-led and more effective for learning.
How do I use cameras for shape learning at home?
Start with a simple shape scavenger hunt: give your child a shape reference card and ask them to find and photograph one example of each shape around the house. Review the photos together and discuss what makes each shape match or not match.
What age is best for camera-based shape activities?
Children as young as three can participate with two or three basic shapes and a short time limit. Children aged five and above can handle more complex shapes and benefit from comparing the same shape found in different contexts.
How does lighting affect shape photos taken by children?
Even, diffuse lighting near a window produces the clearest shape photos. Harsh direct light creates shadows that obscure edges and make shapes harder to identify and discuss.
Can shape photography connect to other school subjects?
Yes. Shape photos link naturally to maths (counting sides, comparing sizes), art (using photos as drawing references), nature study (finding geometric patterns in plants and animals), and literacy (writing captions or shape stories).