
TL;DR:
- Keeping a child’s camera clean with safe supplies prevents blurry photos caused by dirt or smudges. Proper techniques involve blowing off dust, using gentle wipes, and avoiding harsh chemicals or household wipes to preserve delicate coatings. Regular, careful maintenance encourages responsibility and ensures a reliable tool for young explorers’ outdoor adventures.
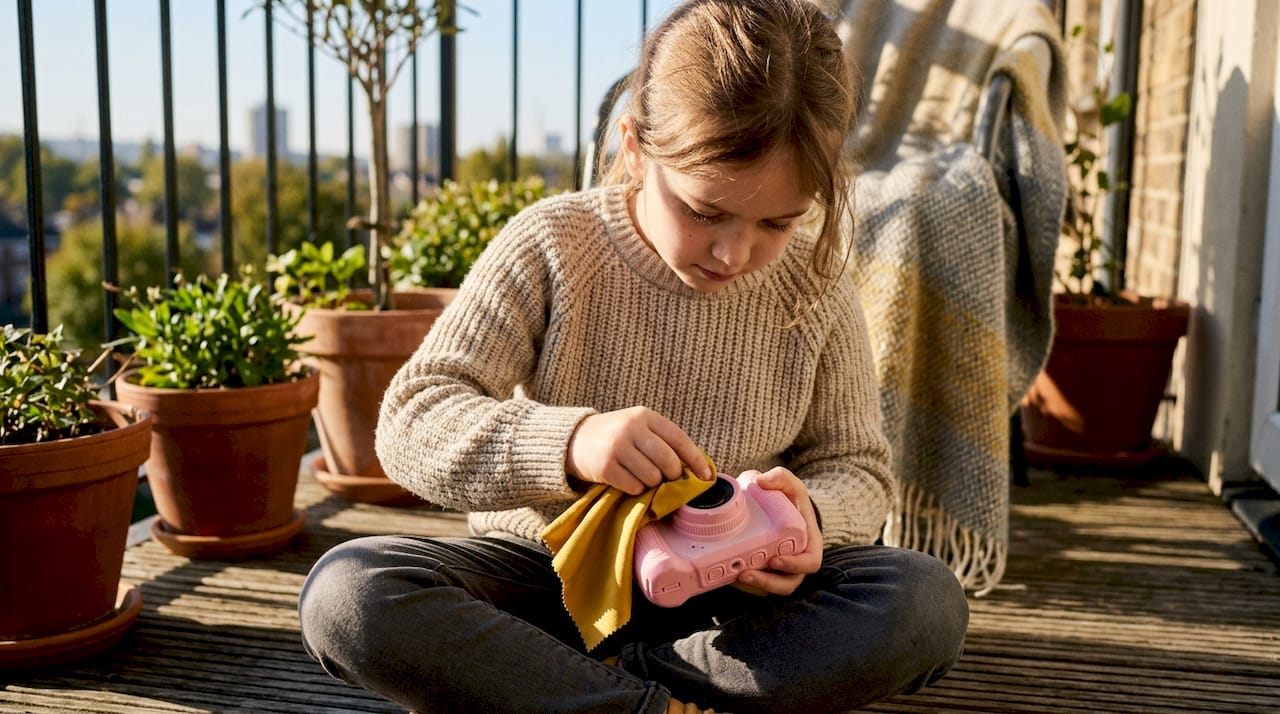
Your child spends a glorious afternoon in the garden or at the beach, camera in hand, capturing butterflies and rock pools with pure delight. Then you look at the photos together and find every single image is blurry, smudged, or oddly tinted. A dirty lens is nearly always the culprit, and the frustration is entirely avoidable. Keeping a kids’ camera clean is straightforward once you know which tools to use and which common mistakes to sidestep. This guide walks you through every step, from gathering safe supplies to caring for adventure cases, so your child’s camera is always ready for the next great discovery.
Table of Contents
- What you’ll need: safe cleaning supplies for kids’ cameras
- Step-by-step: how to clean the body, lens, and screen
- Extra care for underwater and adventure cases
- Troubleshooting and mistakes to avoid
- Why camera cleaning is about more than just maintenance
- Support your child’s creativity with safe camera care
- Frequently asked questions
Key Takeaways
| Point | Details |
|---|---|
| Use gentle tools only | Microfibre cloths and air blowers are safest for cleaning kids’ cameras. |
| Avoid harsh chemicals | Never use household cleaners or wipes, which can damage delicate surfaces. |
| Care for water cases | If used in saltwater or sand, rinse thoroughly and dry the case in the shade. |
| Blow before you wipe | Always remove dust with a blower before touching lenses or screens to prevent scratching. |
| Seek help if unsure | If dust is inside the camera or on the sensor, use a blower only or contact a professional. |
What you’ll need: safe cleaning supplies for kids’ cameras
Before diving into cleaning, it’s essential to use the right tools instead of reaching for whatever’s nearby. Grabbing the nearest kitchen cloth or bathroom spray might seem harmless, but it can permanently damage a lens coating or scratch a screen in seconds. Spending two minutes gathering the correct kit first makes the whole process safer and faster.
Here is a quick overview of the safest tools and what each one does:
| Tool | Purpose | Why it matters |
|---|---|---|
| Microfibre cloth | Wipe lenses, screens, and body | Lifts oils and dust without scratching |
| Rubber air blower | Remove loose dust before wiping | Prevents grit from grinding across glass |
| Lens cleaning fluid | Dissolve stubborn fingerprints | Formulated to be safe on optical coatings |
| Cotton swabs | Reach small crevices around buttons | Gentle and precise for tight spots |
| Soft-bristled brush | Sweep dust from body edges and ports | Dislodges sand without scratching plastic |
For safe camera care, the microfibre cloth and rubber blower are your two most important items. Most other cleaning supplies you find at home are either too abrasive or contain chemicals that strip protective coatings. Sony’s official guidance is clear on this point: avoid household wipes, organic solvents, or abrasive cleaners on camera surfaces.
What to avoid bringing anywhere near a child’s camera:
- Alcohol-based wipes or sprays (including many antibacterial products)
- Paper towels or tissues, which have rough fibres that scratch glass
- Multi-surface sprays and kitchen degreasers
- Compressed air cans, which can blast liquid propellant onto lenses
- Old T-shirt fabric, which may contain coarse threads
For families who prefer planet-conscious choices, looking into eco-friendly cleaning tips can help you identify which lens fluids are free from harsh chemicals, making them safer around young children and kinder to the environment.
Pro Tip: Keep a small camera cleaning pouch in your camera bag at all times. A microfibre cloth and a mini blower take up almost no space but mean you can do a quick clean after every outdoor session before grime has a chance to set.
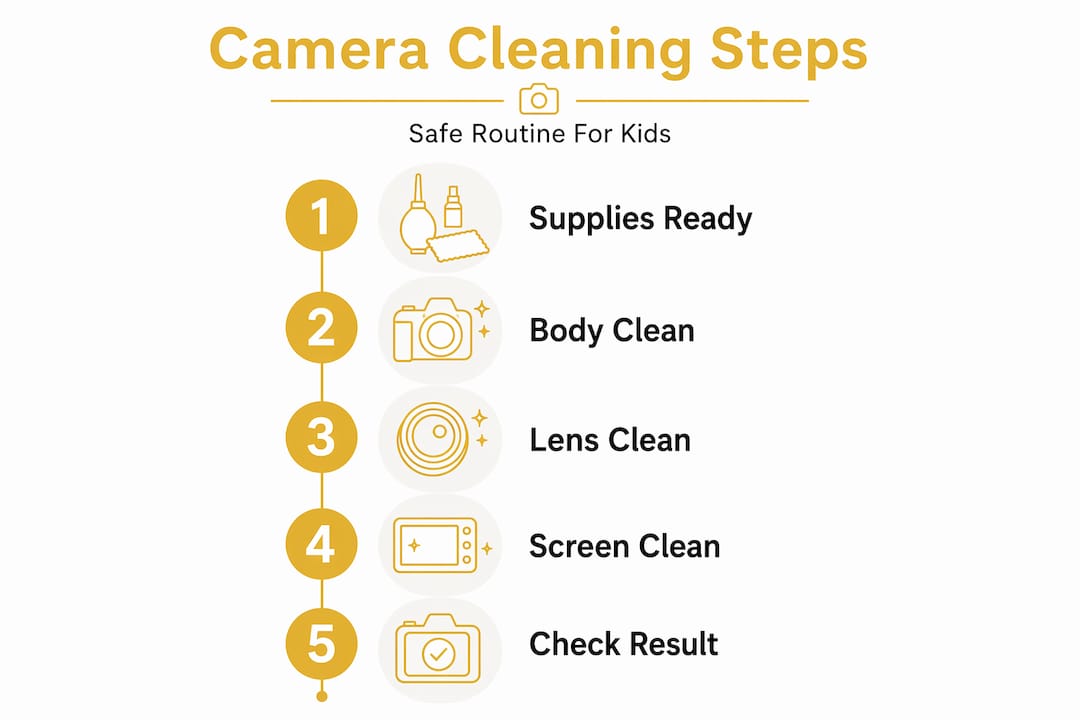
Step-by-step: how to clean the body, lens, and screen
Once your supplies are ready, follow these carefully sequenced steps to clean each delicate part. The order matters. Wiping before blowing pushes loose grit across glass, which is exactly how micro-scratches appear. Patience here protects both the camera and your child’s photos.
Here is a quick comparison of how to treat each part differently:
| Camera part | Primary tool | Liquid allowed? | Technique |
|---|---|---|---|
| Lens | Blower, then microfibre | Yes, a tiny amount on cloth | Centre outward, gentle circles |
| Screen | Microfibre only | No | Light, straight strokes |
| Camera body | Dry cloth first, then barely damp | Small amount if grime is stubborn | Wipe with the grain of any texture |
| Port openings | Soft brush or dry swab | No | Sweep outward, do not press inward |
| Battery compartment | Dry swab | No | Very light, no moisture at all |
Follow these steps in order every time:
- Power off the camera completely and remove any memory card or batteries. You never clean any electronics while they are switched on.
- Use the rubber blower to puff air across the lens surface, screen, and all body edges. Hold the camera upside down so gravity helps dislodged dust fall away.
- Brush away remaining surface dust from the body crevices using the soft-bristled brush, always sweeping outward from ports and buttons.
- Apply one small drop of lens cleaning fluid to the microfibre cloth, never directly onto the lens. Sony’s guidance specifically notes you should avoid direct application of lens cleaner onto glass surfaces.
- Wipe the lens from the centre outward in gentle, overlapping circles. As Sony’s cleaning guidance advises, you should blow before wiping and use gentle, circular motions for any stubborn spots that remain.
- Wipe the camera body with a dry microfibre cloth first. For sticky residue (ice cream and muddy fingers are common offenders), use a cloth that is very slightly dampened with plain water only.
- Clean the screen last, using a fresh, completely dry microfibre cloth. As Sony’s screen care guidance confirms, touchscreens need extra care and no harsh detergents whatsoever.
- Leave the camera open on a clean surface for five minutes before reinserting the battery or memory card, ensuring no residual moisture is trapped.
Remember: if your child’s camera is designed for younger hands, such as the robust models ideal for cameras for preschoolers, the body may have textured rubber grips that trap fine grit. Pay extra attention to those grooves with the soft-bristled brush.
Pro Tip: Use two microfibre cloths, one for the lens and one for the body and screen. Cross-contaminating cloths is one of the most common reasons lenses end up oilier after cleaning than before.
Extra care for underwater and adventure cases
For families whose adventures take them outdoors or underwater, cleaning takes a few extra but essential steps. Sand, salt, and chlorine are far more damaging to protective cases and seals than ordinary dust. A single outing at the beach can pack fine grit into gasket grooves, quietly compromising the waterproofing that keeps the camera safe on the next swim.
Here is what the evidence tells us about saltwater specifically. As underwater case guidance from Pevly confirms, if a camera case has been in saltwater, you should rinse it with lukewarm fresh water and dry it in the shade as soon as possible. Salt crystals that dry on a seal expand slightly as they harden, and over time they cause tiny tears in the gasket material. That transforms a waterproof case into a camera-damaging sieve.
Key steps for adventure case care after each outdoor or water session:
- Rinse immediately with lukewarm, clean fresh water, even if the case looks clean to the eye. Salt is invisible once water evaporates.
- Open the case only in a dry, clean environment, never at the water’s edge where drops and sand are still in the air.
- Inspect the gasket or O-ring closely for sand, hair, or debris each and every time. These are precision seals. Use a dry cotton swab to gently lift any particles from the groove.
- Never use sharp tools, fingernails, or metal objects to clean the seal area. Even a tiny nick creates a leak path.
- Let all parts air dry completely in the shade before closing and storing. Direct sunlight can degrade rubber seals and cause plastic to warp over time.
- Store the case slightly open when not in use. A fully compressed gasket for weeks at a time loses its flexibility faster.
| Condition | Risk level | Response time |
|---|---|---|
| Freshwater (pool or river) | Low to moderate | Rinse within a few hours |
| Saltwater | High | Rinse within 30 minutes ideally |
| Sandy environments | Moderate to high | Brush and rinse immediately |
| Muddy terrain | Moderate | Wipe and rinse same day |
Children exploring rock pools, paddling in lakes, or running through muddy forests are exactly the curious, nature-loving kids we build cameras for. Keeping that protective case in perfect condition is the single most effective way to protect the camera beneath it. You can read more about camera safety for kids and how to match the right protective gear to your child’s age and activity level.
Every parent who has supported their child in fostering creativity outdoors knows how quickly an interest in nature can blossom when the tools work reliably. A camera that fails mid-adventure because of a faulty seal is discouraging in a way that takes real time to repair emotionally for a young child.
Troubleshooting and mistakes to avoid
Even with good intentions, mistakes can happen. Here’s how to avoid the most common ones that parents encounter when cleaning a child’s camera for the first time.
The single most damaging mistake is wiping a lens or screen before blowing away loose grit. It feels intuitive to wipe, but a microfibre cloth dragging a grain of beach sand across glass produces a scratch that no amount of subsequent cleaning will undo. Always blow first, every single time, without exception.
Common mistakes and how to avoid them:
- Using household wipes: even “gentle” baby wipes often contain alcohol, aloe, or mild surfactants that strip anti-reflective and anti-fingerprint coatings from lenses and screens permanently.
- Spraying liquid directly onto the camera: moisture seeps into gaps around buttons and ports, reaching circuit boards where it causes corrosion over days or weeks.
- Pressing too hard when wiping: extra pressure does not remove stubborn grime faster. It just increases the risk of scratching. Light, patient strokes always work better.
- Using paper tissues or kitchen roll: these feel soft but contain wood fibres that are coarser than optical glass tolerates. Reserve microfibre cloths exclusively for camera surfaces.
- Attempting to clean the image sensor yourself: this is the most critical caution of all. Sony’s sensor cleaning advice is explicit: never use commercial cleaning solutions or dry cloths on image sensors. Use only a rubber blower for light dust, and if more serious cleaning is needed, take the device to a professional service.
Important: if your child drops the camera and the lens suddenly produces consistently foggy images that blowing and wiping cannot fix, this likely indicates internal contamination or a displaced element. Do not attempt to disassemble the lens yourself. Seek professional help, as internal repair requires specialist tools and a clean environment.
For guidance on lasting camera fun and how a good maintenance routine protects your investment season after season, our full care guide covers everything from storage tips to battery care.
Pro Tip: After each cleaning session, take a quick test photo of a plain white wall in good light. If the image looks sharp, evenly lit, and free from smudges, your cleaning was successful. This also teaches older children to do a simple quality check themselves.
Why camera cleaning is about more than just maintenance
There is a perspective here that most camera care guides overlook entirely. Teaching a child to clean and care for their camera is not a chore imposed on them. It is one of the most natural ways to build a sense of responsibility, ownership, and pride in their creative work.
When a child learns that a clean lens produces sharper, more beautiful photos, they make a direct connection between care and quality. That connection transfers. Children who learn to respect their tools tend to use them more confidently and more creatively. They also tend to go outdoors more, because they know their camera is ready and reliable.
We firmly believe that the creative benefits of camera care extend well beyond protecting a piece of hardware. A functioning, clean camera removes the friction between a child’s impulse to capture something beautiful and the actual moment of doing it. When the lens is clear and the screen is readable, the camera disappears from the experience and the world takes centre stage.
There is also something worth saying about frustration. Blurry photos from a dirty lens are disheartening for young photographers. Children often blame themselves when their pictures look poor, wondering if they took the photo “wrong.” A clean camera gives every child a fair shot at producing an image they feel genuinely proud of. That confidence matters far more than any technical specification.
Finally, making cleaning part of a short, post-adventure ritual, perhaps two minutes at the end of a walk, teaches children that looking after the natural world and looking after the tools they use to explore it go hand in hand. At The Zoofamily, that connection between care, creativity, and nature is exactly the spirit we hope every young photographer carries with them.
Support your child’s creativity with safe camera care
Ready to make camera care part of your parenting toolkit? The good news is that once you have the right supplies and a simple routine in place, keeping a kids’ camera in perfect condition takes no more than a few minutes after each adventure.

At The Zoofamily, we design cameras with young explorers in mind, built to survive muddy trails, sandy beaches, and curious hands. But even the most robust camera benefits from a little regular attention. To help you nurture your child’s love of photography and the natural world, we have gathered resources, expert advice, and creative project ideas all in one place. Discover the benefits of kids’ cameras and find out how the right camera, properly cared for, can spark a lifelong connection with nature and creativity.
Frequently asked questions
What should I do if there are stubborn fingerprints on the camera lens?
Use a rubber blower first to remove loose dust, then apply a tiny drop of lens cleaner to a microfibre cloth and wipe in gentle circular motions from the centre outward. As Sony’s guidance confirms, you should blow first, wipe in circles and never apply the cleaner directly to the lens surface.
Can I use baby wipes or household wipes to clean my child’s camera?
No, avoid them entirely. Even mild wipes often contain alcohol or surfactants that strip delicate lens coatings; as Sony notes, household wipes contain chemicals that can permanently dull casings and damage optical surfaces.
How do I clean the camera if it was used at the beach or in saltwater?
Rinse the protective case with fresh, lukewarm water as promptly as possible, then allow it to air dry fully in the shade before closing or storing. As Pevly’s care guidance advises, salt needs prompt rinsing and a complete dry in the shade to prevent seal damage.
Is it safe to clean inside the camera or sensor at home?
Only use a rubber blower for light dust inside the camera. Sony’s sensor cleaning guidance is clear: never use commercial cleaning solutions or dry cloths on the image sensor, and if more thorough cleaning is needed, take the camera to a professional service rather than attempting it yourself.