

Old CDs are worth keeping out of the bin. Municipal recycling often excludes discs, and their iridescent surface makes them one of the most visually rewarding materials for home crafts. Here are the best projects to start with:
- CD mosaic mirror or wall art — medium difficulty, around one hour, not kid-friendly without supervision
- Shimmering suncatcher — easy, short duration, kid-friendly ✓
- Hanging mobile — easy, short duration, kid-friendly ✓
- Coaster set — easy, short duration, kid-friendly ✓
- Disco ball or garland — medium difficulty, about half an hour to one hour
- Garden wind spinner or reflector — easy, short duration, kid-friendly ✓
- Jewellery pendant or earring holder — medium difficulty, about half an hour to one hour
- CD clock face — medium difficulty, about half an hour to one hour
- Decorative bowl (oven-shaped) — medium difficulty, about half an hour to one hour, adult supervision required
- Cable organiser — easy, short duration, kid-friendly ✓
- Photo frame trim — easy, about half an hour, kid-friendly ✓
- Kids’ hovercraft toy — easy, short duration, kid-friendly ✓
Table of Contents
- What are the best CD recycling craft ideas you can make at home?
- How do you prepare and cut CDs safely?
- How long do CD craft projects take, and what do they cost?
- Key takeaways
- Why upcycling CDs is worth doing with children
- Thezoofamily’s eco gifts and creative kits for children
- Useful sources and further reading
What are the best CD recycling craft ideas you can make at home?
Old CDs work for both decorative and functional projects — from garden mobiles to desk organisers. The twelve projects below each include a materials list, time estimate, difficulty rating, and clear steps.
1. CD mosaic mirror or wall art
Materials: old CDs or DVDs, tile nippers or heavy-duty snips, mirror base or wooden board, tile adhesive or E6000, grout (optional) Time: 60–90 mins | Difficulty: Medium
- Soak discs in hot water to soften them before cutting.
- Cut into small irregular pieces using snips or tile nippers. Wear gloves and eye protection.
- Arrange pieces on your base, shiny side up, before gluing.
- Apply E6000 adhesive to each piece and press firmly. Leave to cure for 24 hours.
- Fill gaps with grout if desired; wipe clean with a damp cloth.
Pro Tip: DVDs split into two thin layers, giving you twice the pieces per disc and finer cuts for detailed mosaic work.
2. Shimmering suncatcher
Materials: old CD, ribbon or fishing line, beads or small charms, drill or hole punch Time: Under 30 mins | Difficulty: Easy | Kid-friendly ✓
- Drill or punch a small hole near the edge of the disc.
- Thread ribbon or fishing line through the hole.
- Add beads or charms to the ribbon below the disc.
- Hang in a sunny window to cast rainbow reflections.
3. Hanging mobile
Materials: 3–5 old CDs, wooden dowel or branch, string, scissors Time: Under 30 mins | Difficulty: Easy | Kid-friendly ✓
- Cut lengths of string at different heights (20–50 cm each).
- Tie one end of each string through the CD centre hole.
- Attach the other ends to a dowel or branch, spacing them evenly.
- Hang from a ceiling hook or curtain rail.
4. Coaster set
Materials: 2 CDs per coaster, strong craft glue or E6000, felt or cork sheet, scissors Time: Under 30 mins | Difficulty: Easy | Kid-friendly ✓
Gluing two CDs together with the reflective sides facing out creates a spill-resistant base that beginners can decorate with paint or stencils.
- Apply glue to the label side of one disc.
- Press the second disc label-side down onto the first. Hold for 60 seconds.
- Cut a circle of felt or cork to match the disc diameter.
- Glue the felt or cork to the bottom to protect surfaces.
- Leave to cure fully before use.
5. Disco ball or garland
Materials: polystyrene ball or cardboard strip, cut CD pieces, PVA glue, string Time: 30–60 mins | Difficulty: Medium
- Cut CDs into small squares (roughly 1 cm).
- Apply PVA glue to the ball or cardboard strip in small sections.
- Press CD squares onto the glued area, shiny side out, leaving small gaps.
- Continue until covered. Leave to dry fully.
- Attach string for hanging.
Covering a polystyrene ball with mirrored CD pieces takes patience, but the result catches light from every angle — far more effective than shop-bought foil decorations.
6. Garden wind spinner or reflector
Materials: old CDs, garden wire or wooden stake, drill, outdoor-safe adhesive Time: Under 30 mins | Difficulty: Easy | Kid-friendly ✓
- Drill a hole near the edge of each disc.
- Thread garden wire through the hole and twist to secure.
- Attach the wire to a stake pushed into the ground.
- Space multiple discs along one stake for a spinning chain effect.
For outdoor use, E6000 or silicone adhesive and a UV-resistant sealant prevent peeling and fading far better than standard hot glue. See the preparation section below for full weatherproofing advice.
7. Jewellery pendant or earring holder
Materials: CD or DVD, craft knife, sandpaper, jump rings, jewellery wire Time: 30–60 mins | Difficulty: Medium
- Soak the disc in hot water, then cut a small shape (circle, teardrop, triangle) with a craft knife.
- Sand any sharp edges smooth.
- Drill or punch a small hole at the top.
- Attach a jump ring and jewellery wire to finish.
8. CD clock face
Materials: old CD, clock mechanism kit (available from craft shops), acrylic paint, drill Time: 30–60 mins | Difficulty: Medium
- Paint or decorate the label side of the disc as desired.
- Widen the centre hole slightly with a drill to fit the clock spindle.
- Push the clock mechanism spindle through from the back.
- Attach hands and insert a battery.
9. Decorative bowl (oven-shaped)
Materials: old CD, oven-safe bowl as mould, baking paper Time: 30–60 mins | Difficulty: Medium | Adult supervision required
- Preheat oven to 150°C.
- Place the CD on baking paper on top of an inverted oven-safe bowl.
- Put in the oven and watch constantly. The disc will soften and drape within 1–2 minutes.
- Remove immediately and press gently into shape with gloved hands.
- Leave to cool and harden before use.
Work in a well-ventilated room and never leave the oven unattended during this step.
10. Cable organiser
Materials: old CD, elastic band or cable tie Time: Under 15 mins | Difficulty: Easy | Kid-friendly ✓
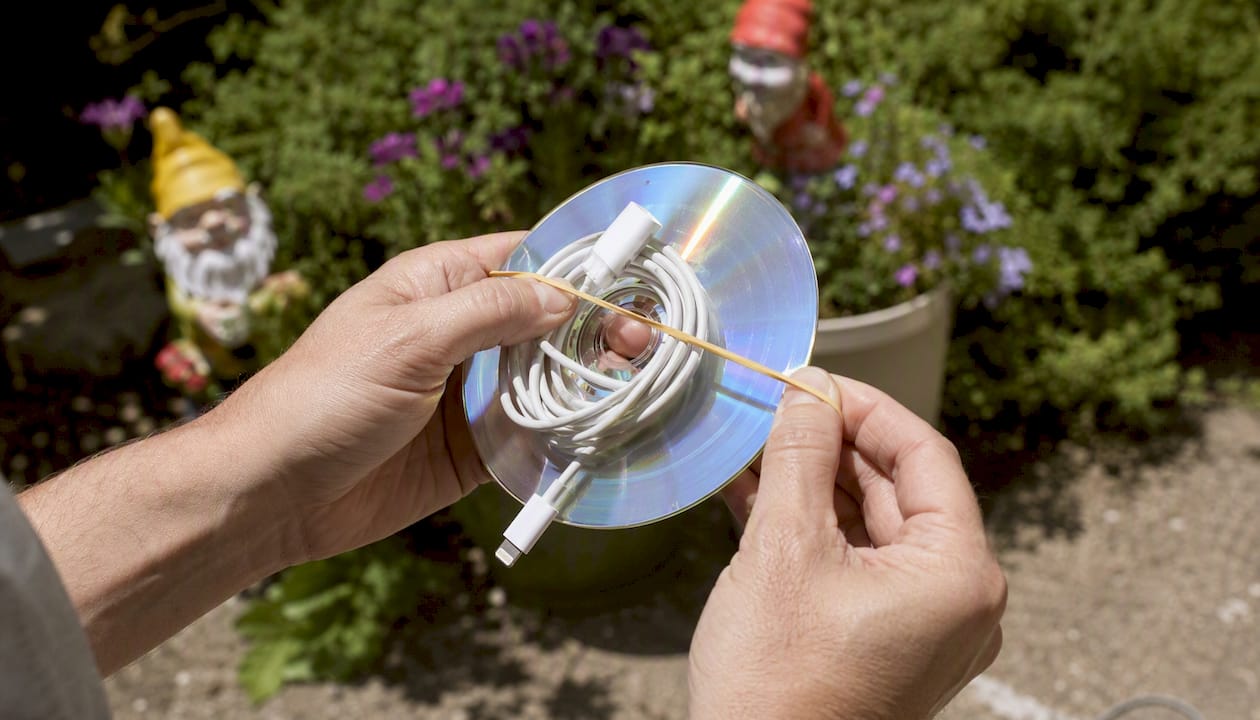
Wind charger cables or fairy lights around the disc with the plug fed through the centre hole. Secure with an elastic band. It keeps cables tangle-free and takes under two minutes per cable.
11. Photo frame trim
Materials: old CDs, photo frame, cut CD pieces, PVA glue Time: 30 mins | Difficulty: Easy | Kid-friendly ✓
- Cut CDs into small pieces or strips.
- Apply PVA glue around the frame border.
- Press CD pieces onto the glue, shiny side up, overlapping slightly.
- Leave to dry for at least one hour.
12. Kids’ hovercraft toy
Materials: old CD, balloon, sports bottle cap (the pop-up type), hot glue Time: Under 30 mins | Difficulty: Easy | Kid-friendly ✓
- Glue the sports bottle cap over the centre hole of the disc. Leave to dry fully.
- Close the bottle cap, then blow up a balloon and stretch it over the cap.
- Place the disc on a smooth surface and open the cap.
- The escaping air lifts the disc slightly, letting it glide across the surface.
Upcycling crafts like this teach children to see waste as a resource and are well suited to group or school activities. For more ideas along these lines, the Thezoofamily blog has a full list of recycled art projects for children.
How do you prepare and cut CDs safely?
Getting the preparation right saves time and prevents cracked discs or injuries. The steps below cover material choice, cutting, layer separation, adhesives, and outdoor finishing.
Choosing between CDs and DVDs
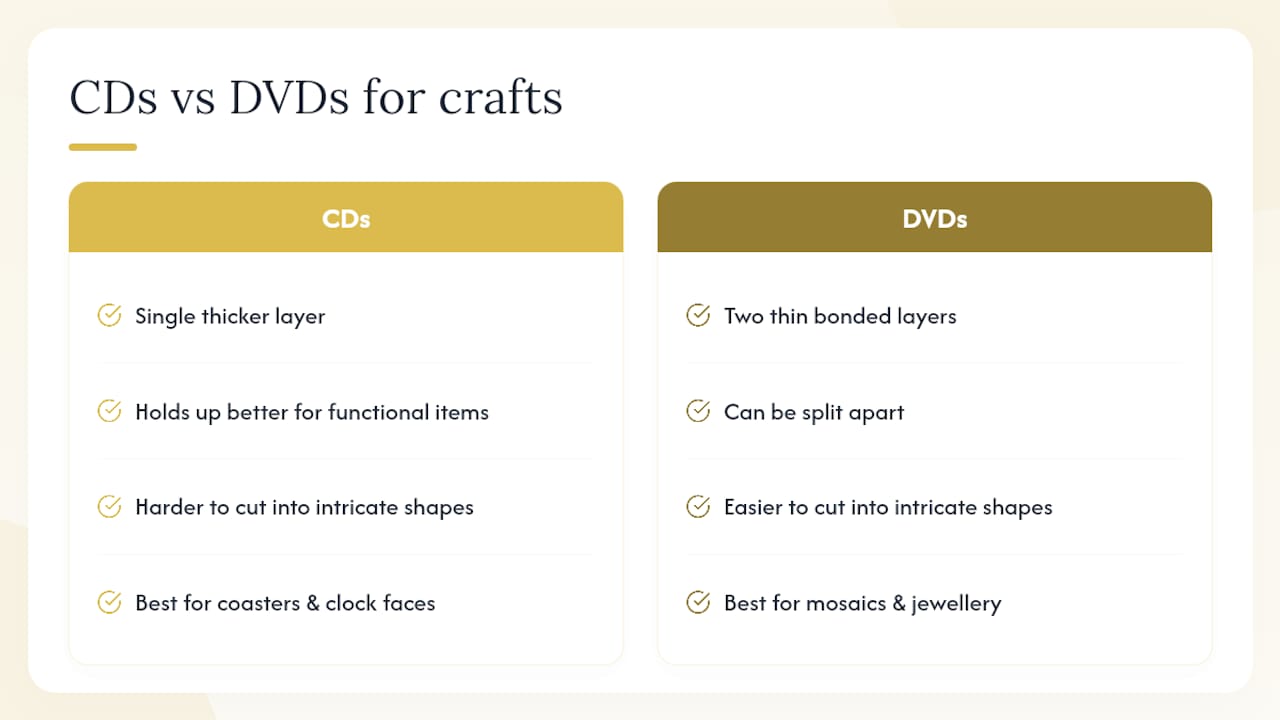
DVDs consist of two thin bonded layers that can be split apart, making them easier to cut into small, intricate shapes. For mosaic work or jewellery, DVDs are the better choice. Standard CDs are a single thicker layer, which holds up better for functional items like coasters or clock faces.
Softening and cutting
Soak discs in very hot water for about ten minutes before cutting. This softens the polycarbonate enough for heavy-duty scissors or snips to cut cleanly without shattering. A Dremel rotary tool gives more precise shapes. A craft knife works for scoring straight lines on a softened disc.
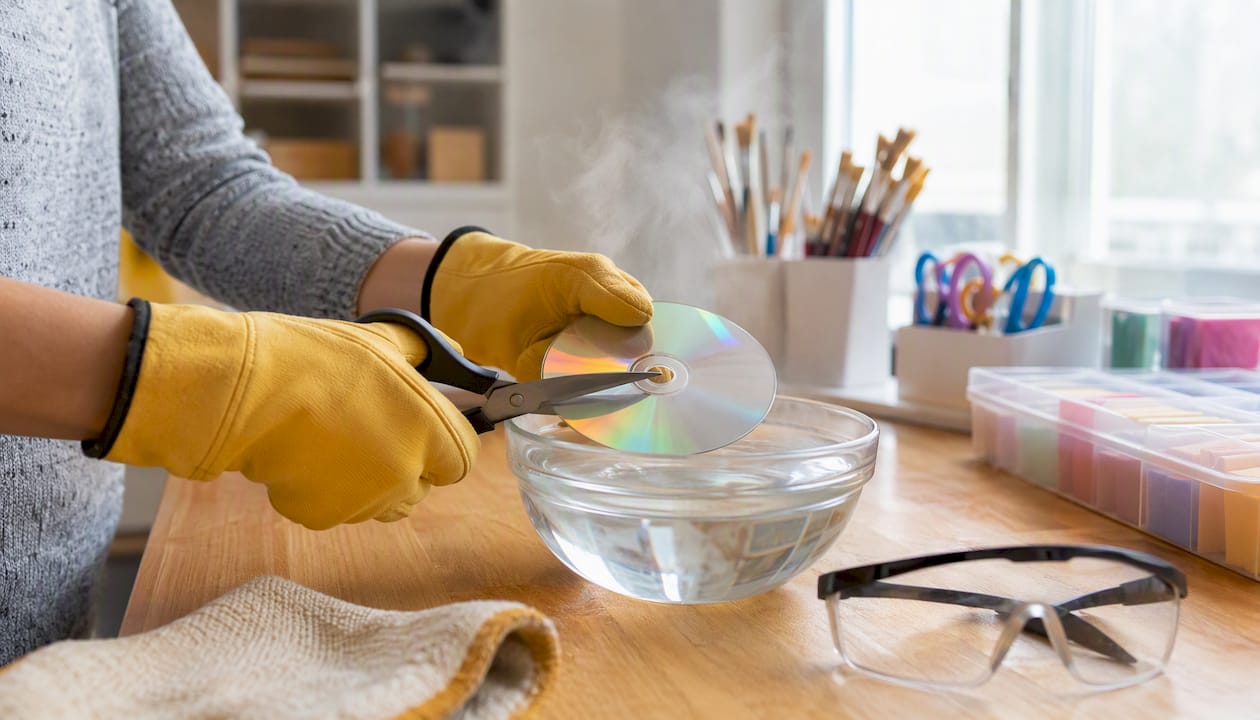
Always wear gloves and safety glasses when cutting. Cut edges are sharp. For children’s projects, an adult should handle all cutting and sand or tape any exposed edges before handing pieces to children.
Separating the reflective layer
To remove the reflective data layer, create a small slit near the edge and use tape to peel it away. This exposes the plain plastic underneath and gives a different visual effect. It also removes the sharp metallic edge on cut pieces, which is useful for projects handled by children.
Adhesives and sealants
For indoor projects, PVA glue or a standard hot-glue gun works well. For anything going outdoors, hot glue fails under temperature and moisture changes. Use E6000 or a silicone-based adhesive instead, and finish with a UV-resistant varnish or Mod Podge Outdoor to prevent peeling and fading. Allow E6000 to cure for at least 24 hours before exposing the piece to weather.
Oven shaping: safety notes
Keep the oven at 150°C or below. Use baking paper under the disc. Stay in the room the entire time — discs soften within one to two minutes and can warp unevenly if left unattended. Open a window before you start. Never melt discs on a hob or with a heat gun indoors without strong ventilation, as the fumes are unpleasant and potentially harmful.
Pro Tip: Test your cutting and shaping technique on a scrap disc before working on the piece you plan to display. Polycarbonate behaves differently at different temperatures, and one practice run prevents wasted effort.
How long do CD craft projects take, and what do they cost?
| Project | Typical time | Cost | Difficulty |
|---|---|---|---|
| Suncatcher / hanging mobile | Under 30 mins | Low | Easy |
| Coaster set (pair) | Under 30 mins | Low | Easy |
| Cable organiser | Under 15 mins | Low | Easy |
| Photo frame trim | 30 mins | Low | Easy |
| Kids’ hovercraft toy | Under 30 mins | Low | Easy |
| Garden wind spinner | Under 30 mins | Low–medium | Easy |
| Disco ball / garland | 30–60 mins | Low–medium | Medium |
| Jewellery pendant | 30–60 mins | Low | Medium |
| CD clock face | 30–60 mins | Low–medium | Medium |
| Decorative bowl | 30–60 mins | Low | Medium |
| Mosaic mirror or wall art | 60–90 mins | Low–medium | Medium |
Cost-saving tips and practical notes:
- Use PVA glue for all indoor projects — it costs very little and bonds well to polycarbonate.
- Cut felt or cork from an old mat for coaster backing rather than buying new sheets.
- Collect discs from charity shops, car boot sales, or community swap groups to keep material costs at zero.
- Most CD upcycle projects cost almost nothing beyond basic craft supplies, making them practical for school groups and low-budget workshops.
- Never melt discs without ventilation — this applies regardless of project type.
- For school or group settings, eco-conscious wrapping and presentation ideas can complement finished CD craft projects nicely.
Key takeaways
Upcycling old CDs into crafts keeps discs out of landfill, costs almost nothing, and produces functional or decorative items suitable for all ages.
| Point | Details |
|---|---|
| Choose DVDs for fine cutting | DVDs split into two thin layers, making them easier to cut for mosaics and jewellery. |
| Soften before cutting | Soak discs in hot water for 10 minutes to prevent shattering and get cleaner cuts. |
| Use outdoor-safe adhesives | E6000 or silicone glue with a UV-resistant sealant is needed for any garden project. |
| Supervise children closely | Adults should handle all cutting; sand or tape sharp edges before children handle pieces. |
| Thezoofamily eco mission | Thezoofamily’s creative recycling projects for families support the same upcycling values these CD crafts build. |
Why upcycling CDs is worth doing with children
The most underrated thing about CD crafts is not the visual result — it is what the process teaches. When a child turns a scratched disc into a working hovercraft or a garden spinner, they are not just making something. They are learning that the category of “rubbish” is not fixed.
That shift in thinking is exactly what Thezoofamily is built around. The brand’s cameras, binoculars, and walkie-talkies are designed with animal references to connect children with the natural world, and for every camera sold, Thezoofamily plants a tree. CD crafts fit that same logic: low cost, hands-on, and grounded in the idea that creative reuse is a better default than disposal.
The projects in this article are also genuinely open-ended. A suncatcher can become a mobile; a mosaic offcut can become a pendant. Encourage children to adapt the steps rather than follow them exactly — that is where the real learning happens.
Thezoofamily’s eco gifts and creative kits for children
Thezoofamily makes nature-focused cameras, binoculars, and walkie-talkies designed to get children curious about the world around them. If you are looking for a ready-made gift that shares the same eco values as these CD craft projects, their range is a practical option.
Every camera sold through Thezoofamily funds the planting of one tree, so the purchase connects directly to the kind of environmental thinking that upcycling projects encourage. The products are built for children and designed to last, which means less waste over time.
Visit thezoofamily.com to see the full range and find a gift that supports both creativity and the natural world.
Useful sources and further reading
- How to Recycle CDs or Use Them for Crafts — Tom’s of Maine — Practical guidance on softening, cutting, and layer separation; good starting point for safe preparation.
- 8 Surprisingly Useful Ways to Reuse Old CDs — Good Housekeeping UK — Functional reuse ideas including cable management and candle drip catchers; UK-focused.
- Creative Crafts and Recycling Ideas for Old CDs — The House Mag — Covers outdoor adhesive choices, DVD layer splitting, and weatherproofing advice.
- 10 Things to Make with Old CDs — Happy Hooligans — Child-friendly project ideas with minimal tools required.
- 15 Fun Ways Kids Can Upcycle Old CDs — Kids Activities Blog — School and group activity ideas; strong on educational value of upcycling.
- Can CDs Be Recycled? — Treehugger — Explains why standard kerbside recycling excludes discs and what the alternatives are.
- DIY Plant Art Projects — Lushy Gardens — Complementary outdoor and garden art ideas that pair well with CD garden reflector projects.
- 8 Creative Recycled Art Projects — Thezoofamily — Related eco craft ideas for families from the Thezoofamily blog.