

The fastest route into teaching environmental care through art is five simple drawings: a smiling Earth, a planted tree, a recycling bin scene, an animal in its habitat, and a sun symbol for clean energy. Each needs only reused paper and non-toxic crayons, takes 10 to 30 minutes, and suits parents at the kitchen table or KS1/KS2 teachers running a class activity.
TL;DR:
- Children aged three to nine can create simple eco-themed drawings with minimal supplies, reinforcing environmental messages through easy step-by-step tutorials.
- Using recycled paper, non-toxic crayons, wooden pencils, and natural materials for land art helps align the materials with sustainability lessons while encouraging hands-on activities.
- Outdoor land art and natural object collection activities teach children about impermanence, the environment’s fragility, and observation skills, especially when combined with reflection and prediction tasks.
- Short slogans like “Reduce, reuse, recycle” or “Love your planet” can be added to drawings via printable templates, promoting meaningful engagement and action ideas.
- Incorporating outdoor exploration with tools like animal cameras and walkie-talkies links drawing activities to real-world nature observation, deepening environmental understanding and responsibility.
Table of Contents
- Taking care of the environment drawing easy: step-by-step tutorials
- Choosing eco-friendly materials for classroom and home art
- Land art and process art with materials found outdoors
- Running the activity at home or in class
- Slogans, templates and turning drawings into action
- Who’s behind this guide and where to go next
- Why simplicity beats polish in environmental art lessons
- Take the nature theme beyond the page with Thezoofamily
- Sources
- FAQ
Taking care of the environment drawing easy: step-by-step tutorials
These five mini-tutorials work for children aged three to nine, adapting in complexity as you go. Each one follows the same rule: big simple shapes first, detail last, and a message the child chooses themselves.
1. The smiling Earth
Start with a large circle for the planet, the technique recommended for environment-themed drawings for kids. Then:
- Draw a big circle filling most of the page.
- Add wobbly blue patches for oceans.
- Add green blobs for continents (shapes don’t need to be accurate).
- Draw a simple smiling face in the middle of a continent.
- Add a sun in one corner and a few clouds.
- Write a short slogan underneath, such as “Love your planet.”
Age and time: three to five years, 10 to 15 minutes with an adult drawing the outline first. Six to nine year olds can manage the whole thing solo in around 20 minutes.
Tip: for younger children, print a plain circle outline in advance so they can focus on colouring and the face rather than shape control.
2. Planting a tree
- Draw a small mound of soil at the bottom of the page.
- Add a thin brown trunk rising from the mound.
- Draw a rounded green canopy on top.
- Add two hands (simple ovals with stick fingers) holding a tiny sapling beside the trunk.
- Draw a watering can or a few raindrops nearby.
- Add a caption: “One tree, one future.”
This one pairs naturally with the Earth Day card tutorials that use the same numbered, image-led approach for beginners.
3. Recycling bin scene
- Draw three simple rectangular bins side by side.
- Colour them blue, green and grey (or whatever your local scheme uses).
- Add the recycling symbol (three curved arrows in a triangle) on the blue bin.
- Draw simple items going into each bin: a bottle, a can, a newspaper.
- Add arrows showing items moving towards the correct bin.
Extend it: older children can add labels naming what belongs in each bin, turning the drawing into a working poster.
4. Animal and its habitat
- Choose one animal (a fox, a bird, a fish).
- Draw a simple oval body and round head.
- Add basic habitat shapes behind it (trees for a fox, a pond for a fish).
- Draw the animal’s food source nearby.
- Add a short sentence about what the animal needs to survive.
5. Simple renewable energy icon
- Draw a bright sun with straight rays.
- Add a simple wind turbine: a pole with three thin triangular blades.
- Colour both in warm and cool tones to contrast clean energy against grey pollution clouds crossed out beside them.
Printable suggestions: a plain Earth-circle outline and a bare tree-and-shovel outline both work well as ready-made templates. Print several copies so children can repeat a design and compare their choices, an approach that mirrors the beginner-friendly step sequences in the Easy Drawing Guides tutorials.
Choosing eco-friendly materials for classroom and home art
The materials matter as much as the drawing itself. A recycling poster drawn with plastic-heavy felt tips undercuts its own message, so match your supplies to what the activity is teaching.
Recommended basics:
- Recycled or FSC-certified paper for the main drawing surface
- Wooden pencils and crayons rather than plastic-cased alternatives
- Non-toxic, water-based paints and soy-based inks for printing
- Glue sticks over solvent-based adhesives, particularly for younger children
These choices follow the guidance on non-toxic art supplies for children, which favours materials that avoid plastic-heavy composition wherever a swap is easy.
Reuse ideas cost nothing and reinforce the lesson directly:
- Flattened cereal boxes as a sturdy drawing base or template stencil
- Scrap paper offcuts for collage details (clouds, water, leaves)
- Old newspaper as a protective table cover, then recycled again afterwards
Pro Tip: Send a one-line materials note home before the session: “Please bring one clean cereal box and any scrap paper.” Parents rarely have craft paint on hand, but everyone has cardboard.
A simple pre-session checklist saves scrambling five minutes before the activity starts: paper, wooden pencils, non-toxic paint, glue sticks, and one recycled item per child.
Land art and process art with materials found outdoors
Drawing on paper is only half the story; integrating hands-on animal care activities into lessons enhances empathy and environmental stewardship, as shown in Od lęku do przyjaźni: Jak dogoterapia uczy dzieci empatii, odwagi i odpowiedzialności. Process art using found natural materials teaches the same environmental lessons through touch, not just sight, and environmental land art uses nothing but what’s already lying on the ground, producing temporary works that decompose naturally.
Four activities work reliably outdoors:
- Nature mandala — arrange leaves, petals and stones in a circular pattern radiating from a central point.
- Silhouette figures — lay sticks and leaves flat on the ground to build the outline of an animal or a person.
- Balance towers — stack stones or short sticks by size, testing gravity and patience together.
- Found-object collage — glue a small selection of natural items onto cardboard for a lasting version of the outdoor work.
Before starting, run a short material scavenger hunt: give children two minutes to collect only items already on the ground, never picked from living plants. This “leave no trace” rule keeps the activity ethical and matches how these lessons meet Key Stage 2 art objectives when the collecting and sorting is guided rather than random.
Photograph every piece before it’s disturbed by wind or footsteps. This isn’t just tidy record-keeping. Educators recommend it specifically because ephemeral outdoor works need photographing to preserve them for later reflection and assessment.
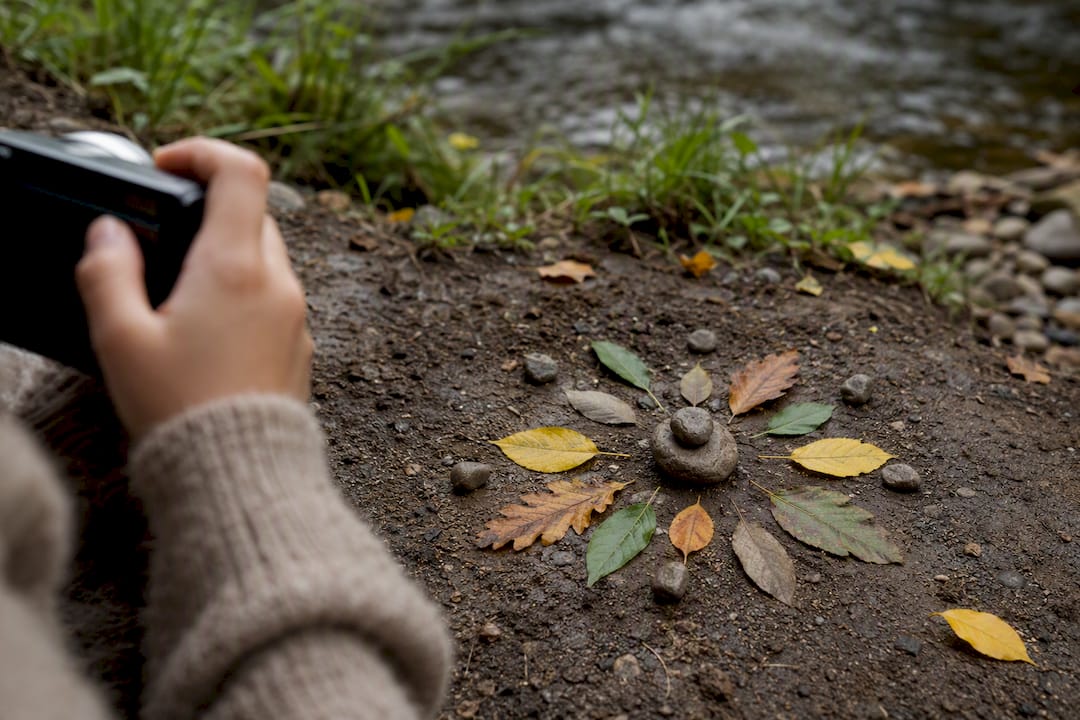
A simple simulation game extends the lesson without any extra materials: ask the group to predict how their mandala or sculpture will look the next morning after wind or rain. Return the following day, compare the prediction to reality, and discuss what changed. This exact technique produces measurable gains in observation and reflection skills and teaches impermanence in a way a static drawing never quite manages.
Running the activity at home or in class
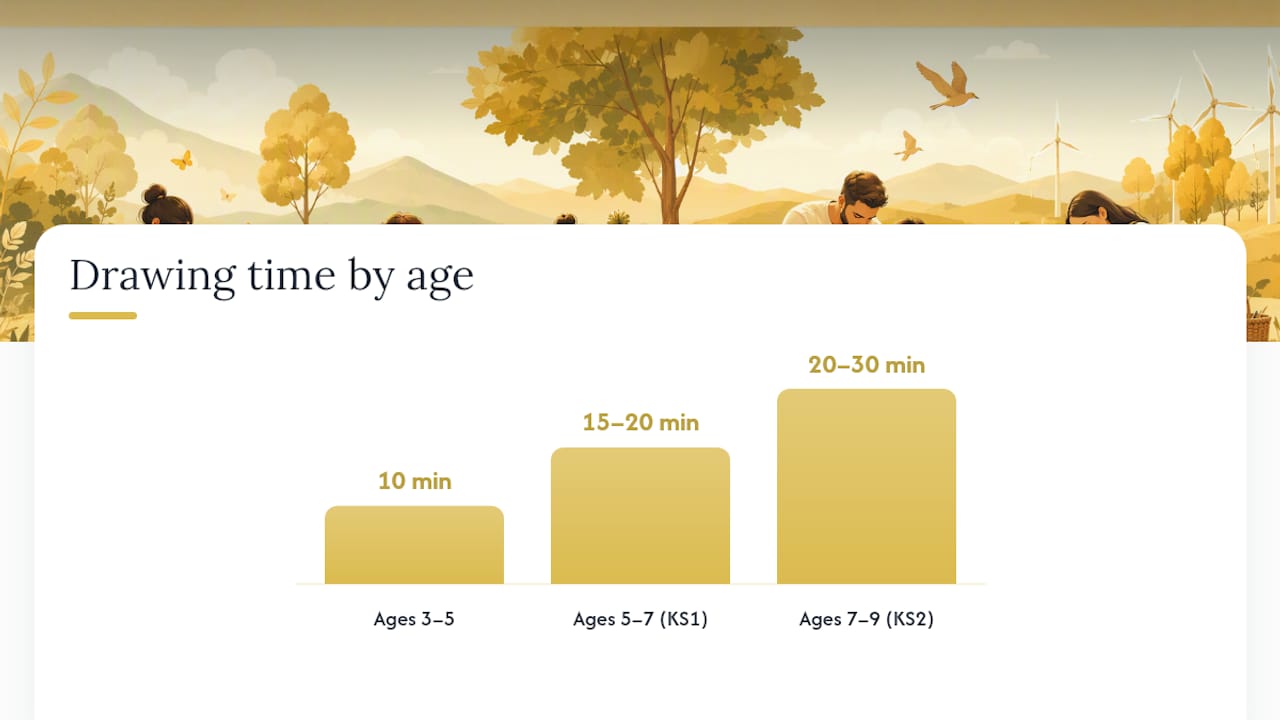
Timing and grouping decide whether this feels like a treat or a chore. A workable mini-lesson plan runs like this: five minutes introducing the theme, 15 to 20 minutes drawing or building, five minutes sharing.
- Ages three to five: one adult per two children, shorter 10 minute drawing window, focus on colour and shape rather than accuracy.
- Ages five to seven (KS1): pairs or small groups of three, 15 to 20 minutes, introduce one new vocabulary word per session (habitat, recycle, renewable).
- Ages seven to nine (KS2): individual or small-group work, 20 to 30 minutes, add a written sentence or fact alongside the drawing.
For assessment without tests, a photo journal works well: snap each child’s drawing or land art piece and build a simple class gallery over a term. Peer sharing, where each child says one thing about their drawing to a partner, takes two minutes and reveals more about understanding than a worksheet does.
Check allergy and permission details before any outdoor foraging session, particularly if children will be handling leaves, berries or unfamiliar plants.
Pro Tip: Keep a “quiet finish” activity ready, such as adding a slogan or colouring a border, for children who complete the main drawing early. It prevents the inevitable “I’m done” queue at the front of the room.
Slogans, templates and turning drawings into action
A printable Earth outline (a plain circle with faint continent guides) and a tree-and-shovel outline both work as ready-made starting points for children who find blank pages daunting. Print them at A5 for cards or A4 for posters.
Twenty short slogans children can add straight onto their drawings:
- Love your planet
- Reduce, reuse, recycle
- Plant one, save many
- Every drop counts
- Trees are life
- Save water, save Earth
- Clean air starts here
- One Earth, one chance
- Be kind to nature
- Small steps, big change
- Recycle today
- Grow green
- Protect our home
- Nature needs us
- Turn off, save power
- Bin it right
- Water is precious
- Keep it wild
- Give trees a chance
- Care for our Earth
| Follow-up idea | Best for | Time needed |
|---|---|---|
| Turn drawing into a pledge card | Home, individual | 5 minutes |
| Group mural on shared paper roll | Classroom, whole group | 20 to 30 minutes |
| Mini-exhibition on a corridor wall | Classroom, display | 10 minutes to set up |
Group murals work particularly well for a whole-class version of the tree or recycling scene, with each child contributing one section to a shared roll of paper.
Who’s behind this guide and where to go next
This guide is written by Alain for Thezoofamily, drawing on classroom-tested drawing and land-art techniques rather than a single fixed curriculum.
- Thezoofamily designs animal-themed cameras, binoculars and walkie-talkies specifically to build children’s interest in the natural world.
- For every camera sold, the brand plants one tree, connecting a purchase directly to a real environmental action.
- For more drawing technique, see 7 essential tips for nature drawings.
- For a broader activity list, see 7 creative ideas for celebrating Earth Day.
Why simplicity beats polish in environmental art lessons
The research behind this guide points to one uncomfortable truth: adults tend to over-engineer these lessons. A perfect Earth drawing with accurate continents teaches a child nothing that a wobbly circle with a smile doesn’t. What actually sticks is the process, not the finished piece, which is exactly why open-ended process art prompts outperform rigid step-by-step instructions when the goal is genuine environmental thinking rather than a tidy display.
Conventional advice leans hard on worksheets and colouring sheets because they’re easy to manage in a group. But the outdoor land art activities in this guide, the ones with no fixed template and a real chance of the wind ruining your work overnight, do more for a child’s grasp of fragility and impermanence than any laminated handout. If you only have time for one thing, skip the printable and take the group outside for ten minutes with a scavenger hunt instead. The drawing can happen indoors any day; the chance to build something from fallen leaves before the rain comes cannot.
— ALAIN
Take the nature theme beyond the page with Thezoofamily
Drawing a tree or a fox in its habitat naturally leads to a question: what does the real thing look like? Thezoofamily’s animal-themed cameras, binoculars and walkie-talkies give children a reason to go and check, turning a 20 minute drawing session into an afternoon outdoors spotting the details they’d otherwise have guessed at.
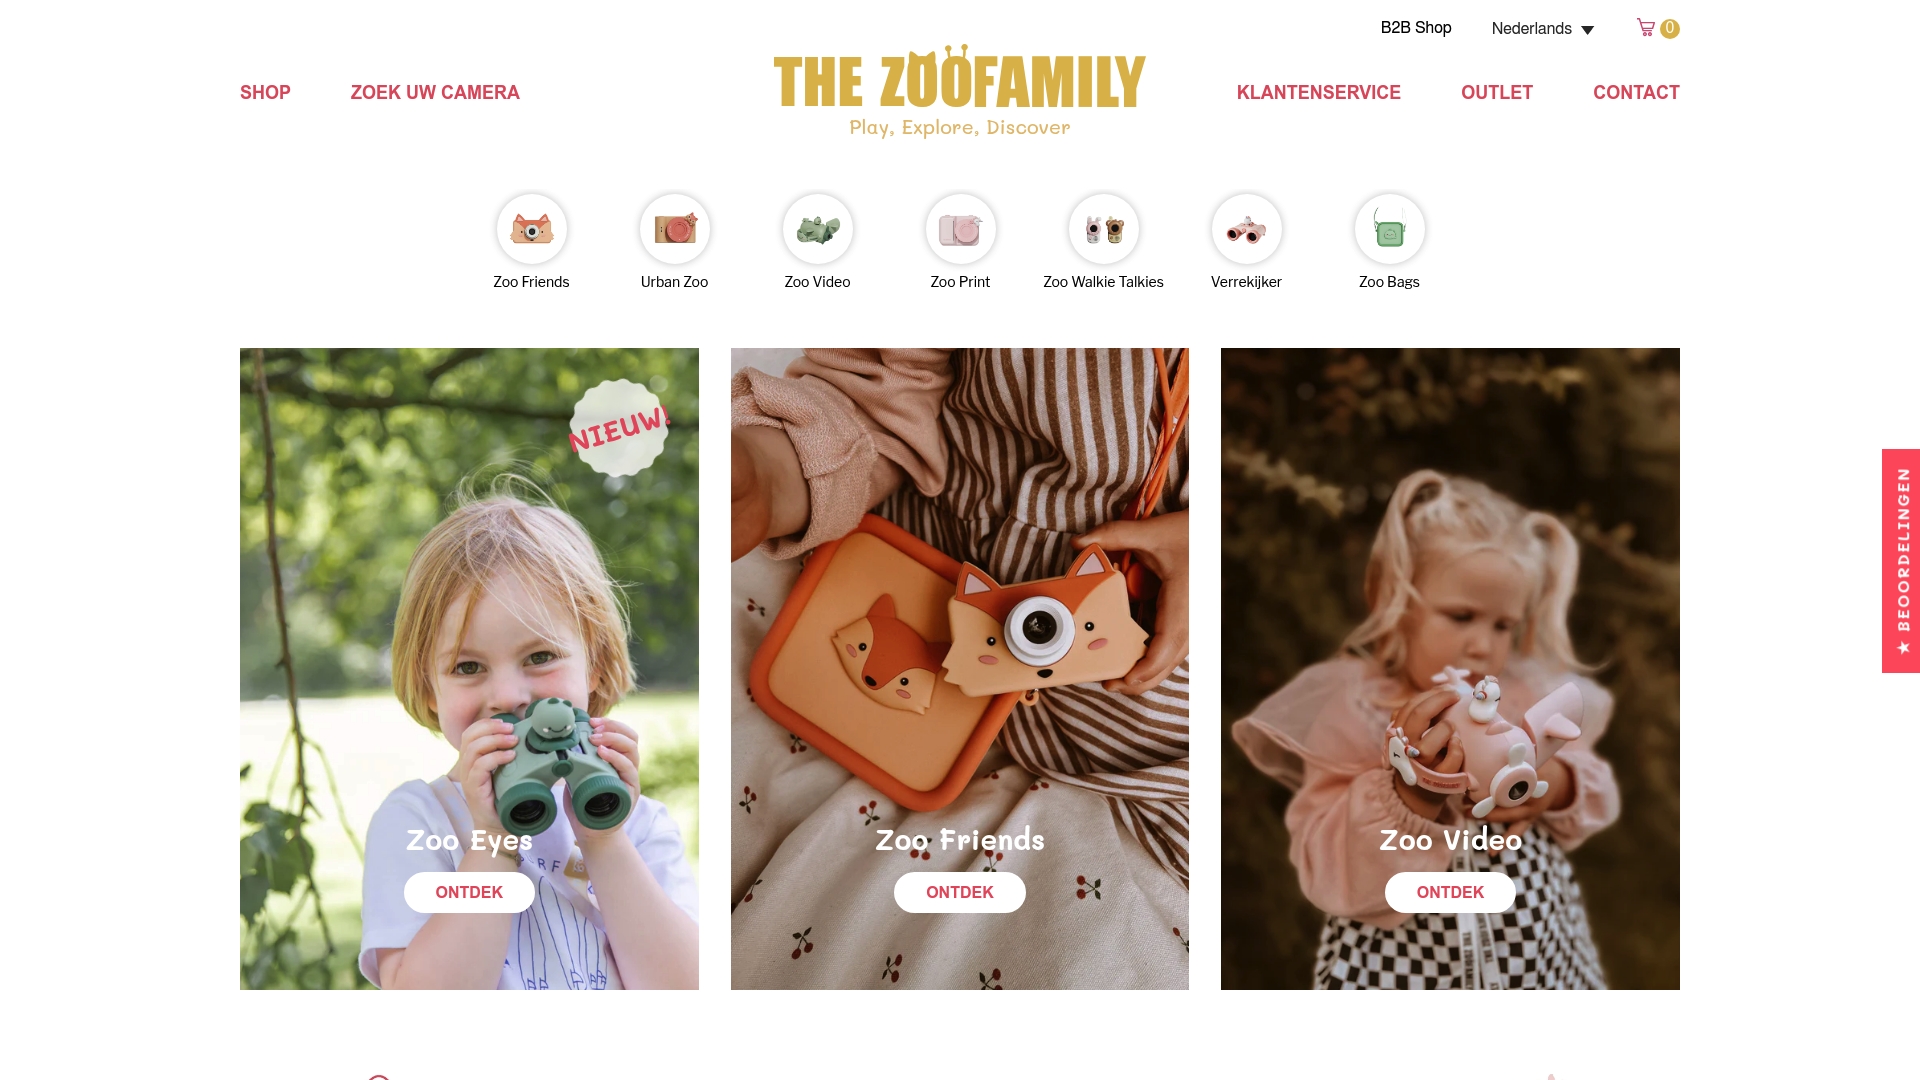
A child sketching a recycling bin scene one day and photographing real litter on a nature walk the next builds a stronger link to the topic than either activity alone. A range of animal-themed cameras and walkie-talkies is designed around that same instinct: spark curiosity about animals and nature, then let a child document it themselves. Every camera sold also helps support tree planting efforts, so the environmental message in the drawing carries through to an actual action behind the purchase. Browse the full range at Thezoofamily to find a piece of gear that fits your next outdoor session.
Sources
- Environment Day drawing for kids — Vedantu
- Best eco-friendly non-toxic art supplies for kids — Leafscore
- Environmental sculpture: natural materials — Flip Education
- How to draw an Earth Day card — Easy Drawing Guides
FAQ
How do you draw taking care of the environment easily?
Start with one big simple shape, such as a circle for the Earth or a mound for a planted tree, then add two or three basic details and a short slogan. The Vedantu tutorial approach of starting with a large circle and adding simple nature symbols works well for beginners of any age.
What are some examples of environmental art?
Environmental art ranges from a drawn recycling poster to outdoor land art made entirely from leaves, sticks and stones found on site. Land art activities like nature mandalas and stick silhouettes are temporary by design, teaching sustainability through the work decomposing naturally afterwards.
How do you teach children to take care of the environment?
Pair a hands-on activity, drawing or building with natural materials, with a short fact or story about why it matters, such as why recycling reduces waste or why trees support wildlife. Active approaches like material scavenger hunts and temporary sculpture-building tend to build stronger understanding than a worksheet alone.
How do you draw “save the Earth” simply?
Draw a large circle, add blue patches for oceans and green shapes for land, then include a sun, a tree and a short encouraging slogan underneath. This sequence follows the same beginner-friendly, image-led steps used in Earth Day card tutorials.
What supplies does Thezoofamily recommend for these activities?
Reused paper, wooden pencils and non-toxic paint work for the drawings, while a Thezoofamily camera or binoculars can extend the lesson into an outdoor nature walk afterwards. Current prices and full product details are listed on the Thezoofamily site.