Finding safe, creative activities that connect your children with nature while promoting eco-friendly values can feel overwhelming. You want projects that spark imagination, use non-toxic materials, and keep little hands engaged without harming the planet. This guide walks you through crafting enchanting fairy figures using biodegradable natural supplies, ensuring safe, sustainable play that nurtures creativity and environmental respect.
Table of Contents
- Introduction To Diy Fairy Crafts With Nature
- Materials And Preparation For Eco-Friendly Fairy Crafts
- Designing Your Fairy Template For Creativity And Storytelling
- Step-By-Step Assembly And Decorating Fairy Crafts
- Safety Considerations And Final Checks For Child-Friendly Fairy Crafts
- Common Mistakes And Troubleshooting Your Fairy Craft Projects
- Expected Timeline And Developmental Benefits Of Diy Fairy Crafts
- Discover More Creative Craft Ideas And Eco-Friendly Play Resources
- Frequently Asked Questions
Key takeaways
| Point | Details |
|---|---|
| Natural materials foster creativity | Twigs, leaves, moss, and pinecones create safe, biodegradable fairy crafts that connect children with nature |
| Step-by-step assembly ensures durability | Secure attachments with non-toxic glue and allow 2-hour drying time for safe, lasting play |
| Projects support development | 30-60 minute fairy crafts enhance fine motor skills and imaginative storytelling |
| Safety checks prevent hazards | Inspect for choking risks, use child-safe adhesives, and supervise based on age |
Introduction to DIY fairy crafts with nature
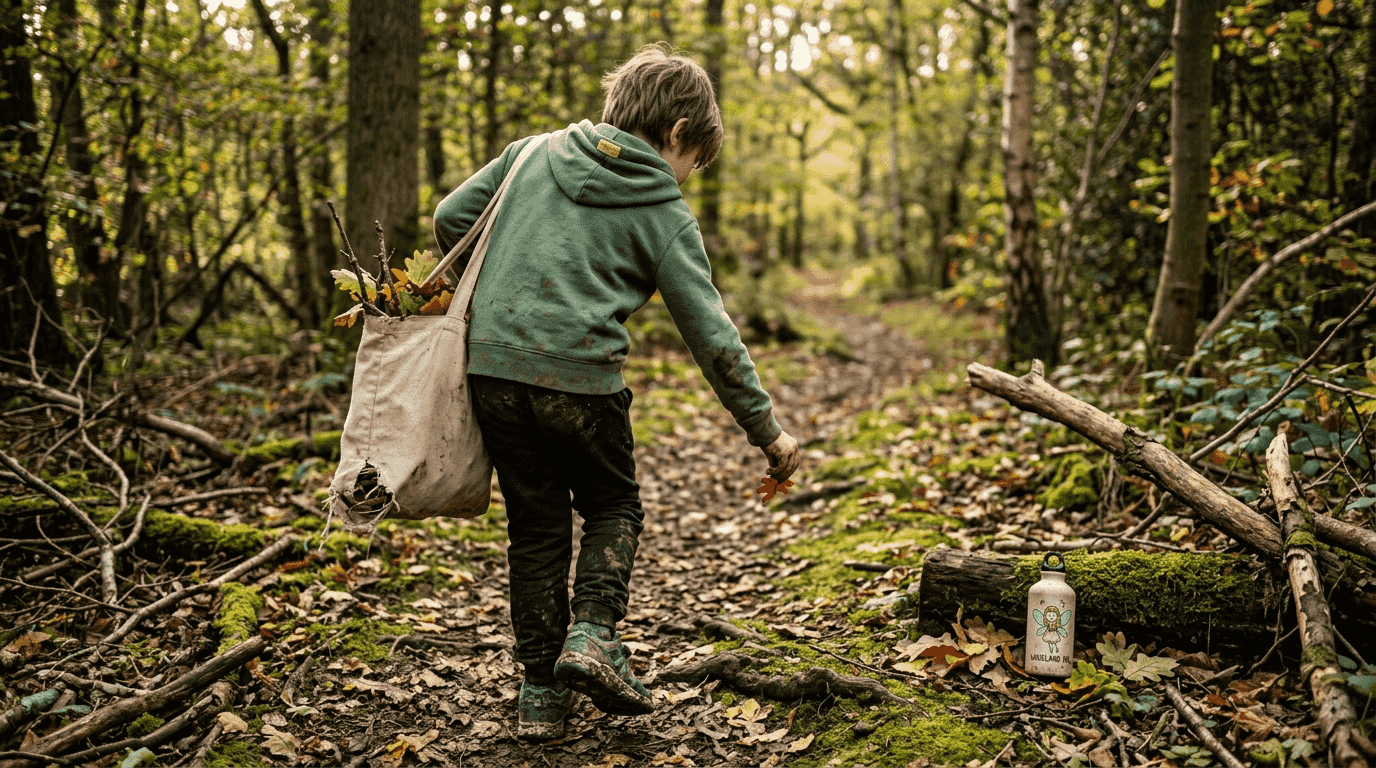
Fairy crafts transform simple natural materials into magical figures and tiny houses that fuel hours of imaginative play. These creations use twigs, leaves, moss, pinecones, and stones to build miniature worlds where children’s stories come alive. By choosing biodegradable, renewable, non-toxic supplies, you ensure your child’s safety whilst teaching environmental care from an early age.
Natural materials offer unique textures and shapes that inspire creativity far beyond manufactured craft kits. Children learn to see potential in everyday natural objects, developing problem-solving skills as they figure out how to attach a pinecone roof or fashion moss into fairy wings. This hands-on exploration builds fine motor control and spatial reasoning whilst fostering a deep appreciation for the natural world.
Typical natural materials you’ll gather include:
- Twigs and small branches for bodies and limbs
- Leaves for wings and clothing
- Moss for hair, beards, or soft furnishings
- Pinecones for houses, hats, or textured details
- Smooth stones for pathways or decorative elements
Fairy house crafts made from found natural materials like bark, pinecones, and moss encourage hours of imaginative play and strengthen family bonds through shared creativity. Working together to collect supplies during nature walks creates opportunities for conversation and discovery, turning the entire experience into quality family time.
“Natural fairy crafts combine artistic expression with environmental education, giving children tangible connections to the living world around them whilst building confidence through creative achievement.”
Materials and preparation for eco-friendly fairy crafts
Gathering safe, clean materials forms the foundation of successful fairy crafting. Start by collecting twigs, leaves, moss, pinecones, and small stones from pesticide-free areas like your garden or local parks. Always check that materials are free from insects, dirt, and sharp edges before bringing them indoors.
Recycled materials offer excellent alternatives or supplements to natural finds. Cardboard from cereal boxes, fabric scraps from old clothing, and scrap paper all work beautifully. Alternative eco-friendly materials for fairy crafts include recycled cardboard, natural cotton fabric scraps, and clay, each with tradeoffs in durability, ease of use, and aesthetic.
| Material Type | Durability | Ease of Use | Eco-Friendliness |
|---|---|---|---|
| Natural twigs and leaves | Medium (seasonal) | Easy | Excellent (biodegradable) |
| Moss and pinecones | High | Moderate | Excellent (renewable) |
| Recycled cardboard | Medium | Very easy | Good (reduces waste) |
| Fabric scraps | High | Moderate | Good (reuses textiles) |
Cleaning materials properly prevents unwanted surprises during crafting. Gently brush off loose dirt with a soft brush, then lay items on newspaper to air-dry completely for 24 hours. This process eliminates hidden insects and ensures materials are ready for tiny hands to handle safely.
Pro Tip: Collect materials during dry weather and inspect each piece carefully for spider webs, ant trails, or sticky sap before storage.
Essential tools and supplies you’ll need:
- Non-toxic white craft glue or natural glue alternatives
- Child-safe scissors with rounded tips
- Recycled paper or cardboard for templates
- Washable markers or natural dyes
- Small containers for organising materials
- Newspaper or craft mat for workspace protection
Explore more detailed guidance on how to create a fairy with natural materials through step-by-step visual instructions that complement this written guide.
Designing your fairy template for creativity and storytelling
Creating a personalised fairy design template gives children ownership of their project from the start. Provide recycled paper and encourage your child to sketch their fairy’s basic shape, considering body proportions, wing placement, and facial features. This planning stage helps visualise the finished creation and identifies which natural materials will work best for each element.
Leave generous space in your template for natural embellishments. A simple body outline allows moss to become flowing hair, leaves to transform into elegant wings, or feathers to create whimsical hats. The template serves as a guide, not a rigid blueprint, giving children freedom to adapt as inspiration strikes during assembly.
Creative design tips to spark imagination:
- Experiment with different fairy sizes, from tiny flower fairies to larger woodland sprites
- Mix materials for varied textures, combining smooth stones with rough bark
- Personalise each fairy with unique natural elements like acorn caps or seed pods
- Create character backstories to deepen engagement and narrative play
Children develop fine motor skills and narrative abilities when engaging in hands-on fairy craft assembly with parents, benefiting cognitive and emotional growth. The act of deciding where each twig should go or how to position wings strengthens spatial awareness and decision-making capabilities.
Encourage your child to name their fairy and invent a brief story about where it lives and what magic it possesses. Writing these details on the template or in a craft journal transforms the physical creation into a character with personality and purpose. This storytelling dimension extends play value far beyond the crafting session itself, as children return to their fairies for imaginative adventures weeks or months later.
Find inspiration and downloadable fairy design templates that offer starting points for various skill levels and age groups.
Step-by-step assembly and decorating fairy crafts
Assembling your fairy craft requires patience, creativity, and the right techniques to ensure durability. Follow these steps for successful construction:
- Build the fairy body by selecting a sturdy twig as the main frame
- Attach smaller twigs for arms and legs using generous amounts of non-toxic glue
- Create wings from overlapping leaves, securing them firmly to the back
- Form the head from a small pinecone, acorn, or rounded stone
- Allow the basic structure to dry completely before adding decorative elements
- Attach moss, feathers, or fabric scraps for hair, clothing, and details
Decoration ideas to enhance your fairy’s character:
- Moss hair styled in different arrangements for unique personalities
- Feather accessories for hats, scarves, or decorative trim
- Tiny beads or seeds for eyes and facial features
- Recycled fabric pieces for dresses, capes, or shoes
- Natural dyes from berries for colour accents on fabric elements
Pro Tip: Allow at least 2 hours of drying time between assembly stages to ensure attachments cure properly and won’t come apart during play.
Secure all attachments firmly by applying glue to both surfaces, pressing together for 30 seconds, then setting aside to cure. Fairy craft projects typically take 30-60 minutes depending on complexity and child age, allowing for manageable engagement without loss of interest. Breaking the project into shorter sessions works well for younger children with limited attention spans.
Incorporate storytelling throughout the decoration process by asking questions about your fairy’s personality. Does she live in a flower garden or deep forest? What magical powers might she possess? These narratives guide decoration choices and create emotional investment in the finished creation.
Extend your fairy crafting into complete miniature worlds by exploring techniques for making fairy gardens that provide magical homes for your newly created characters.
Safety considerations and final checks for child-friendly fairy crafts
Safety must remain paramount throughout your fairy crafting experience. Before handing finished creations to children for play, conduct thorough inspections to identify and eliminate potential hazards.
Essential safety checks to perform:
- Inspect all small parts like beads or seeds that could present choking hazards for children under three
- Ensure every attachment is secure by gently tugging each element
- Check for sharp twig ends or rough edges that could scratch or poke
- Verify that all glue has dried completely with no tacky residue
- Confirm natural materials are clean and free from insects or mould
Fairy craft projects that use non-toxic, child-safe glue and paints are critical for avoiding skin irritation and toxicity risks in children under 10 years old. Always read product labels carefully and choose supplies specifically marketed as safe for children’s crafts.
“Child-safe materials protect not only skin but also respiratory health, as young children often bring crafts close to their faces during imaginative play and may inadvertently inhale particles or fumes from unsuitable adhesives.”
Thorough drying and curing times prevent pieces from detaching during play and creating choking hazards. After final assembly, set crafts aside for a minimum of 2 hours in a well-ventilated area before allowing children to handle them. For larger or more complex creations, overnight drying provides extra assurance.
Parental supervision requirements vary based on your child’s age and developmental stage. Children under five need constant supervision during both crafting and play. Older children can work more independently but still benefit from periodic checks to ensure safe practices and provide encouragement.
Discover additional guidance on creating safe fairy garden crafts with comprehensive safety protocols for various age groups.
Common mistakes and troubleshooting your fairy craft projects
Even experienced crafters encounter challenges when working with natural materials. Recognising common pitfalls helps you avoid frustration and create successful projects consistently.
Frequent issues and practical solutions:
- Using plastic or non-biodegradable materials defeats eco-friendly goals; switch to natural alternatives
- Insecure attachments result from insufficient glue or inadequate drying time
- Skipping safety inspections creates hazards; always perform thorough final checks
- Dirty materials introduce insects or mould; clean and dry everything before use
- Underestimated project duration leads to rushed work; plan realistic timeframes
When parts won’t stick properly, the problem usually stems from surface preparation or glue application. Natural materials often have waxy coatings or rough textures that prevent adhesion. Lightly sand connection points with fine sandpaper or wipe with a damp cloth before applying glue. Use generous amounts of adhesive and hold pieces firmly together for at least 30 seconds.
Pro Tip: Thorough drying time and curing of at least 2 hours after assembling natural fairy crafts ensure durability and safe handling during play.
Material preparation mistakes often become apparent only after assembly begins. Twigs that seemed dry may still contain moisture, causing glue to fail. Leaves may be too brittle and crumble during handling. Prevent these issues by collecting materials several days before crafting and storing them in a dry location.
Time management challenges frequently arise when parents underestimate project complexity or their child’s pace. Always gather and prepare materials before sitting down to craft. Set up your workspace with everything within easy reach. This preparation prevents mid-project scrambles for supplies that break creative flow and test patience.
Find comprehensive fairy craft troubleshooting tips covering advanced problem-solving for specific material combinations and age-related challenges.
Expected timeline and developmental benefits of DIY fairy crafts
Understanding realistic timeframes helps you plan successful crafting sessions that match your child’s attention span and skill level. Project duration varies based on age, complexity, and whether you complete the craft in one session or several shorter periods.

| Child Age | Simple Fairy | Detailed Fairy | Fairy House |
|---|---|---|---|
| 3-5 years | 20-30 minutes | 45-60 minutes | 60+ minutes (multiple sessions) |
| 6-8 years | 15-25 minutes | 30-45 minutes | 45-60 minutes |
| 9+ years | 15-20 minutes | 25-40 minutes | 30-50 minutes |
DIY fairy craft projects typically take 30-60 minutes depending on complexity and child age, allowing for manageable engagement without loss of interest. Breaking longer projects into stages maintains enthusiasm and prevents fatigue.
Developmental benefits extend far beyond the finished product:
- Fine motor skills improve through precise gluing, positioning, and decorating
- Imaginative storytelling flourishes as children create characters and narratives
- Environmental awareness grows through hands-on experience with natural materials
- Problem-solving abilities strengthen when adapting plans to available materials
- Patience and focus develop during assembly and drying periods
These projects create lasting play props that children return to repeatedly, unlike single-use commercial toys. Fairies become characters in ongoing stories, supporting sustained imaginative play that evolves over weeks or months. The personal investment children feel in their handmade creations enhances play value and emotional connection.
The accessible nature of fairy crafts encourages repeat sessions with different materials and designs. Each new project builds skills and confidence, creating a positive feedback loop that motivates continued creative exploration. Many families establish regular crafting times that become cherished traditions and opportunities for quality connection.
Discover more creative craft ideas and eco-friendly play resources
At The Zoofamily, we believe in nurturing children’s creativity whilst fostering deep connections with nature. Our curated collection of eco-friendly craft projects and play resources helps families create meaningful experiences that inspire environmental stewardship and imaginative exploration.

Explore detailed guides for natural materials fairy crafts that expand on these techniques with visual step-by-step instructions and age-specific variations. Discover miniature world-building projects, seasonal nature crafts, and sustainable play ideas that bring your family closer to the natural world.
Frequently asked questions
What natural materials are best for fairy crafts?
Twigs, leaves, moss, pinecones, and smooth stones work brilliantly for fairy crafts. Choose supplies from pesticide-free areas and ensure they’re clean, dry, and insect-free before use. Recycled paper and fabric scraps complement natural materials beautifully.
How can I ensure my child’s fairy craft is safe to play with?
Use only non-toxic, child-safe glue and paints throughout the project. Inspect finished crafts thoroughly for small parts that could present choking hazards and ensure all attachments are secure. Supervise young children during both crafting and play based on their age and motor skills.
How long does a typical fairy craft project take?
Most fairy crafts require 30 to 60 minutes of active crafting time, depending on design complexity and your child’s age. Always allow an additional 2 hours minimum for glue to dry completely before play. Breaking complex projects into shorter sessions works well for younger children.
What should I do if a craft part doesn’t stick properly?
Apply generous amounts of non-toxic glue to both surfaces and hold pieces together firmly for at least 30 seconds. Clean connection points before gluing and allow full curing time of 2 hours or more. Lightly sanding rough natural surfaces improves adhesion significantly.