
More than half of british families want to make their gardens safer and more inviting for children, yet many feel unsure about where to start. Creating an inspiring outdoor play area takes more than just adding a swing or sandbox. A careful approach can turn any garden or yard into a haven where kids can explore and connect with nature. This guide outlines practical steps to help you design an outdoor space that is both safe and exciting for young explorers.
Table of Contents
- Step 1: Assess Your Available Outdoor Space
- Step 2: Plan Your Nature-Inspired Play Features
- Step 3: Gather Eco-Friendly Materials And Tools
- Step 4: Construct Your Diy Outdoor Play Area
- Step 5: Check Safety And Add Finishing Touches
Quick Summary
| Key Insight | Explanation |
|---|---|
| 1. Assess Outdoor Space Thoroughly | Evaluate available space, noting features and hazards to create an engaging play area. Consider sunlight, flat ground, and existing elements like trees or slopes. |
| 2. Design Flexible Play Features | Create adaptable play zones using natural elements that can evolve with children’s interests, such as movable logs or quiet plant areas. |
| 3. Use Eco-Friendly Materials | Choose untreated, safe, and sustainable materials like natural woods and stones, avoiding harmful chemicals for a child-friendly environment. |
| 4. Involve Children in Construction | Engage children in the building process with age-appropriate tasks, fostering their sense of ownership and connection to the play space. |
| 5. Conduct Thorough Safety Checks | Perform a detailed safety inspection of the play area, ensuring structures are secure, surfaces are safe, and play zones are clearly defined. |
Step 1: Assess your available outdoor space
Before creating your dream outdoor play area for children, you need to carefully evaluate the space you have available. Think of this assessment as your foundational blueprint for an engaging nature spot that will spark curiosity and adventure for young explorers.
Start by measuring your entire outdoor area and sketching a rough layout. The National Program for Playground Safety recommends creating developmentally appropriate environments that consider children’s physical capabilities and developmental stages. Walk around your garden or yard, noting sunny and shaded areas, existing features like trees or slopes, and potential hazards. Look for relatively flat ground with good drainage to ensure a stable play surface. Measure the total usable space and consider how you can divide it into different activity zones such as a sensory exploration area, a climbing section, and a quiet relaxation spot.
A crucial tip is to photograph your space from multiple angles. These images will help you visualise potential layouts and track your progress as you transform the area. Remember that not every square metre needs intense development. Strategic planning allows you to create interesting play spaces even in compact areas. Your next step will involve selecting appropriate ground surfaces and planning specific play zones that encourage natural exploration and physical activity.
Step 2: Plan your nature-inspired play features
With your outdoor space assessed, it is time to design an enchanting natural playground that sparks imagination and encourages exploration. The National Wildlife Federation advocates for integrating natural elements into play areas that promote creativity and engagement through thoughtful landscape design.
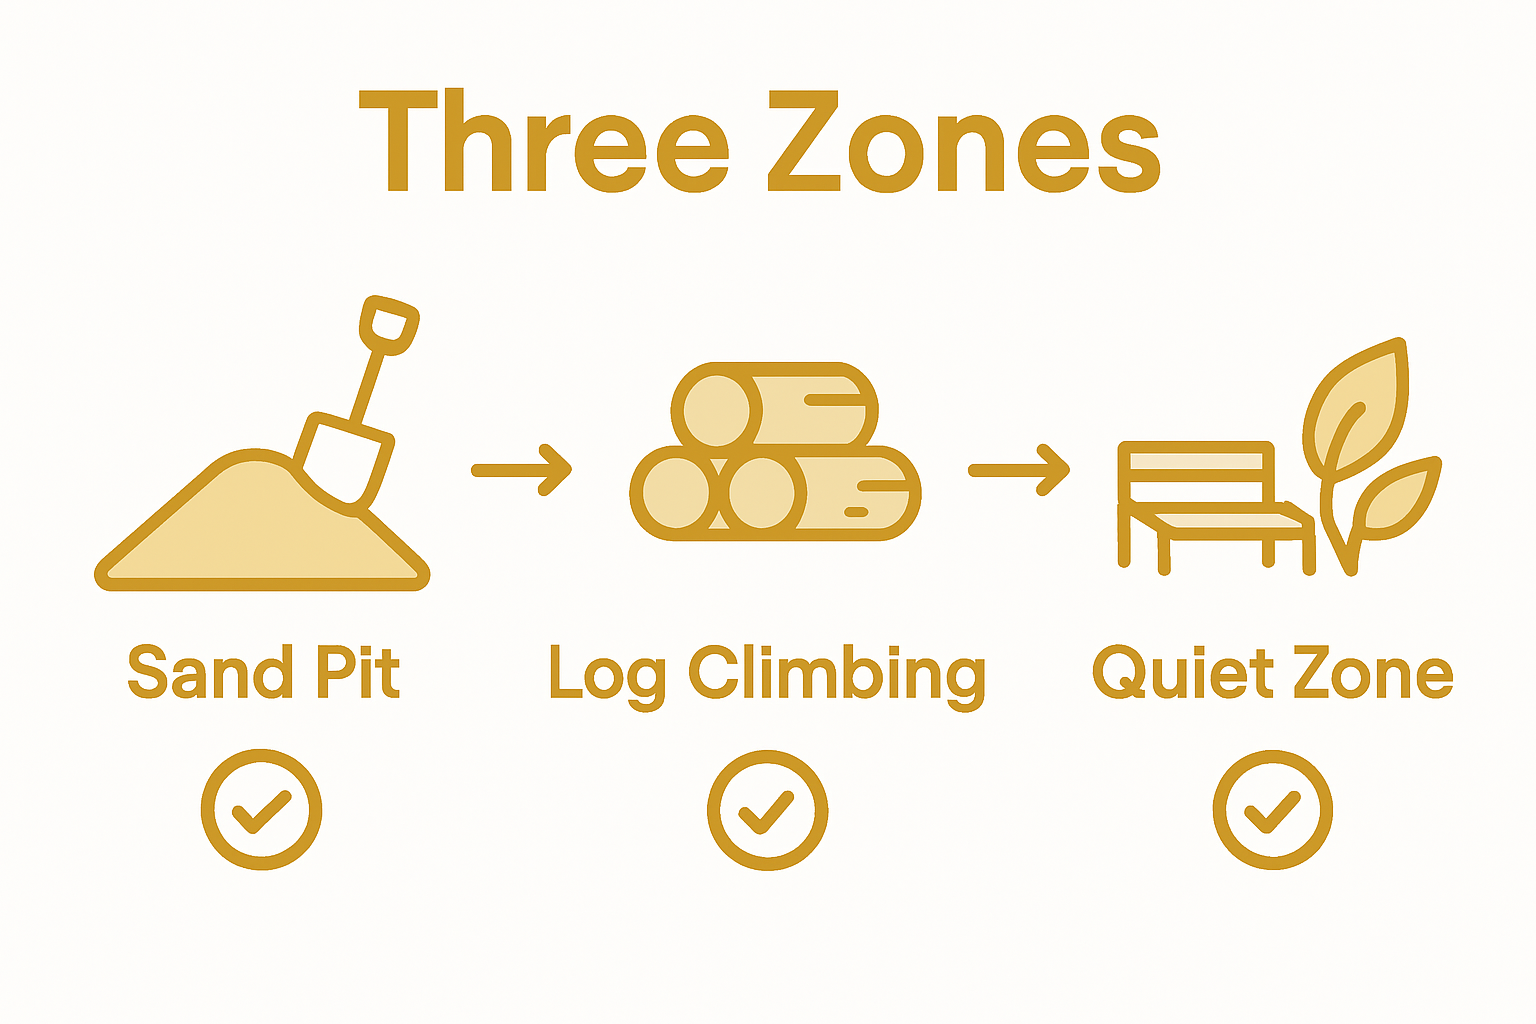
Consider creating different zones that appeal to children’s diverse play needs. Families in Nature suggests incorporating loose parts play areas with natural materials to foster creativity and physical activity. Think about including elements like a small sand pit for sensory play, a log climbing area for physical challenges, and a quiet space with native plants for peaceful exploration. Select materials that are safe yet stimulating natural features such as smooth stones, fallen branches, and indigenous plants that can become part of imaginative play scenarios. Ensure each feature provides opportunities for children to interact with the environment in meaningful ways.
A key tip is to design flexibly. Children’s play evolves quickly, so create spaces that can be easily modified or rearranged. Consider movable elements like lightweight logs or repositionable stones that allow kids to shape their own play environment. This approach not only keeps the play area interesting but also encourages problem solving and creative thinking. Your next step will involve preparing the ground and selecting appropriate safety surfaces for your nature inspired play space.
Step 3: Gather eco-friendly materials and tools
Now comes the exciting part of selecting sustainable materials that will transform your outdoor play area into a safe and environmentally conscious space. The Consumer Product Safety Commission recommends using naturally rot-resistant woods like cedar or redwood while carefully avoiding materials treated with harmful chemicals.
The World Playground Research Institute highlights the importance of selecting materials that are safe, durable, and environmentally friendly, considering the developmental needs of children. Begin by sourcing untreated wooden logs, smooth river stones, locally available branches, and natural fabrics. Look for reclaimed or sustainably harvested timber that has not been chemically treated. Consider collecting materials from local woodland areas or landscaping projects that would otherwise be discarded. Pay attention to the texture and stability of each item to ensure they are safe for children to interact with.
A crucial tip is to inspect all natural materials thoroughly before use. Check wooden elements for splinters, ensure stones are stable and not sharp-edged, and clean branches to remove potential insects or loose bark. Your eco-friendly approach not only creates a unique play environment but also teaches children about sustainability and responsible material use. The next step will involve preparing and arranging these materials to create engaging play zones that inspire creativity and connection with nature.
Step 4: Construct your diy outdoor play area
With your materials gathered and design planned, it is time to bring your nature play space to life. Begin by preparing the ground carefully, ensuring a level surface that provides stability and drainage for your play features. The garden cabin construction guide offers practical insights for creating safe and engaging outdoor structures that inspire children’s imagination.
Start by marking out your designated play zones using environmentally friendly materials like smooth stones or wooden stakes. Create a soft base using natural materials such as wood chips, sand, or rubber mulch to provide cushioning and protect against potential falls. Construct simple play elements like log climbing structures, balance beams from fallen tree trunks, and sensory exploration areas with different textured surfaces. Consider building low platforms or gentle mounds that encourage physical movement and spatial awareness.
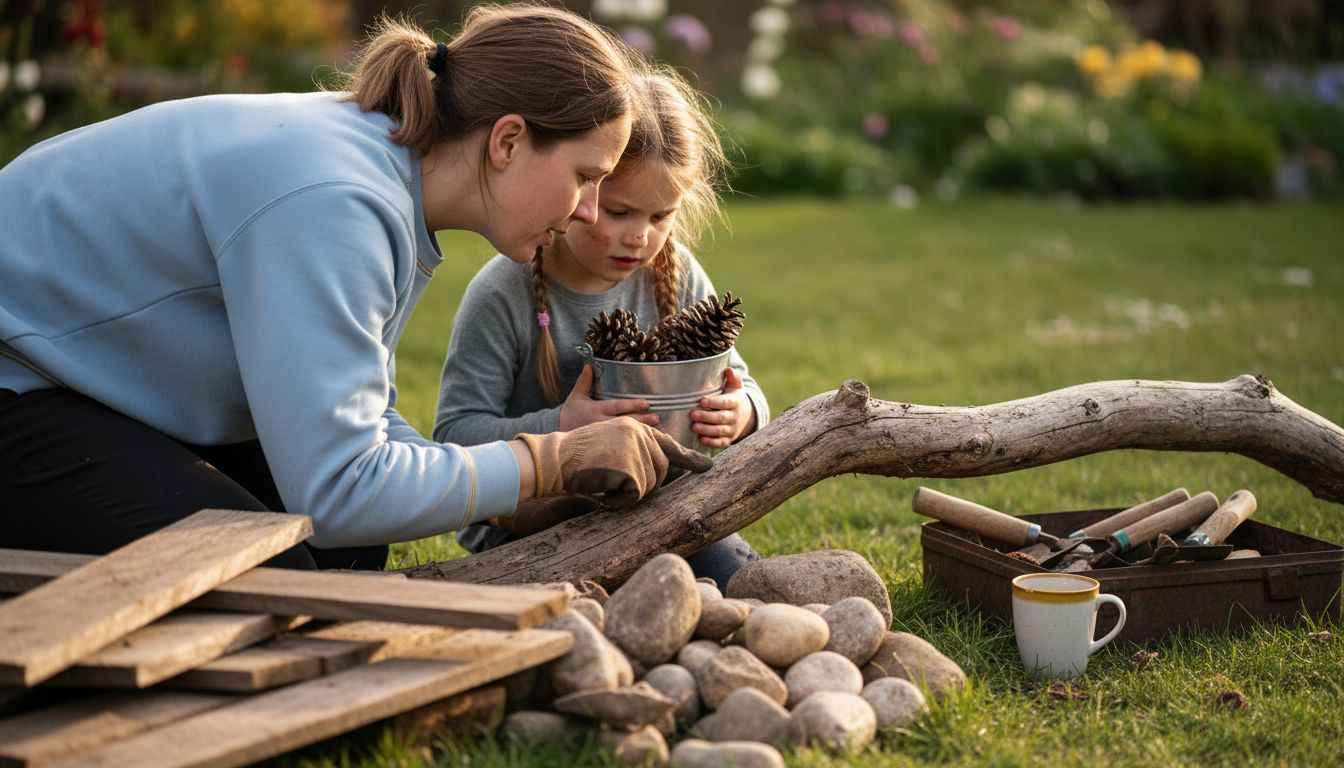
A crucial tip is to work systematically and involve your children in the process. Let them help with age appropriate tasks like gathering small stones or arranging natural materials. This not only makes the construction more enjoyable but also helps children develop a sense of ownership and connection to their new outdoor play space. Always prioritise safety by ensuring all structures are securely anchored and free from potential hazards. Your next step will involve adding finishing touches and creating inviting play scenarios that spark creativity and exploration.
Step 5: Check safety and add finishing touches
With your outdoor play area nearly complete, it is time to conduct a thorough safety inspection and add those special details that transform a basic play space into an engaging nature exploration zone. The Virtual Lab School provides a comprehensive Safe Outdoor Environments Checklist to help evaluate equipment spacing, fall zones, and potential hazards.
Head Start emphasises the critical importance of providing shaded areas and conducting regular safety inspections to maintain a stimulating and secure outdoor environment. Begin by walking through the entire play area, checking that all structures are firmly anchored, surfaces are even, and there are no sharp edges or protruding objects. Verify that your ground cover provides adequate cushioning and that play elements are appropriately spaced. Add natural elements like potted native plants, decorative stones, or small wooden signs to create visual interest and educational opportunities.
A crucial safety tip is to create clear boundaries and visual markers that help children understand safe play zones. Consider using low, natural barriers like rounded logs or strategically placed rocks to define different areas. Ensure you have a shaded spot for rest and protection from direct sunlight, and keep a small storage box nearby with first aid supplies. Your outdoor play area is now ready to inspire countless hours of imaginative, nature connected play for your children.
Inspire Your Child’s Connection with Nature Through Safe Outdoor Play
Creating a safe and imaginative outdoor play area can present challenges such as selecting eco-friendly materials, ensuring child safety, and designing zones that encourage exploration. This article highlights the importance of assessing your space, planning sensory and climbing features, and prioritising safety while fostering your child’s natural curiosity. If you wish to turn these plans into reality while nurturing your children’s creative bond with the environment, we have the perfect tools to complement your DIY project.

At The Zoofamily, we provide innovative children’s cameras, walkie-talkies, and binoculars designed to spark interest in the natural world. Each product encourages outdoor adventure and mindful connection with nature, supporting your goal to create not only a safe play area but also a vibrant learning space. Discover how you can enhance your outdoor creation with products that invite exploration and respect for the planet. Begin your journey today and help inspire a generation that values the beauty of our world. Explore our collection and take the next step towards crafting an unforgettable nature play experience for your kids.
Frequently Asked Questions
How do I assess my outdoor space for a play area?
To assess your outdoor space, measure the total area and sketch a rough layout. Identify sunny and shaded spots, any existing features, and potential hazards to create a safe and engaging environment for children.
What features should I include in my DIY outdoor play area?
Include diverse play features that cater to children’s needs, such as sand pits, climbing logs, and quiet zones with native plants. Plan for movable elements like lightweight logs to encourage creativity and adaptability in play.
What eco-friendly materials are best for constructing a nature play area?
Use untreated, naturally rot-resistant woods, smooth stones, and locally sourced branches to build your play structures. Ensure all materials are safe and environmentally friendly to enhance both play and sustainability.
How can I ensure safety in my outdoor play area?
Conduct a thorough safety inspection to check that all structures are securely anchored and free of sharp edges. Additionally, create clear boundaries using natural barriers to define play zones, ensuring a safe exploration space for children.
What finishing touches can enhance my outdoor play area?
Add visual interest and educational elements by incorporating potted native plants, decorative stones, or low signs that encourage interaction. These finishing touches can inspire creativity and make the space more inviting for children.
How can I involve my children in the construction process?
Involve your children in age-appropriate tasks such as gathering materials or arranging play features. This engagement fosters a sense of ownership and connection to their new outdoor space, making them more likely to enjoy it.