
TL;DR:
- Using cameras in nature-based science lessons sparks children’s curiosity and enhances observation skills.
- Accessible tools like smartphones and rugged cameras enable confident exploration and scientific reflection outdoors.
- Incorporating photography activities fosters deeper understanding, communication, and a genuine connection to nature.
Getting children genuinely excited about science can feel like an uphill battle, especially when lessons stay confined to worksheets and textbooks. Many European parents find that their children switch off when learning feels abstract or disconnected from the real world. Cameras change that dynamic entirely. When a child holds a camera and heads outdoors, curiosity takes over and every insect, leaf, or bird becomes a subject worth investigating. This guide walks you through practical steps for weaving photography into nature-based science lessons, so your child can learn by doing, observing, and genuinely wondering.
Table of Contents
- What you need to get started with cameras in science lessons
- Step-by-step: Using cameras for nature exploration
- Innovative approaches: Camera traps and microscope photography
- Outcomes and troubleshooting: Verifying learning and overcoming challenges
- A fresh perspective: Why hands-on camera activities unlock real nature connection
- Explore more nature photography ideas with The Zoofamily
- Frequently asked questions
Key Takeaways
| Point | Details |
|---|---|
| Accessible tools | Simple cameras and a nature journal are all most families need for science lessons outdoors. |
| Step-by-step guidance | Structured activities with prompts and reflection help children engage more deeply with nature. |
| Advanced options | Camera traps and microscope photography unlock learning about wildlife and cellular science. |
| Tangible learning outcomes | Children show improved ecological knowledge and nature connection after camera-based lessons. |
| Expert perspective | Child-led camera activities are especially powerful for sparking creativity and lasting curiosity. |
What you need to get started with cameras in science lessons
Before heading into the garden or local park, it helps to gather the right tools. You do not need expensive equipment to run a meaningful science lesson. The goal is accessibility, and most families already have what they need.
Camera options for different ages and budgets:
- Smartphone cameras: readily available and familiar to most children
- Simple point-and-shoot digital cameras: easier for younger children to grip and operate
- Child-friendly cameras: rugged, lightweight, and designed for small hands
- Clip-on macro lenses: inexpensive additions that turn any phone into a close-up nature viewer
Research into photovoice in science education shows that when children are given basic, easy-to-use tools, they focus far more on observation and less on operating the device. That shift in attention is exactly what good science lessons need.
Other materials worth having on hand:
- Spare batteries and a fully charged power bank
- A microSD card with enough storage for a full afternoon of photos
- A simple nature journal for sketching, labelling, and writing observations
- A waterproof bag or case for rainy days
- A magnifying glass to complement close-up photography
Safety and supervision matter too, particularly for younger children. Explain basic rules before going outdoors: stay on paths, do not touch unfamiliar plants or insects without checking first, and always keep the camera strap around the wrist. Ecological photography for children works best when children feel safe enough to explore freely within clear boundaries.
Research confirms that giving children simple point-and-shoot cameras, along with a brief usage lesson and supervised nature walks, produces engaged, confident young scientists.
Pro Tip: Choose a weatherproof or shockproof camera for outdoor lessons. Children drop things, and a camera that survives a tumble means the lesson carries on without tears or frustration.
| Camera type | Best age range | Key benefit | Approximate cost |
|---|---|---|---|
| Smartphone | 8 years and up | Familiar and versatile | Already owned |
| Point-and-shoot digital | 6 to 10 years | Simple controls, larger buttons | £30 to £80 |
| Child-friendly rugged camera | 4 to 8 years | Durable, lightweight, colourful | £20 to £60 |
| Clip-on macro lens | 7 years and up | Close-up detail on a budget | £5 to £20 |
Understanding how cameras help children explore nature is the first step. Once you have the right tools assembled, you are ready to move into the actual lesson structure.
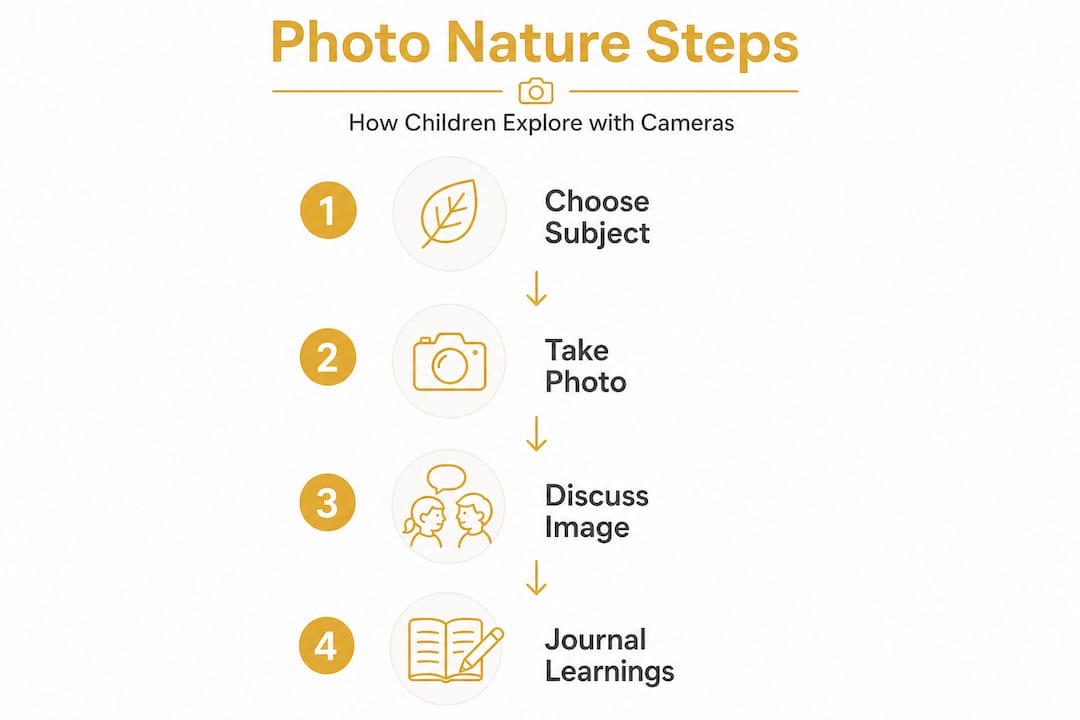
Step-by-step: Using cameras for nature exploration
A well-structured session makes all the difference between a chaotic afternoon and a genuinely rich science experience. Here is a simple, repeatable sequence that works for primary school-aged children.
- Introduce the camera and the mission. Spend five to ten minutes showing your child how the camera works. Keep it brief. Then set a simple theme, such as “find three living things smaller than your thumb” or “photograph something that surprises you.”
- Head outdoors and let curiosity lead. Accompany your child on the nature walk but resist the urge to direct every shot. Ask open questions like “What do you like about that?” or “Why did you choose to photograph that particular leaf?” These prompts encourage scientific thinking without shutting down imagination.
- Capture and collect. Encourage your child to take far more photos than they think they need. Volume builds confidence, and sorting through images later becomes its own learning activity.
- Review photos together. Sit down with your child and look through the images as a pair. Ask them to pick their two or three favourites and explain their choices. This reflective step is where real learning happens. Research shows that children who used point-and-shoot cameras during nature walks and then selected favourites for exhibition and reflection developed stronger observational language and greater confidence.
- Record findings in the nature journal. Sketch what they photographed, write a short description, and note the date, weather, and location. This bridges photography with traditional scientific recording.
- Share and discuss. If possible, print a favourite photo or display it digitally and let your child explain their discovery to another family member or friend. Communication is a core science skill.
Photovoice methodology describes this process well: children take photos to document and reflect on their environment, promoting inquiry and communication in ways that worksheets simply cannot replicate.
Not every session needs to follow the same format. Consider mixing child-led and guided approaches depending on your child’s confidence level and the topic you are exploring. Nature photography activities also open wonderful doors for children to express themselves creatively while learning scientifically.
| Approach | Structure | Best for | Learning style |
|---|---|---|---|
| Child-led photography | Child chooses subjects freely | Confident, curious children | Creative, independent |
| Guided photography | Parent sets prompts and themes | Younger or shy children | Structured, supported |
| Mixed approach | Starts guided, then opens up | Most children | Flexible, progressive |
Pro Tip: Use the photo review session as a chance for open dialogue rather than correction. If your child photographs a weed instead of a wildflower, ask them what they notice about it rather than redirecting. You will be surprised how deep the conversation goes.
The beauty of exploration for young minds is that even “wrong” choices reveal rich thinking. Educational tips for animal photography with children can help you plan themed sessions around specific species or habitats, adding variety to your programme.
Innovative approaches: Camera traps and microscope photography
Once your child is comfortable with basic nature photography, two approaches can take their learning to an exciting new level: camera traps and microscope photography.
Camera traps are motion-activated cameras placed in natural settings to photograph wildlife without human presence. They are brilliant for teaching ecological concepts because they capture animals behaving naturally, which is something even the most patient child rarely sees on a walk.
Setting up a camera trap is straightforward:
- Choose a spot with signs of wildlife activity such as footprints, droppings, or nibbled plants
- Secure the camera to a post or tree at animal height
- Check it after 24 to 48 hours and review the footage together
- Use free apps such as iNaturalist to identify any animals captured
Camera traps teach ecological concepts such as wildlife habitat use, food selection, and daily activity patterns. They transform your child into a genuine field researcher.
Safety note: Always use adult-supervised, battery-operated camera traps and check batteries before each deployment. Avoid leaving equipment in public areas unattended for long periods, and never place a camera trap where it might film members of the public. Replace batteries regularly because heavy video mode drains power quickly.
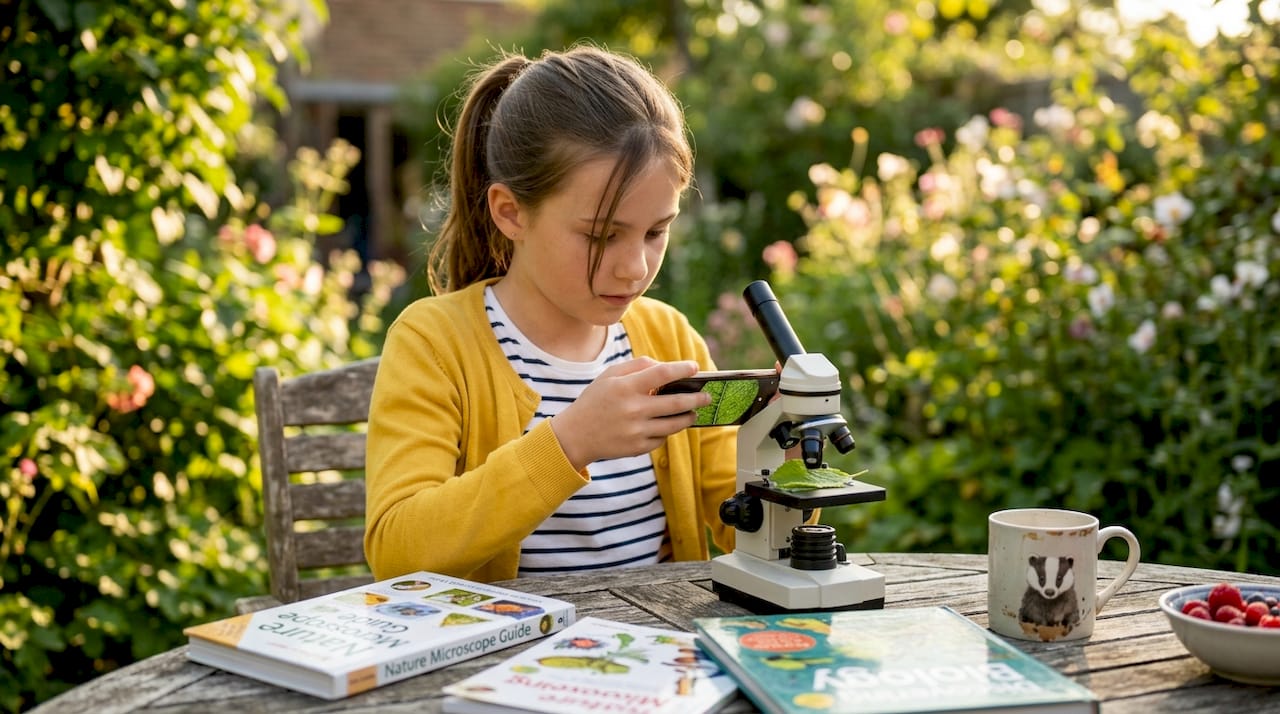
Microscope photography is the other extraordinary tool available to families at very low cost. You do not need a specialist rig. Holding a phone against the eyepiece of an affordable classroom microscope produces surprisingly clear images of cells, pollen, wing scales, and soil organisms.
Children who photograph what they see under the microscope retain far more detail than those who simply observe and move on. The act of framing a shot demands careful focus and patience, two skills that sit at the very heart of scientific method.
For families who enjoy making their own activities, DIY nature projects offer wonderful extensions to both camera trap work and microscope photography, turning science lessons into creative family projects.
Outcomes and troubleshooting: Verifying learning and overcoming challenges
Camera-based science lessons produce measurable outcomes, and knowing what to look for helps you gauge whether the approach is working for your child.
Expected learning outcomes include:
- Improved ability to name and draw local mammals, birds, and insects
- Stronger vocabulary for describing nature, habitats, and animal behaviour
- Greater willingness to spend time outdoors and observe the environment
- Better communication skills, as children explain their photographic choices
- Increased sense of connection to the natural world
Research from a UK citizen science programme found that camera traps improved pupils’ ability to name and draw UK mammals, particularly those captured in the photographs. Crucially, children who started with lower nature connection scores showed the greatest improvement, which means this approach works especially well for children who feel less naturally drawn to the outdoors.
Common challenges and practical solutions:
- Battery drain: charge all devices the night before and carry a power bank; camera traps in video mode consume power rapidly, so switch to photo mode for longer deployments
- Shy or reluctant children: allow them to photograph from a distance and choose their own favourite images for discussion rather than showing everything to the group
- Fading motivation over weeks: vary the themes, introduce nature challenges to spark fresh curiosity, and celebrate small discoveries loudly
- Poor image quality: teach the simple habit of holding still and breathing out slowly before pressing the shutter; this alone transforms results for young photographers
Pro Tip: Rotate camera roles across sessions. Let one child be the lead photographer, another the nature journal recorder, and another the iNaturalist identifier. Changing roles every session keeps every child engaged and ensures that no one feels left out or overshadowed.
The outcomes from these activities are not just academic. Children who regularly photograph and discuss nature develop a genuine sense of care for the environment, which is something no textbook exercise can manufacture.
A fresh perspective: Why hands-on camera activities unlock real nature connection
Here is something that most educational resources do not say plainly enough: textbook science lessons about nature often produce children who can define an ecosystem but have never actually stopped to watch a beetle. That gap between knowing and noticing is enormous, and cameras close it in a way that very little else can.
We have seen, both through research and through the families who use The Zoofamily cameras, that children who photograph nature regularly begin to see differently. They slow down. They crouch. They wait. That behaviour is the foundation of scientific curiosity, and it is nearly impossible to teach directly.
There is an important distinction worth making between child-led reflection and structured data collection. Photovoice and Reggio-inspired approaches give children creative ownership of their enquiry, while camera traps introduce them to systematic, objective data gathering. Both approaches build nature connection, but they do so through different strengths. A child who learns both styles becomes genuinely flexible in their thinking.
The mistake many well-meaning parents make is assuming that more structure produces more learning. In nature-based science, the opposite is often true. A child who explores nature freely with a camera and then reflects on their choices is doing something cognitively rich. They are forming hypotheses, gathering evidence, and drawing conclusions, all without a worksheet in sight.
Children also thrive when they are treated as co-researchers rather than pupils following instructions. Handing a child a camera and saying “show me what surprises you” is a far more powerful scientific prompt than “find an example of a producer in the food chain.” Both goals can be met, but the first approach gets children emotionally invested in the answer.
Explore more nature photography ideas with The Zoofamily
Nature-based science learning works best when it is regular, varied, and joyfully supported. If today’s walk sparked something in your child, that momentum is worth nurturing.

At The Zoofamily, we have built our cameras, binoculars, and walkie-talkies around the idea that children who connect with nature become the generation that protects it. Every camera we sell plants one tree, so your child’s science adventures contribute directly to the natural world they are learning to love. For fresh ideas on how to keep that curiosity alive season after season, explore our photography inspiration for children and discover new projects, prompts, and seasonal nature challenges designed to grow with your child.
Frequently asked questions
What type of camera is best for primary science lessons?
Simple point-and-shoot cameras or child-friendly digital cameras are the most practical choice, as they require minimal setup and are easy for young children to operate independently.
How can shy children participate in photography-based lessons?
Allow shy children to select their own favourite images for discussion rather than sharing every photo, and use gentle prompts to help them engage at their own pace without pressure.
What are common troubles with using cameras in science lessons?
Battery drain and inconsistent motivation are the most frequent issues; charge devices fully before each session and rotate roles to keep engagement high over time.
Can using cameras help children learn about biodiversity?
Camera activities improve children’s recognition of local mammals, birds, and insects, building ecological knowledge and a genuine sense of connection to local wildlife.
Is microscope photography easy for children?
Yes, aligning a phone with the eyepiece of a standard microscope produces clear images and transforms abstract cell biology into something children can see, photograph, and remember.