
Self confidence photography is more than just pointing a camera and hoping for a good shot. Nearly 70 percent of people feel more comfortable in photos when the environment suits their personality or style. Most assume it is all about having the latest gear or mastering complex settings, but that could not be further from the truth. Real confidence shines from simple changes to your setup and approach, turning even the most camera shy person into the star of every frame.
Table of Contents
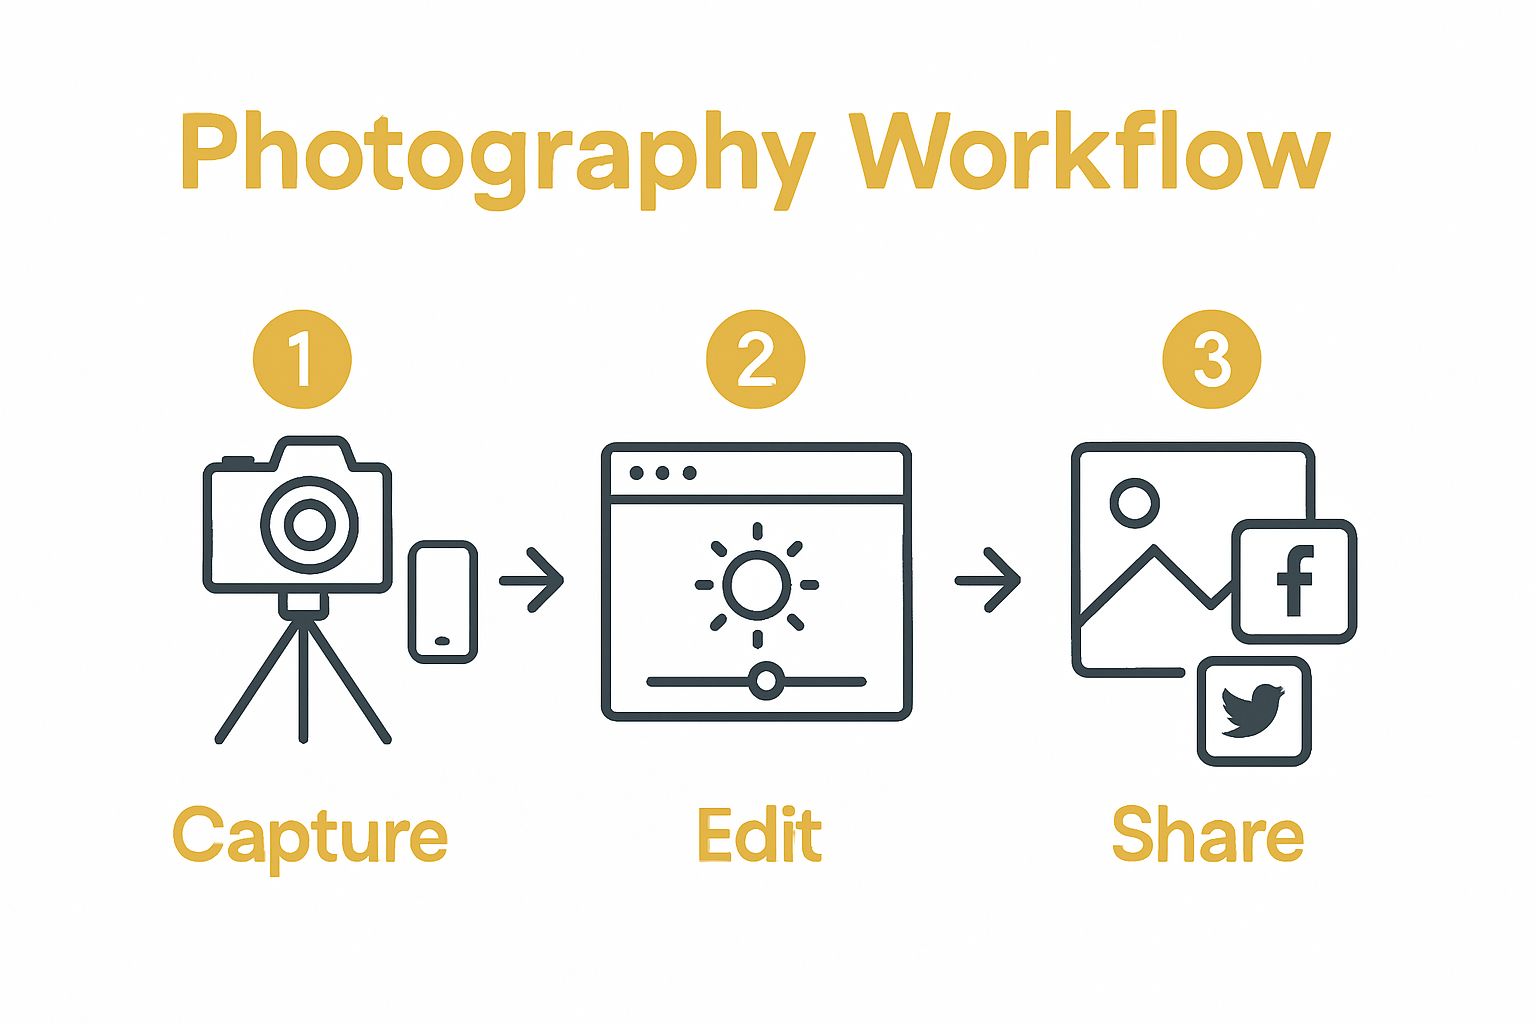
- Step 1: Prepare Your Photography Environment
- Step 2: Choose The Right Equipment And Settings
- Step 3: Develop A Comfortable Posing Strategy
- Step 4: Direct Your Subjects With Confidence
- Step 5: Review And Edit Your Photos For Impact
- Step 6: Share Your Work And Celebrate Your Progress
Quick Summary
| Key Point | Explanation |
|---|---|
| 1. Choose a Comfortable Environment | A relaxed space with good natural light enhances creativity and subjects’ comfort during photography sessions. |
| 2. Use Minimal Yet Effective Equipment | Equip yourself with a neutral backdrop and soft lighting to ensure your subjects are the focal point of the images. |
| 3. Engage Subjects in Natural Posing | Encourage a relaxed atmosphere where subjects can express themselves organically for more authentic photographs. |
| 4. Direct with Confidence and Empathy | Use supportive communication to foster a collaborative and comfortable environment for your subjects during shoots. |
| 5. Edit with a Critical Eye for Emotion | Focus on enhancing the emotional essence of photos rather than striving for technical perfection during the editing process. |
Step 1: Prepare Your Photography Environment
Creating a confident photography environment starts with understanding that your surroundings dramatically influence your creative potential. Whether you are capturing family memories or exploring artistic expression, thoughtful preparation transforms ordinary moments into extraordinary visual stories.
Begin by selecting a space that resonates with comfort and inspiration. Natural light becomes your primary ally in self confidence photography, so choose areas near windows or outdoor spaces with soft, diffused illumination. Rooms with neutral backgrounds work exceptionally well, reducing visual distractions and allowing your subject to remain the focal point.
Your photography setup requires minimal yet strategic equipment. A sturdy surface like a table or clean floor space provides stability. Consider having these essential tools ready:
- Neutral backdrop (white sheet or plain wall)
- Soft lighting source
- Comfortable seating for subjects
- Clean, clutter-free environment
Psychological preparation matters equally. Create an atmosphere that feels relaxed and welcoming. Soft background music, comfortable temperature, and a calm demeanour help subjects feel at ease. Confidence emerges when people feel safe and supported during their photographic experience.
Practical considerations include checking your camera settings beforehand, ensuring battery charge, and having sufficient memory card space. Position yourself and your subject strategically, maintaining a comfortable distance that allows natural interaction. Learn more about exciting photography techniques that can further enhance your creative approach.
Successful environment preparation means your subjects will feel relaxed, your technical setup will be smooth, and your creative vision can flow freely. Take time to experiment, adjust lighting, and find what works best for your unique photographic style.
Below is a summary table outlining essential tools and resources for preparing a confident photography environment, including their purpose and any special notes for best use.
| Tool/Resource | Purpose | Special Notes |
|---|---|---|
| Neutral backdrop | Reduces visual distractions and focuses attention | White sheet or plain wall |
| Soft lighting source | Provides flattering illumination for subjects | Natural light preferred |
| Comfortable seating | Helps subjects relax during the session | Adjust for height and comfort |
| Clean, clutter-free space | Minimises distractions and enhances creativity | Tidy up before starting |
| Sturdy surface (table/floor) | Stabilises camera and equipment | Ensure area is steady |
| Charged camera & spare card | Prevents interruptions during shooting | Check before session begins |
| Calm atmosphere | Encourages subjects to feel at ease | Use music or adjust temperature |
Step 2: Choose the Right Equipment and Settings
Selecting the right equipment transforms self confidence photography from a challenging task into an enjoyable creative journey. Your camera is more than a device it is a storytelling tool that captures moments, emotions, and personal narratives. Understanding your equipment empowers you to translate your unique vision into compelling visual experiences.
For beginners, smartphone cameras offer an accessible starting point. Modern smartphones provide advanced features like portrait mode, multiple lens options, and excellent image stabilization. If you are considering dedicated cameras, entry level digital cameras or mirrorless options provide exceptional versatility without overwhelming complexity.
Camera settings become your artistic palette. Learn to manipulate three fundamental elements: aperture, shutter speed, and ISO. Aperture controls depth of field, allowing you to create beautifully blurred backgrounds or keep everything sharply in focus. Shutter speed manages motion capture, while ISO determines light sensitivity. Professional photographers recommend understanding these core settings as they form the foundation of compelling imagery.
Consider these essential equipment recommendations:
- Smartphone with good camera capabilities
- Lightweight tripod for stability
- Basic editing software or mobile app
- Extra memory card
- Neutral coloured clothing for consistent backgrounds
Practical testing matters more than theoretical knowledge. Experiment with different settings in various lighting conditions. Take multiple shots of the same scene, adjusting one setting at a time. This approach helps you understand how each adjustment impacts your final image. Review your photographs critically, noting which settings produce results closest to your creative vision.
Remember that technical perfection matters less than emotional authenticity. Your growing confidence will naturally translate into more intuitive, expressive photography. Trust your instincts, remain curious, and enjoy the learning process.
Step 3: Develop a Comfortable Posing Strategy
Posing represents the critical bridge between technical skill and emotional expression in self confidence photography. Your approach to positioning subjects determines the narrative and authenticity of each image. A thoughtful posing strategy transforms awkward moments into natural, compelling visual stories.
Begin by recognizing that comfort trumps perfection. Traditional rigid posing often creates tension and artificial expressions. Instead, focus on creating environments where subjects feel relaxed and genuinely themselves. Encourage movement, capture candid interactions, and allow personalities to emerge organically.
Communication becomes your most powerful posing tool. Before capturing images, engage in gentle conversation that helps subjects feel at ease. Provide clear, kind instructions that feel more like friendly guidance than rigid commands. For instance, instead of saying “Stand exactly here,” try “How about moving near this lovely light” or “Let me show you a comfortable way to stand”.
Consider these strategies for natural posing:
- Start with seated or standing positions subjects find comfortable
- Encourage slight body movements and shifts
- Use props to create natural interaction points
- Allow subjects to adjust their positioning
- Provide positive, affirming feedback during the shoot
Professional photographers recommend understanding body language as a fundamental skill in creating relaxed imagery. Watch for signs of discomfort like stiff shoulders, forced smiles, or tense hands. When you notice these indicators, pause and reset. Ask subjects how they are feeling, offer water, or take a brief break.
Successful posing emerges from genuine connection. Your role is part photographer, part supportive friend who helps people feel confident and seen. Practice patience, maintain a calm demeanour, and remember that every individual has a unique way of expressing themselves through physical positioning.
Trust the process, remain adaptable, and celebrate the beautiful imperfections that make each photograph uniquely human.
Step 4: Direct Your Subjects with Confidence
Directing subjects transforms photography from a technical exercise into an art of human connection. Confidence in direction stems from clear communication and genuine empathy. Your ability to guide subjects goes beyond simple positioning it involves creating an environment where individuals feel comfortable, valued, and empowered to express themselves authentically.
Begin by establishing a rapport that transcends the photographic moment. Before raising your camera, engage in conversation that helps subjects understand your vision and feel respected. Your tone, body language, and approach should communicate professionalism mixed with warmth. Think of yourself as a collaborative partner rather than an authoritative director.
Verbal guidance requires precision and positivity. Instead of telling subjects what not to do, focus on constructive instructions that inspire natural movement. Replace phrases like “Don’t look stiff” with encouraging suggestions such as “Try relaxing your shoulders” or “Let your body feel comfortable”. This approach shifts the dynamic from correction to creative exploration.
Consider these communication strategies for effective direction:
- Use clear, concise language
- Demonstrate poses yourself when possible
- Provide immediate positive reinforcement
- Ask open ended questions to spark natural interactions
- Maintain a calm, supportive demeanour
Professional photography resources emphasize the importance of emotional intelligence when directing subjects. Read their non verbal cues carefully. If someone appears uncomfortable, pause and adjust your approach. Some individuals require more gentle guidance, while others appreciate direct instruction.
Technical skill matters, but emotional connection creates remarkable photographs. Your confidence emerges not from perfecting every technical detail, but from your ability to make subjects feel seen and appreciated. Practice active listening, remain adaptable, and trust that each photographic session is a unique collaborative journey between you and your subject. Remember, the most compelling images capture genuine human emotion beyond precise positioning.
Step 5: Review and Edit Your Photos for Impact
Editing transforms raw photographs into powerful visual narratives, turning good images into extraordinary memories. Your editing process is where technical skill meets creative interpretation, allowing you to enhance the emotional essence of each captured moment. This stage represents the final brushstroke in your photographic journey, where personal style and technical precision converge.
Begin your review by viewing images with a critical yet compassionate eye. Do not immediately discard photographs that seem imperfect. Sometimes unexpected moments reveal the most genuine emotions. Examine each image for its storytelling potential, looking beyond technical precision to the underlying human connection.
Modern editing tools offer remarkable capabilities for subtle yet significant improvements. Understand your editing software as an extension of your creative vision, not a replacement for thoughtful photography. Basic adjustments like brightness, contrast, and colour balance can dramatically elevate an image without compromising its authenticity. Mobile applications and desktop software provide user friendly interfaces that make professional level editing accessible to everyone.
Consider these strategic editing approaches:
- Start with minimal adjustments
- Preserve natural skin tones
- Maintain image clarity
- Use consistent editing style across series
- Save original files before editing
Professional photographers recommend understanding editing fundamentals as a critical skill in visual storytelling. Learn to make nuanced corrections that enhance rather than artificially transform your images. Pay attention to cropping, which can dramatically improve composition by removing distracting elements and focusing viewer attention.
Successful editing is an intuitive process that balances technical skill with emotional intelligence. Trust your creative instincts while remaining open to learning and refinement. Each edited photograph represents a personal interpretation of a moment, reflecting not just what was captured, but how you perceive and value that experience.
 Embrace imperfections, celebrate unique perspectives, and remember that the most powerful images tell stories beyond pixel perfect precision.
Step 6: Share Your Work and Celebrate Your Progress
Sharing your photographic journey transforms personal achievement into a collaborative experience of growth and inspiration. Vulnerability in showcasing your work becomes the cornerstone of self confidence photography, inviting connection, feedback, and personal development. This step is less about perfection and more about celebrating your unique artistic voice.
Choose sharing platforms that align with your comfort level and creative goals. Online platforms like Instagram, Flickr, or dedicated photography communities provide supportive environments for emerging photographers. Family sharing platforms or private photo albums offer more intimate spaces for those seeking a smaller audience. Remember that each platform has its own culture and audience, so select spaces that feel genuinely supportive of your artistic exploration.
Constructive feedback becomes a powerful tool for growth, but learn to receive it with discernment. Not all commentary represents absolute truth about your work. Seek perspectives from photographers you respect, who understand the emotional journey behind each image. Look for feedback that provides specific, actionable insights rather than vague criticism.
Consider these strategies for meaningful sharing:
- Start with trusted friends and family
- Join photography groups with supportive cultures
- Create themed photo collections
- Participate in online photography challenges
- Document your learning journey alongside images
Photography communities recommend developing a reflective sharing practice that focuses on personal growth. Each shared photograph represents a moment of courage. Celebrate the technical improvements, emotional depth, and creative risks embedded in your work. Track your progress by periodically reviewing older images, recognizing how your skills and perspective have evolved.
Ultimately, sharing is about connection more than validation. Your photographs are visual stories that communicate experiences, emotions, and perspectives unique to your journey. Embrace imperfection, remain curious, and view each shared image as an invitation to deeper understanding both of yourself and the world around you. Photography becomes a language of personal expression, with every image telling a story beyond pixels and light.
The following table offers a step-by-step overview of the main stages in self confidence photography, with key focus and outcomes for each part of the process.
| Step | Key Focus | Expected Outcome |
|---|---|---|
| 1. Prepare Environment | Comfort, inspiration, and readiness | Relaxed and supportive session |
| 2. Choose Equipment & Settings | Simplicity, usability, technical adjustment | Appropriate tools for your vision |
| 3. Develop Posing Strategy | Communication, relaxation, authenticity | Natural, genuine subject expressions |
| 4. Direct Subjects with Confidence | Guidance, empathy, positive reinforcement | Subjects feel valued and at ease |
| 5. Review & Edit Photos | Emotional focus, minimal enhancements | Images that convey authentic narrative |
| 6. Share Work & Celebrate Progress | Reflection, feedback, growth | Improved confidence and creative output |
Elevate Your Self Confidence Photography With The Zoofamily
Are you ready to put your self confidence photography skills into action? The article above highlighted how preparing the right environment, choosing the best equipment, and creating a safe, inspiring atmosphere are vital for empowering both you and your subjects. But what if your tools could boost both creativity and connection, especially for young photographers finding their confidence? At The Zoofamily, we understand the challenges of nurturing curiosity and self belief through photography. Our kid friendly cameras and adventure gear are designed to make every step easier and every session more uplifting.

Give your child an experience that inspires creative self expression and a love for the natural world. Each camera from The Zoofamily is crafted to help your family capture memories with more ease and joy. Plus, with every purchase we plant a tree, helping restore natural beauty for future generations. Explore our innovative products now and see how simple it is to blend learning with fun in your next photography session. Start your journey today by visiting our main site and make your next photo story even more meaningful.
Frequently Asked Questions
How can I boost my self-confidence in photography?
To boost your self-confidence in photography, start by preparing your environment and ensuring that you understand your equipment. Take time to practice regularly in comfortable settings and focus on creating a relaxed atmosphere for your subjects. Aim to photograph at least once a week to build your skills and confidence over time.
What are the best techniques for posing my subjects naturally?
To pose your subjects naturally, prioritise their comfort and encourage genuine interactions. Engage in conversation to help them relax, and guide them gently with positive feedback rather than rigid instructions. Practise by taking candid shots, aiming for at least five candid images each session to capture authentic expressions.
How do I effectively review and edit my photographs?
Begin by critically assessing your photos for their emotional essence rather than technical perfection. Focus on making minimal adjustments like brightness and contrast to enhance the story behind each image. Set a goal to review and edit at least ten images from each session to refine your skills.
What should I consider when sharing my photography online?
When sharing your photography online, choose platforms that align with your creative goals and comfort level. Begin with trusted friends or small groups to receive constructive feedback while remaining open to growth. Share at least one photo a week to document your progress and connect with your audience.
How can I enhance my camera skills without overwhelming myself?
To enhance your camera skills, focus on mastering one element at a time, such as aperture, shutter speed, or ISO. Practise manipulating these settings in different lighting conditions and take multiple shots of the same scene, adjusting only one setting at a time. Aim to experiment with various settings during each photography session to slowly build your technical prowess.
What role does communication play in building self-confidence in photography?
Communication is crucial in building self-confidence as it helps your subjects feel valued and understood. Use clear, positive language to guide them through poses and create a collaborative atmosphere. Practise active listening during your sessions to ensure each subject feels appreciated and respected, enhancing their overall experience.