Over one million plastic bottles are bought every minute worldwide, and many end up as waste rather than useful materials. Turning these bottles into creative crafts not only reduces landfill but also offers a fun hands-on activity for families. With a few simple steps, you can transform ordinary plastic bottles into eye-catching projects that inspire creativity and teach the value of recycling.
Table of Contents
- Step 1: Gather and Clean Plastic Bottles
- Step 2: Prepare Crafting Tools and Materials
- Step 3: Design and Cut Creative Bottle Shapes
- Step 4: Assemble and Decorate Your Craft
- Step 5: Check Safety and Finish for Use
Quick Summary
| Key Point | Explanation |
|---|---|
| 1. Gather clean plastic bottles | Collect various plastic bottles and rinse them thoroughly to remove residues for crafting. |
| 2. Prepare essential crafting tools | Ensure you have basic tools like scissors, glue gun, paints, and child-safe materials before starting. |
| 3. Draw and cut unique shapes | Use permanent markers to outline designs on bottles, and cut carefully to create smooth edges. |
| 4. Decorate with creativity | Personalize your crafts by adding colors and textures with paints and decorations for a unique finish. |
| 5. Perform final safety checks | Inspect crafted items for sharp edges and stability to ensure they are safe for use, especially for children. |
Step 1: Gather and Clean Plastic Bottles
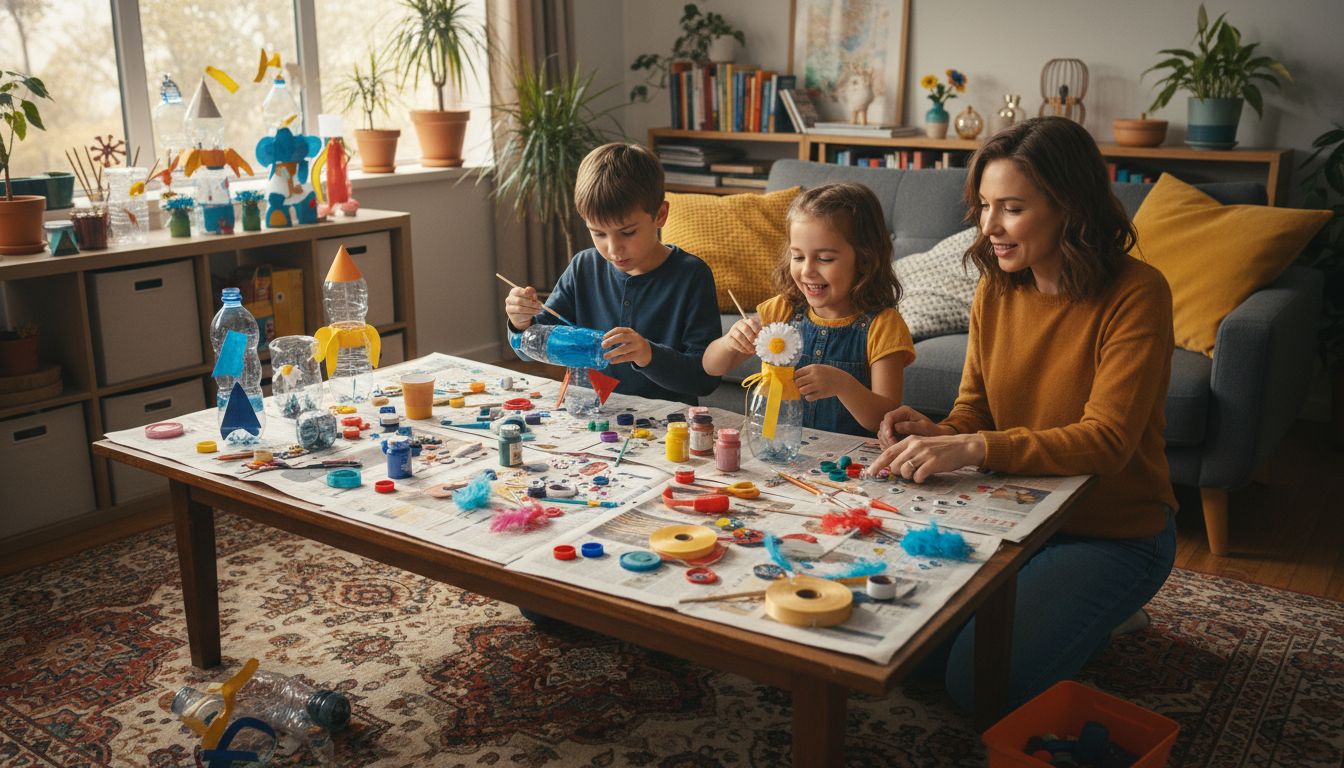
Welcome to your plastic bottle crafting adventure! In this step, you will collect and prepare your plastic bottles for some amazing creative projects. We need clean, dry bottles that are ready to be transformed into something spectacular.
Start by gathering various plastic bottles from your home. Look in your recycling bin, kitchen, or storage areas for water bottles, soft drink containers, and other clean plastic vessels. According to Green NAU, it is crucial to rinse these bottles thoroughly to remove any residues and ensure they are suitable for crafting. Peel off labels carefully and use warm soapy water to wash the inside and outside of each bottle.
Pro tip: Not all plastic bottles are created equal. Choose bottles with smooth surfaces and minimal texture for easier crafting. Avoid bottles that have held chemicals or cleaning products. Rinse multiple times and let them dry completely on a clean towel before starting your creative project. Your cleaned bottles are now ready for the exciting transformation ahead!
Step 2: Prepare Crafting Tools and Materials
Now that you have gathered and cleaned your plastic bottles, it is time to set up your crafting workspace with all the essential tools and materials. This stage is crucial for creating amazing plastic bottle crafts that will spark your child’s creativity and imagination.
According to the International Development Innovation Network, having the right tools is fundamental for successful plastic bottle projects. You will need some basic crafting supplies like sharp scissors, craft knife, ruler, permanent markers, glue gun, paintbrushes, acrylic paints, and colourful decorative elements such as ribbons, glitter, or stickers. Make sure to choose child safe scissors if your little ones will be helping you craft.
Pro tip: Lay out a protective covering on your work surface like an old newspaper or plastic tablecloth to keep things tidy. Keep a damp cloth nearby for quick cleanups and ensure all sharp tools are handled by adults. Your workspace is now ready for an exciting crafting adventure that will transform ordinary plastic bottles into extraordinary works of art. Get ready to unleash your creativity!
Step 3: Design and Cut Creative Bottle Shapes
Time to unleash your creativity and transform those clean plastic bottles into unique shapes and designs! This exciting step will help you turn ordinary plastic containers into extraordinary craft projects that will amaze your children and spark their imagination.
Style Estate highlights the importance of precise cutting techniques when upcycling plastic bottles. Begin by drawing your desired shape directly onto the bottle using a permanent marker. Choose simple designs like animal outlines, geometric shapes, or decorative patterns that are easy for children to recognise. Use sharp scissors or a craft knife carefully guided by an adult to cut along the marked lines. Remember to create smooth edges by cutting slowly and steadily.
Pro tip: Always supervise children during cutting and use child safe scissors. Practice your cutting technique on spare bottles before attempting your final design. If you make a mistake, do not worry. Creativity is about experimenting and learning. Your unique bottle shapes are now ready for the next exciting stage of decoration and transformation!
Step 4: Assemble and Decorate Your Craft
Now comes the most exciting part of our plastic bottle crafting adventure where your unique creation will truly come to life! This step transforms your carefully prepared and cut plastic bottle into a wonderful piece of art that reflects your creativity and imagination.
According to Dunes Center, decorating your craft involves thoughtful assembly and personalisation. Start by arranging your cut bottle pieces and decide on the final design. Use acrylic paints, markers, or decorative materials like ribbons and stickers to add vibrant colours and textures. If you are making an animal figure, consider painting details like eyes, fur patterns, or special features that will make your creation unique.
Pro tip: Let each layer of paint dry completely before adding another to prevent smudging. Encourage your children to experiment with different colour combinations and design elements. Remember that there are no strict rules in creativity each craft is a special reflection of the artist. For even more inspiration, check out our creative seashell crafts article that might spark additional ideas for your next crafting adventure. Your plastic bottle craft is now ready to shine and bring joy to everyone who sees it!
Step 5: Check Safety and Finish for Use
As you near the end of your creative plastic bottle craft journey, it is crucial to ensure that your masterpiece is safe and ready for its intended purpose. This final step will help you evaluate and perfect your crafted item to guarantee both functionality and child friendly enjoyment.
WasteAid emphasises the importance of careful preparation and safety checks when working with recycled materials. Carefully inspect all edges to ensure they are smooth and free from sharp points. Check that any added decorations are securely attached and that paint or glue has dried completely. If your craft is meant to be a functional item like a pencil holder or planter, test its stability and make certain it can hold items without tipping over.
Pro tip: Always supervise children when using the finished craft and perform a final safety check. If any part of the craft seems weak or potentially hazardous, reinforce it with additional glue or trim any rough edges. Your plastic bottle creation is now a unique piece of art that showcases creativity while promoting recycling and environmental awareness. Celebrate your achievement and enjoy the satisfaction of transforming an ordinary plastic bottle into something extraordinary!
![]()
Spark Creativity and Care for Nature with The Zoofamily
Creating beautiful crafts from plastic bottles can feel overwhelming when trying to balance safety, creativity, and environmental responsibility. This guide highlights challenges such as safely cutting and decorating bottles while engaging kids’ imaginations and fostering eco-awareness. At The Zoofamily, we understand these goals deeply. Our products not only inspire children’s curiosity about the natural world through fun and educational tools like cameras and binoculars but also encourage creative connections with the planet as described in this Creative Plastic Bottle Craft for Kids: Step-by-Step Guide.

Discover how you can continue this journey of creativity and sustainability with us. Join a community that cares for nature and children’s development by exploring our full range of innovative products at The Zoofamily. Take the next step today to spark your child’s imagination while planting a tree for every camera sold, combining artistry, learning and environmental stewardship all in one experience.
Frequently Asked Questions
What types of plastic bottles are best for crafting?
Choose plastic bottles with smooth surfaces and minimal texture for easier crafting. Avoid bottles that have held chemicals or cleaning products, and focus on clean water or soft drink containers.
How can I clean plastic bottles for crafting?
Rinse your plastic bottles thoroughly with warm soapy water to remove any residues, then peel off any labels. Let them dry completely on a clean towel before using them for your projects.
What basic crafting tools do I need for plastic bottle crafts?
Essential tools include sharp scissors, a craft knife, ruler, permanent markers, glue gun, paintbrushes, and decorative items like ribbons and stickers. Ensure to use child-safe scissors if kids are involved in the crafting process.
How do I design creative shapes from plastic bottles?
Start by drawing your desired shapes directly onto the bottle using a permanent marker, focusing on simple designs. Use sharp scissors or a craft knife to carefully cut along the marked lines to create your shapes.
What are some safety tips for crafting with kids?
Always supervise children while using sharp tools and perform a final safety check on the crafted items. Ensure all edges are smooth and check that any decorations are securely attached before allowing use of the finished crafts.
How can I decorate my plastic bottle craft?
Use acrylic paints, markers, and various decorative materials like stickers and ribbons to personalize your creation. Allow each layer of paint to dry completely before adding additional layers for the best results.
Recommended
- Bricolages avec coquillages : Créez des cadeaux uniques pour enfants – The Zoofamily
- Making Learning Fun: Engaging Activities for Your Kids – The Zoofamily
- Comment protéger la planète au quotidien avec ses enfants – The Zoofamily
- Making Learning Fun: Engaging Activities for Your Kids – The Zoofamily