

Switch the camera to night mode, brace it against something solid, set a two or three second timer, and head out at dusk rather than full darkness. Most children get a recognisable shot of the sky or a star trail on their first attempt with this setup. Try it tonight: set the camera up, step outside for five minutes, and see what comes back on the screen.
TL;DR:
- Using night mode with a self-timer and turning off the flash is the best basic setup for children’s night sky photos, preventing darkness and blur.
- Stable braces like a small tripod, beanbag, or leaning against surfaces help reduce blur caused by movement, especially with slow shutter speeds.
- Planning outings during the twenty minutes after sunset with a clear or partly cloudy sky offers the best conditions for visible stars and moon photos.
- Children should focus on capturing the moon, brightest stars, and familiar constellations like the Big Dipper, rather than full sky scenes, to maximize success.
- Reviewing each photo with specific questions about sharpness, framing, and lighting enhances learning and confidence, rather than emphasizing technical perfection.
Table of Contents
- What are the best night sky camera settings for kids?
- How do you keep a child’s camera steady at night?
- Fun ways to make night sky photography safe and exciting for kids
- Fixing blurry, dark, or noisy night photos
- Which cameras and settings suit children best?
- Your quick-start checklist for a night sky photo session
- When is the best night to photograph the sky with kids?
- What can kids actually spot and photograph in the night sky?
- How should kids review their own night photos?
- What The Zoofamily’s ALAIN thinks about teaching kids night photography
- Give your child a camera built for nights like this
- Sources
- FAQ
What are the best night sky camera settings for kids?
Children’s cameras rarely offer manual dials, and that’s a good thing. The job is to match a simple control to a simple outcome, not to teach exposure triangles to a six year old.
Here’s how the main controls map onto what actually happens outside after dark:
- Night mode: Slows the shutter and lifts sensitivity automatically. Use it any time the sky looks darker than the last hour of daylight.
- Brightness or exposure boost: On cameras without a dedicated night mode, nudging exposure up one or two steps does a similar job. Use it if the preview screen looks nearly black.
- Self-timer (2 to 3 seconds): Removes the shake from pressing the shutter button. Use it every single time, indoors or out.
- Flash off: Flash on a night-sky shot lights up nothing but the air ten centimetres from the lens. Turn it off unless you’re photographing a person standing close by.
For a kids’ point-and-shoot digital camera, night mode plus timer plus flash off covers almost every situation. For an instant print camera, there’s usually no night mode at all. Rely on the built-in flash only for close-up portraits, and save the darker sky shots for the digital camera instead. For a smartphone in child-safe mode, tap the screen to focus on the brightest star or the moon, then let the phone’s own night mode handle the rest.
Each setting earns its place for a reason a child can understand: night mode stops photos coming out black, the timer stops them coming out blurry, and no flash means no washed-out puddle of light where the stars should be. As ExpertPhotography notes, camera modes are best taught one at a time through visual comparison rather than dumped on a child all at once, so manual mode stays off the table until a child is older and genuinely curious about the dials.
Pro Tip: Take one test shot before your child touches the camera. If it comes out too dark on your test, fix the setting first. Nothing kills a five-minute activity faster than ten failed attempts before it even starts.
How do you keep a child’s camera steady at night?
Blur is the single biggest reason night photos disappoint children, and it’s almost always down to movement rather than the wrong setting. A slower shutter needs a stiller camera, so stability matters more after dark than at any other time of day.
You don’t need a full tripod kit to solve this. A few low-cost options work just as well for small hands:
- A small tabletop tripod sitting on a wall, bench, or car roof.
- A beanbag or rolled-up jumper wedged under the camera on any flat surface.
- Leaning the camera against a railing, fence post, or rucksack propped at the right angle.
- Two hands plus elbows tucked in, paired with the self-timer, for whenever nothing else is around.
Whichever brace you use, the self-timer does the real work: it lets go of the shutter button before the shutter actually opens, so the small wobble from a finger press never reaches the photo. Composition stays simple too. Ask your child to frame a nearby silhouette, a tree, a play tent, a favourite toy, at the bottom or side of the shot rather than dead centre, using any on-screen gridlines as a rough guide. Keep sessions short, increasing duration as children grow and stay engaged, with younger children having briefer sessions and older children able to handle longer ones.
Fun ways to make night sky photography safe and exciting for kids
The best night outings feel like a mission, not a lesson. Framing it as a hunt or a challenge, rather than a technique to master, keeps younger children engaged far longer.
- Star-hunt checklist. Give your child a short list, the moon, the brightest star, one constellation shape, and let them tick each one off with a photo.
- Dusk silhouette portraits. Stand your child against the last of the evening sky and let them direct where you or a sibling should pose.
- Glow-stick light trails. Crack a glow stick, have your child wave it slowly in a circle or a letter shape while the camera’s timer runs, and watch the trail appear on the screen. WonderHowTo’s night photography guide is a good source of these playful, supervised light experiments.
- Sparkler-safe alternative. Skip actual sparklers for younger children and stick to glow sticks or a torch beam waved gently for the same trailing effect, with an adult holding the light source for the under sevens.
Every activity runs on the same safety rules: stay within arm’s reach, no climbing on walls or rocks for a better angle, keep well away from ponds, rivers, or pool edges, and let one adult control any torch or light source at all times. Nat Geo Kids points out that short, closely supervised outings keep children both safer and more focused, which matters more after dark than during the day. For three to five year olds, keep it to the star hunt and silhouettes near the house. Six to nine year olds can handle glow-stick trails with help. Ten and up can start setting the timer themselves. Print the best shots into a small seasonal album regularly to create a keepsake that tracks how the sky changes through the year.
Fixing blurry, dark, or noisy night photos
Most night-photo problems have the same three causes, and none of them require a new camera. Working through them with your child, out loud, turns a disappointing shot into a quick lesson.
- Too dark: Switch on night mode or nudge the brightness setting up, and try again slightly earlier at dusk rather than full dark.
- Blurry: Check the camera was braced and the timer was used. If neither happened, that’s the fix, not the setting.
- Grainy or speckled: This is normal. Night shots carry visible grain even on adult cameras, and it’s not a fault to chase away.
Audubon’s guide to nature photography with children recommends reviewing photos with kids around three simple ideas: focus, composition, and light. Ask “is the star sharp or fuzzy,” “what’s in the frame,” and “was it too dark or too bright.” That’s the whole review, and it works for a four year old just as well as a ten year old.
Celebrate the attempt every time, even when the shot is a total miss. Only change approach if the same problem repeats across several nights, dark, blurry, dark, blurry, which usually points to a setting worth fixing rather than bad luck. A camera upgrade or a local photography workshop is worth considering once a child is asking specific questions about how the camera works, not before.
Pro Tip: Keep a tiny notebook by the camera bag. After each session, jot one sentence: “too dark, try night mode next time.” Three sessions in, your child will start predicting the fix themselves.
Which cameras and settings suit children best?
Durability and simplicity beat features every time with young photographers. ExpertPhotography’s guidance for teaching children photography points specifically to rugged, easy-mode cameras over anything with a steep learning curve, and that holds especially true once you’re outside in the dark with cold fingers and excited kids.
Look for three things above all else: a single dedicated night or low-light mode that needs one button press, a built-in self-timer, and a body that survives a drop onto grass or a knock against a fence post. Complicated menus and manual dials add nothing for a child under ten and only slow down the moment when the sky actually looks good. Animal-themed cameras built around simple controls a child can operate alone, sturdy bodies, and designs that make the camera feel like a toy worth taking outside rather than a fragile adult gadget kept in a drawer.
Instant print cameras deserve a specific mention here. They’re brilliant for daytime portraits and silhouette shots at dusk, but their fixed flash and simple exposure mean they’re not built for genuine darkness. Pair one with a digital camera on night mode for the actual sky shots, and let the instant camera handle the printed keepsakes of the outing itself.
Your quick-start checklist for a night sky photo session
Print this out or screenshot it before you head outside. It covers the whole session from setup to the walk back indoors.
- Check the sky an hour before dusk. Clear or partly clear is fine; heavy cloud means try another night.
- Charge the camera and clear the memory card so nothing stops you mid-session.
- Switch on night mode, or raise brightness/exposure if there’s no dedicated night setting.
- Turn flash off unless you’re taking a close-up portrait of your child.
- Set the self-timer to two or three seconds.
- Find a brace, a wall, a beanbag, a fence post, before your child even lifts the camera.
- Frame something in the shot besides the sky: a tree, a toy, a sibling’s silhouette.
- Take three shots, review together, and adjust one setting if needed.
- Keep the whole outing under twenty minutes for younger children.
- Review the best shot together indoors, focus, composition, light, and pick a favourite to print or save.
Stick this list on the fridge next to the camera bag and it becomes a habit rather than a production.
When is the best night to photograph the sky with kids?
Timing matters more than any camera setting. A clear dusk sky with a thin crescent moon will beat a technically perfect setup under thick cloud every single time.
Aim for the twenty minutes after sunset rather than full darkness. There’s still enough ambient light for a child’s camera to read the scene properly, and the sky often carries a deep blue that photographs far better than pure black. A new moon or thin crescent gives the darkest, most star-filled sky, while a full moon washes out fainter stars but makes for a striking, easy-to-photograph subject in its own right, genuinely useful if the aim is simply a good moon photo rather than a starry sky.
Weather does the rest of the work. Clear or lightly hazy skies are workable; anything with visible cloud cover or fog will leave a child’s camera hunting for light that isn’t there. Check a basic weather app for cloud percentage before committing to an outing, and avoid windy nights if you’re relying on a lightweight tabletop tripod that might tip over. Weeknight outings close to home, a garden, a balcony, a nearby park, tend to work better than a big planned trip, since children get restless quickly and a five-minute walk home when they’re tired beats a long drive.
What can kids actually spot and photograph in the night sky?
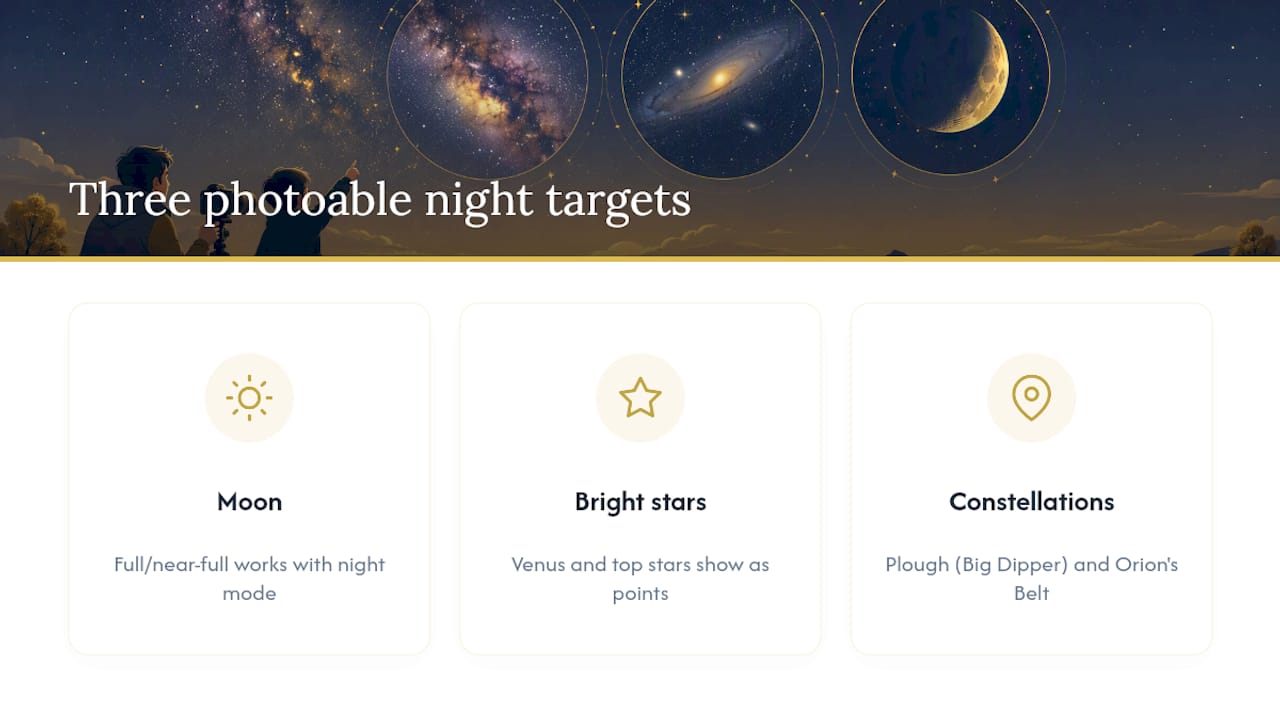
Three targets cover almost everything a child’s camera can realistically capture: the moon, the brightest stars, and a handful of easy constellation shapes.
The moon is the easiest win by far, bright, large, and forgiving of a slightly wrong setting. A full or near-full moon photographed with night mode and a steady brace will almost always come out recognisable, and it’s the shot most children get most excited about first.
Bright stars come next. Venus, when visible in the evening sky, and the brightest stars in familiar patterns show up as clear points of light even on a basic camera. Point out one or two by name before the camera comes out, children photograph what they’ve already noticed with more excitement than what you point at cold.
Constellations are trickier to capture in full but easy to introduce as a spotting game even if the camera only picks up a few of the brightest points. The Plough (also called the Big Dipper) is the easiest shape for young children to recognise and point their camera towards, since its seven stars form an unmistakable saucepan outline. Orion’s Belt, three stars in a neat line, works well for slightly older children once winter evenings roll around.
Treat the sky itself as the lesson plan: spot it first, name it out loud, then photograph it. That order matters more than any camera setting.
How should kids review their own night photos?
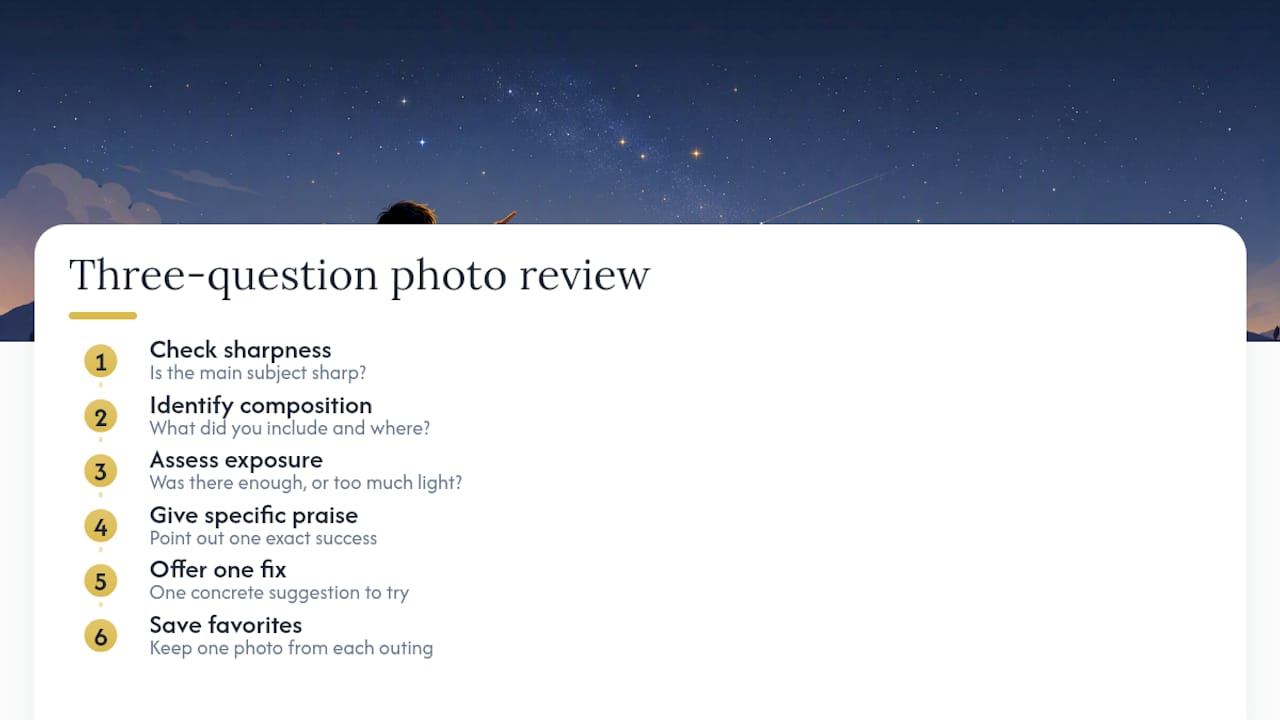
Reviewing photos together is where the actual learning happens, more than the shooting itself. Audubon’s advice on nature photography with children centres on giving specific, positive feedback rather than a general “well done,” and the same three-question method used for troubleshooting works just as well as a teaching tool.
Sit down together straight after the outing, screen or printed photo in hand, and ask your child three things in order. First, “is the main thing sharp?” Second, “what did you put in the picture, and where?” Third, “was there enough light, or too much?” Let your child answer each one before you offer your own view. This turns review into a game of noticing rather than a critique.
Praise specifics rather than generalities: “I love how you got the moon right in the corner” lands far better than “great photo.” Save any correction for a single, concrete suggestion, “next time, let’s brace it against the fence,” rather than a list of everything that could improve. Children who get one clear thing to try next time come back to the activity far more willingly than those handed a string of fixes at once.
Keep a favourite from every outing in a simple folder or printed album. Watching their own shots improve session to session does more for a child’s confidence than any explanation of what an f-stop is.
What The Zoofamily’s ALAIN thinks about teaching kids night photography
Most advice on children’s photography assumes the goal is a technically good photo. It isn’t. The goal is a child who wants to go outside again next week, and that changes almost every decision you’d otherwise make about settings and gear.
The instinct to teach manual controls early is the biggest mistake parents make, not because children can’t grasp them eventually, but because a fumbled dial in the cold and dark turns a five-minute game into a frustrating chore. One button, one outcome, works. Three dials interacting with each other doesn’t, not at age six, and often not at age ten either.
Thezoofamily’s longer guide to photographing the night sky goes deeper into the technical side for parents who want it, but the principle behind Thezoofamily’s approach to design stays the same across every camera it builds: simple controls first, curiosity second, technical mastery only if a child asks for it. A tree is planted for one camera sold, creating a link between a child looking up at the sky tonight and the landscape they’ll grow up into.
— ALAIN
Give your child a camera built for nights like this
Animal-themed cameras are built around the approach covered above: one button for night mode, a built-in timer, and a body sturdy enough to survive a fence post brace or an accidental drop onto grass. There’s no menu to get lost in and no manual dial to fumble with cold fingers, which matters far more at dusk than in daylight.

You don’t need Thezoofamily’s cameras to try tonight’s five-minute practice run, any simple point-and-shoot or instant camera works for the steps above. But if you’re choosing a first camera for a child who’s shown real interest in the sky, a design built specifically for small hands and outdoor knocks solves problems a standard camera never anticipated. A tree is planted for every purchase, a detail worth mentioning to a child once the novelty of the camera itself wears off. Visit Thezoofamily to browse the range and find a camera suited to your child’s age.
Sources
- How to Unlock Your Child’s Creativity and Confidence Through Nature Photography | Audubon
- Top wildlife photography tips for your kids | Nat Geo Kids
- Photography for Kids: 15 Valuable Lessons to Teach Them | ExpertPhotography
- How to do night photography with your kids | WonderHowTo
FAQ
What’s the single best camera setting for a child’s night photo?
Night mode paired with a two or three second self-timer solves the two most common problems, darkness and blur, in one step.
Do kids’ instant cameras work for night sky photos?
Not well for the sky itself, since their fixed flash and simple exposure suit close-up portraits better; pair one with a digital camera on night mode for actual sky shots.
How long should a night photography session last for young children?
Ten minutes for children aged three to five, stretching to around twenty minutes for children aged six and over who stay engaged.
Is a full moon or a new moon better for photos?
A new or crescent moon gives a darker sky with more visible stars, while a full moon gives an easier, brighter subject that’s simpler for a child’s camera to capture well.
What if a child’s night photo comes out grainy?
Grain is normal at night, even on adult cameras, and isn’t a fault to fix; focus the review instead on whether the main subject is sharp and well framed.