Making mud pies might sound like messy chaos, but it is actually a brilliant way to engage a child’s creativity outdoors. Children can transform patches of slightly damp, clay-rich soil into tiny works of art and the soil you choose makes all the difference. Most parents worry about the mess, yet the real surprise is how these muddy sessions teach children hands-on lessons about science, patience, and self-expression without them even realising.
Table of Contents
- Step 1: Choose A Suitable Outdoor Space
- Step 2: Gather Essential Materials And Tools
- Step 3: Prepare The Mud Mixture
- Step 4: Shape And Decorate Your Mud Pies
- Step 5: Verify The Quality Of Your Creations
Quick Summary
| Key Point | Explanation |
|---|---|
| 1. Choose the right outdoor space | Select a damp, clay-rich area in your garden for optimal mud pie creation and to avoid disturbing plants. |
| 2. Gather appropriate materials and tools | Use retired kitchen utensils and ensure easy access to water for maintaining mud consistency and encouraging creativity. |
| 3. Create the perfect mud mixture | Aim for a thick cake batter-like consistency using clay-rich soil with gradual water addition to ensure moldability. |
| 4. Shape and decorate mud pies | Encourage creativity by using various natural elements for decoration and different moulding techniques to craft unique masterpieces. |
| 5. Verify pie quality and stability | Assess structural integrity and texture of each pie to enhance learning about craftsmanship and the scientific properties of mud. |
Step 1: Choose a Suitable Outdoor Space
Making mud pies starts with finding the perfect outdoor location that transforms an ordinary day into an extraordinary adventure of creativity and messy fun. Your chosen space will become the canvas for your child’s muddy masterpieces, so selecting the right spot requires thoughtful consideration.
Understanding the Ideal Mud Pie Terrain
The perfect location for making mud pies combines several key elements: accessible soil, adequate moisture, and a space that allows for unrestricted play. Look for areas in your garden or backyard with slightly damp, clay-rich soil that holds together well when squeezed. Avoid locations near flower beds or vegetable gardens to prevent accidentally disturbing planted areas. Create a dedicated mud kitchen zone where children can explore and create without limitations.
Ideal terrain characteristics include:
- Soft, workable soil with some natural moisture
- Slightly shaded area to prevent mud from drying too quickly
- Near a water source like an outdoor tap or garden hose
- Relatively flat ground to support stable mud pie construction
Before setting up your mud pie workspace, conduct a quick soil assessment. Pick up a handful of soil and squeeze it gently.
![]() Perfect mud pie soil will hold its shape without crumbling but won’t be overly sticky or waterlogged. If the soil is too dry, keep a water source nearby to add moisture gradually.
Perfect mud pie soil will hold its shape without crumbling but won’t be overly sticky or waterlogged. If the soil is too dry, keep a water source nearby to add moisture gradually.
Consider placing a large plastic sheet or tarp underneath the play area to contain the mess and make cleanup easier. This simple preparation protects your garden while giving children the freedom to explore and create without constant worry about staining clothes or creating excessive mess.
Remember that supervision is key. Choose a location within eyesight, preferably close to your home, so you can monitor the fun while allowing children the independence to explore their creativity. The right outdoor space transforms mud pie making from a simple activity into an engaging sensory experience that connects children with natural materials and encourages imaginative play.
Step 2: Gather Essential Materials and Tools
Preparing for your mud pie adventure requires collecting a delightful array of tools and materials that will transform an ordinary afternoon into a memorable creative experience. Think of this step as assembling your young chef’s muddy culinary kit, where imagination meets earthy exploration.
Crafting Your Mud Pie Workshop
Start by gathering kitchen utensils that have been retired from food preparation but can now become dedicated mud pie tools. Old baking trays, muffin tins, plastic containers, and wooden spoons make perfect mud pie equipment. According to research from the National Park Service, children benefit from having a variety of containers and tools to spark their creativity.
Essential materials for your mud pie station include:
- Several plastic or metal containers of different sizes
- Old wooden spoons or mixing utensils
- A large bucket or basin for water
- Old kitchen towels or aprons
- Garden gloves (optional)
Water management is crucial in mud pie creation. Position a water source nearby, such as a garden hose or outdoor tap, to help children maintain the perfect mud consistency. Pro tip: Fill a large bucket with water beforehand, allowing it to sit at room temperature for easier mixing.
Consider the clothing aspect of your mud pie adventure. Dress children in old clothes or dedicated play clothes that can get completely dirty. Rubber boots or old shoes work best, as they protect feet while allowing full immersion in the muddy experience. Some parents opt for full-body waterproof suits, which can make cleanup significantly easier.
A small table or designated mud work surface can help contain the mess and provide a stable area for pie construction.
Here is a concise overview of recommended tools and materials for setting up an engaging mud pie workshop, outlining their main purposes and any practical tips for use.
| Item | Purpose | Tips/Considerations |
|---|---|---|
| Old kitchen utensils | Mixing, shaping, and decorating mud pies | Retire from actual food use for safety |
| Plastic/metal containers | Moulding and forming mud pies | Collect various sizes for creativity |
| Large bucket or basin | Holds water for mixing mud | Fill beforehand to allow water to warm up |
| Old kitchen towels/aprons | Protects clothing from mud splashes | Dress in play clothes for easy cleanup |
| Garden gloves (optional) | Protects hands from dirt and irritation | Useful for sensitive skin or colder days |
| Rubber boots/old shoes | Keeps feet dry and safe in muddy conditions | Choose footwear that can get thoroughly dirty |
| Plastic sheet or tarp | Contains mess and simplifies cleanup | Place under the play area if on grass or patio |
| If you’re working directly on the ground, a large plastic sheet or tarp can protect the underlying surface and make post-play cleanup a breeze. |
Remember that the goal is not perfection but exploration. Every utensil, container, and patch of dirt becomes a potential tool for creativity. By gathering materials that invite open-ended play, you’re setting the stage for an afternoon of sensory discovery, imaginative construction, and pure, messy joy.
Step 3: Prepare the Mud Mixture
Creating the perfect mud mixture is an art form that transforms ordinary dirt into a magical medium for culinary imagination. This step is where science meets play, as children learn about texture, consistency, and the delicate balance of ingredients that will make their mud pies truly spectacular.
Mastering the Mud Pie Recipe
Begin by selecting the right soil for your mud pie adventure. Not all dirt is created equal. Clay-rich soil works best, providing the perfect sticky consistency that allows pies to hold their shape. If your garden soil seems too sandy or loose, consider mixing in some clay or fine garden soil to improve the texture.
The water-to-soil ratio is critical in creating the ideal mud mixture. Start with small amounts of water, adding gradually to avoid turning your mixture into a soupy mess. Aim for a consistency similar to thick cake batter - firm enough to hold shape but moist enough to be moldable. Children can learn valuable lessons about measurement and consistency during this process.
Key mixing techniques include:
- Use a large container or bucket for mixing
- Add water slowly, stirring continuously
- Test consistency by forming a small ball that holds together
- Adjust with more soil or water as needed
Encourage children to experiment with their mixing technique. Some might prefer using their hands, while others might opt for a wooden spoon or garden trowel. The tactile experience of mixing is just as important as the final product. Watch as they discover how different amounts of water change the mud’s texture and workability.
For added creativity, consider introducing natural decorative elements during the mixing process. Small pebbles, leaves, or flower petals can be mixed into the mud, creating unique textures and visual interest in the final mud pies. This approach transforms a simple mixing activity into a sensory exploration of natural materials.
Verify your mud mixture’s readiness by performing the “shape test”. Pick up a handful of mud and squeeze gently. Perfect mud pie mixture should:
- Hold its shape when squeezed
- Not crumble immediately
- Not be so wet that it drips
- Feel smooth and malleable
Remember that mud pie making is about process and fun, not perfection. Each batch will be slightly different, and that’s part of the charm. Embrace the messy learning experience, knowing that every handful of mud is a step towards creative discovery.
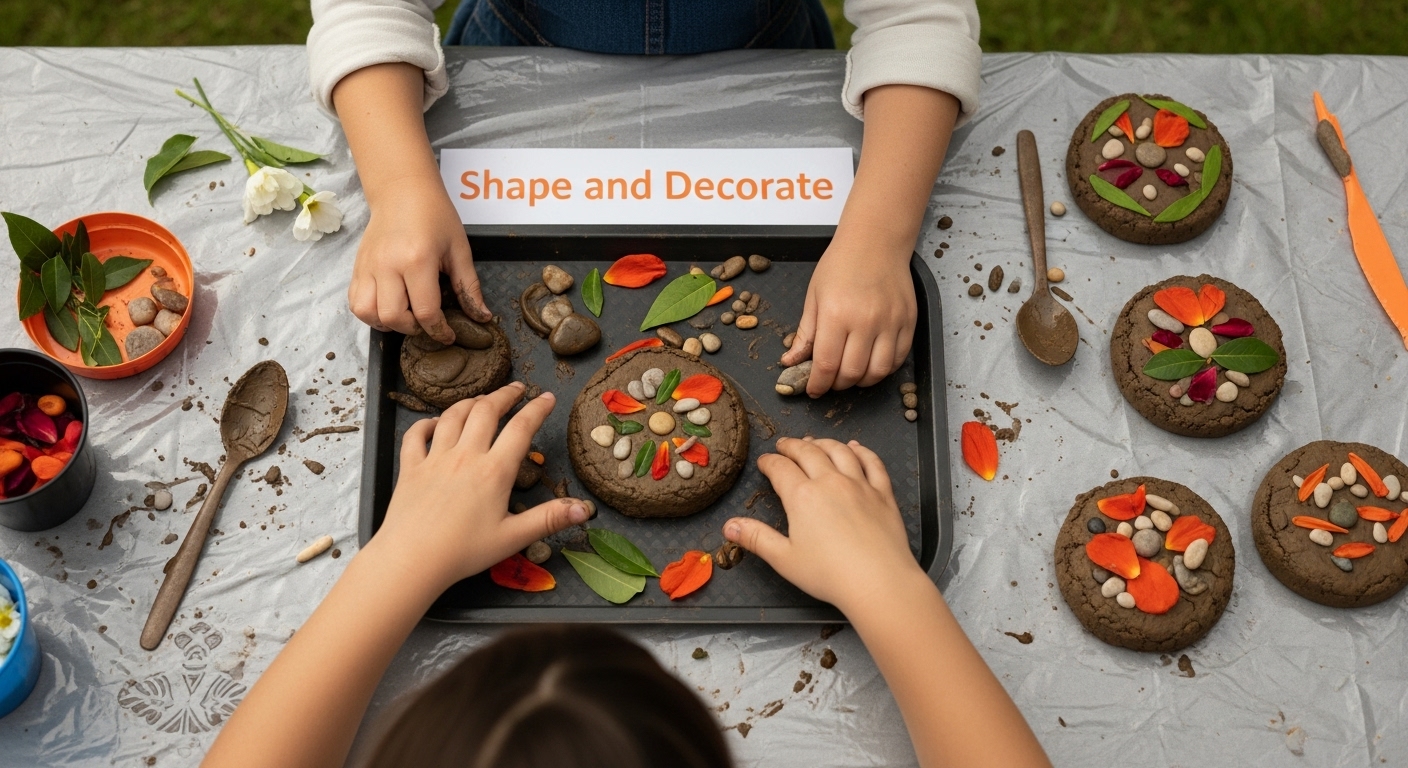
Step 4: Shape and Decorate Your Mud Pies
Shaping and decorating mud pies transforms a simple mud mixture into a canvas of culinary creativity, where imagination takes physical form through earthy sculptures. This step is where children truly become mud pie artists, turning their carefully prepared mixture into delightful creations that celebrate natural play and boundless creativity.
Crafting Mud Pie Masterpieces
Start with the fundamental pie-making technique: using containers as molds or shaping pies directly by hand. Muffin tins create perfect individual mud pies, while larger containers can produce magnificent “family-sized” creations. Press the mud mixture firmly into chosen containers, ensuring even distribution and smooth surfaces. According to research from the National Park Service, natural decorative elements can transform simple mud pies into extraordinary works of art.
Decorative techniques to explore include:
- Using small pebbles to create pie “crusts”
- Pressing leaves for intricate surface patterns
- Adding flower petals as elegant garnishes
- Creating texture with twigs and small sticks
Encourage children to experiment with different shaping methods. Some might prefer using their hands to create free-form pies, while others might enjoy the precision of container molding. The goal is not perfection but joyful exploration. Show them how to gently tap containers to release mud pies, maintaining the shape while creating a smooth surface.
For added complexity, introduce layering techniques. Children can create multi-layered mud pies by allowing initial layers to partially set before adding subsequent decorative elements. This approach teaches patience and allows for more intricate design possibilities.
Remember that mud pie decoration is about personal expression. Each child will develop their unique style, some preferring minimalist designs while others create elaborate, nature-inspired masterpieces. Encourage creativity by providing a variety of natural materials like moss, small shells, or interesting bark fragments that can become unexpected decorative elements.
Verify a successful mud pie by checking these key criteria:
- Pie holds its shape when gently lifted
- Decorative elements are securely embedded
- Surface appears smooth and intentionally designed
- Child shows excitement and pride in their creation
The true magic of mud pie making lies not in the final product but in the imaginative journey of creation. Each pie tells a story of exploration, sensory discovery, and unbridled childhood creativity.
Step 5: Verify the Quality of Your Creations
The final stage of mud pie making is a critical moment of assessment and celebration, where children learn to evaluate their culinary earth-based artwork with a discerning eye. This step transforms the messy process into a valuable learning experience about craftsmanship, attention to detail, and creative problem-solving.
Assessing Mud Pie Perfection
Begin the quality check by examining the structural integrity of each mud pie. According to research from KidsGardening.org, understanding soil composition is key to creating stable creations. Hold each pie gently and observe how well it maintains its shape. A high-quality mud pie should hold together without crumbling, yet remain soft enough to showcase delicate decorative elements.
Key verification criteria include:
- Consistent texture throughout the pie
- Smooth, even surface without major cracks
- Decorative elements securely embedded
- Ability to be lifted without immediate disintegration
Encourage children to develop a playful yet analytical approach to their mud pie evaluation. This isn’t about creating perfect sculptures, but about understanding the relationship between moisture, soil composition, and structural design. Some pies might be more rustic, while others demonstrate remarkable architectural precision.
Comparative testing adds an extra layer of scientific exploration. Place different mud pies on various surfaces - a flat stone, a tilted board, or slightly uneven ground - and observe how they respond. This activity teaches children about gravity, balance, and the importance of a solid foundation. Watch how some pies might slowly deform or maintain their shape, turning the verification process into an engaging experiment.
Remember that imperfections are part of the creative journey. A slightly lopsided pie or one with an unexpected crack tells a story of exploration and learning. Celebrate these unique characteristics, helping children understand that creativity isn’t about flawless execution but about joy, experimentation, and personal expression.
Final verification involves a holistic assessment:
Use this checklist to help children verify the quality of their mud pies, ensuring both educational value and satisfaction with their creations.
| Verification Criteria | What to Check | Why It Matters |
|---|---|---|
| Consistent texture | Even mix throughout, no sogginess or dryness | Ensures structure and ease of shaping |
| Smooth, even surface | No large cracks or rough patches | Creates aesthetic and durable results |
| Secure decorative elements | Pebbles, leaves, and flowers firmly embedded | Prevents decoration from falling off |
| Holds together when lifted | Does not crumble or disintegrate upon handling | Demonstrates construction success |
| Creative use of materials | Unique patterns, layering, and variety | Encourages imagination and experimentation |
| Child’s satisfaction and pride | Expresses enjoyment with their work | Reinforces positive learning experience |
- Child’s satisfaction with the creation
- Structural stability
- Creative use of natural decorative elements
- Evidence of careful craftsmanship
The ultimate success of a mud pie isn’t measured by professional standards but by the sparkle of excitement in a child’s eyes, the pride in their creative process, and the memories made during this delightful outdoor adventure.
Inspire Deeper Nature Play With The Zoofamily
Does your child light up when moulding the perfect mud pie or dreaming up nature-inspired masterpieces? The article highlighted the challenge of nurturing creativity through outdoor play, supporting hands-on exploration while showing respect for our planet. Parents often wish for deeper connections between children and the environment, especially as messy activities like mud pie making open doors to imaginative thinking and learning. But sometimes the right tools to encourage curiosity and lasting memories make all the difference.

Now is the time to take your child’s outdoor adventures to the next level. At The Zoofamily, we have designed more than just top-quality kids’ cameras and nature-inspired gear. Every item we offer is crafted to spark a lifelong bond with the natural world. For every camera you choose, we plant a tree, helping you give back to the planet while your child creates. Dive into our collection to nurture creativity, foster connection, and make every mud pie moment truly unforgettable. Discover your next step towards joyful learning and a greener Earth today at The Zoofamily.
Frequently Asked Questions
What ingredients do I need to make mud pies?
You primarily need clay-rich soil and water to create the perfect mud mixture. Additional materials include old kitchen utensils, containers, and natural decorative elements like pebbles, leaves, and flower petals.
How do I ensure the soil is suitable for making mud pies?
The ideal soil should be slightly damp and clay-rich, which allows it to hold shape when squeezed. Perform a quick test by picking up a handful of soil and squeezing it; it should hold together without crumbling.
What tools are best for shaping and decorating mud pies?
Common tools include old baking trays, muffin tins, wooden spoons, and plastic containers. Natural elements like small pebbles, twigs, and leaves can also be used for decoration to enhance creativity.
How can I manage the mess while making mud pies?
Lay a large plastic sheet or tarp underneath the play area to contain the mess. Encourage children to wear old clothes and rubber boots, and designate a specific play area for creating mud pies to make cleanup easier.