

Suncatchers, mosaic planters, garden spinners, coasters and simple beaded jewellery are the fastest wins for old CDs, all doable in under an hour with basic craft tools. Suncatchers and coasters suit total beginners and kids with supervision, mosaic planters and spinners work best as weekend garden projects, and jewellery makes a quick handmade gift. Whichever you pick, clean the disc first and wear eye protection if you’re cutting it.
TL;DR:
- Using DVDs for mosaic projects yields more vibrant, densely colored shards compared to standard pressed CDs, especially in reflective crafts.
- Safety glasses, cut-resistant gloves, and proper tools are essential when cutting or breaking discs, which can shatter into sharp shards if not handled carefully.
- Outdoor projects like garden spinners and mosaic planters require waterproof adhesives, clear sealants, and rust-resistant mounting hardware for durability.
- Basic kits including a heat gun or hairdryer, scissors, and glue make most crafts achievable with minimal cost and preparation.
- Kid-friendly projects are limited to whole-disc decorating and magnet making, with adults handling any cutting or shaping to ensure safety.
Table of Contents
- Quick craft ideas with old CDs to try first
- Materials, tools and preparation: what to gather first
- Cutting and shaping old CDs without cracking them
- Six CD craft recipes to build from start to finish
- Making CD crafts survive outdoors
- Kid-friendly CD crafts and classroom ideas
- Finishing touches: paint, partial mosaics and natural pairings
- Where to find patterns, sealants and further guidance
- Why a stack of old discs is worth the effort
- Pair craft time with The Zoofamily’s activity ideas
- Sources
- FAQ
Quick craft ideas with old CDs to try first
Before diving into full recipes, it helps to see the range of what a stack of scratched discs can become. Some projects need nothing more than glue and glitter; others ask for a craft knife and a steady hand.
- CD suncatcher: Hang a whole or shard-covered disc in a window. Difficulty: easy. Time: about twenty to thirty minutes. Safety note: none if using a whole disc, gloves if cutting shards.
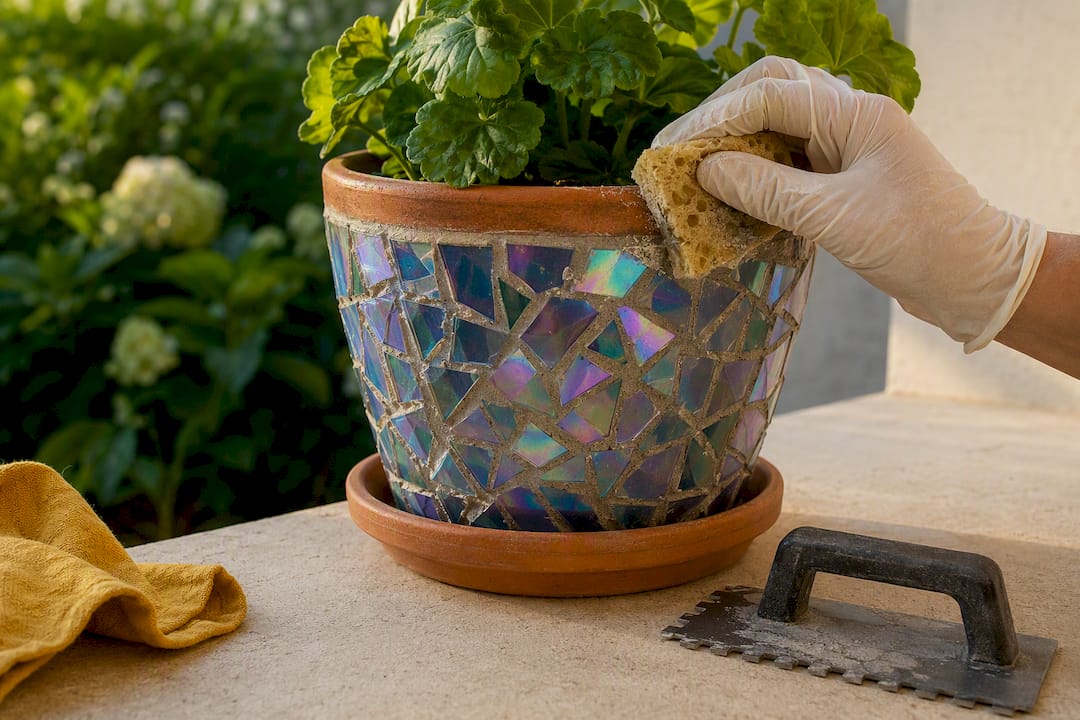
- Mosaic plant pot: Cover a terracotta pot in broken CD pieces and grout between them. Difficulty: moderate. Time: about one to two hours plus drying. Safety note: cut-resistant gloves and safety glasses when breaking discs.
- Garden wind spinner: String several discs on fishing line to spin and flash in the breeze, doubling as a bird scarer. Difficulty: easy. Time: about thirty minutes. Safety note: check for sharp edges before hanging near paths.
- Disco ball ornament: Cut small squares and glue them onto a foam or polystyrene ball. Difficulty: moderate. Time: about one hour. Safety note: work over a tray to catch shards.
- CD coasters: Back a whole disc with felt or cork for a heat and scratch resistant coaster. Difficulty: easy. Time: 15 minutes. Safety note: minimal, no cutting required.
- Beaded CD jewellery: Punch small circles or use a cutter to make pendants and earrings. Difficulty: moderate. Time: 45 minutes. Safety note: use a leather punch, not scissors, on thick sections.
- Wall clock face: Mount clock hardware through the centre hole of a decorated disc. Difficulty: easy. Time: about thirty minutes. Safety note: none beyond standard drilling care.
- Kaleidoscope mobile: Hang several suncatcher-style discs at different lengths from a branch or hoop. Difficulty: easy. Time: 40 minutes. Safety note: same as suncatchers.
- Photo frame trim: Glue small CD fragments around a plain frame edge for a shimmer border. Difficulty: moderate. Time: about one hour. Safety note: gloves for handling shards.
- Garden edging markers: Push painted whole discs onto stakes to mark plant rows. Difficulty: easy. Time: 20 minutes. Safety note: none.
- CD bowl: Heat a disc gently and mould it over an upturned bowl for a decorative dish. Difficulty: advanced. Time: 30 minutes plus cooling. Safety note: heat protection gloves, ventilated space.
- Fridge magnets: Cut small motifs and glue magnets to the back. Difficulty: easy. Time: 20 minutes. Safety note: adult supervision for cutting with children present.
Materials, tools and preparation: what to gather first
Not every disc behaves the same way under a blade, and that matters more than most guides admit. Standard pressed CDs are thin and brittle, so they shatter into angular shards rather than curling. DVDs and CD-Rs have a slightly different laminate structure, and DVDs in particular tend to produce denser, richer colour in shards than a standard pressed CD, because their microscopic data tracks are packed more tightly. If a project depends on visual sparkle, such as a suncatcher or mosaic, raid the DVD pile first and save plain CDs for structural pieces like coasters or backing.
Before cutting anything, gather a basic kit:
- Safety glasses (non-negotiable when cutting or snapping any disc)
- Cut-resistant gloves
- Sharp household scissors or a craft knife
- A hairdryer or heat gun for softening thick discs
- Fine sandpaper (120 to 220 grit) for smoothing edges
- Strong adhesive (superglue for small joins, E6000 for anything load-bearing)
- A dust mask if sanding indoors for any length of time
Optional extras for advanced shaping include a rotary tool with a cutting wheel, a leather punch for clean holes, and tile nippers for controlled mosaic breaks.
Cleaning is simple but easy to skip. Peel off any paper label first, then soak the disc in warm water with a little washing-up liquid to lift adhesive residue. Run a fingernail across the surface afterwards; if it catches on old glue, give it another soak. A full kit costs very little if you already own scissors and glue. Sandpaper, a heat gun and E6000 adhesive together typically run under £15 from any hardware shop.
Pro Tip: Hold each disc up to a window before you commit to cutting it. Scratches that are invisible under room lighting often show up as ugly white lines once sunlight passes through, so test suncatcher candidates in direct light first.
Cutting and shaping old CDs without cracking them
Four methods cover almost every project, and choosing the right one saves both material and fingers.
- Scissors: Best for trimming the outer edge into rough shapes or cutting small confetti pieces. Works on thinner CD-Rs more easily than pressed CDs.
- Craft knife with a fresh blade: Good for scoring a line before snapping the disc along it, similar to scoring glass. Always cut away from your body.
- Warm-and-peel: Many tutorials recommend warming thick discs with a hairdryer or heat gun for 20 to 30 seconds before peeling back the reflective layer, which softens the plastic enough to reshape or separate layers without shattering it. This is the safest route for anyone nervous about shards.
- Rotary tool with a cutting wheel: Fastest for precise shapes like clock faces or jewellery pendants, but it throws fine plastic dust, so use it outdoors or with a mask and eye protection.
To make a hanging hole, heat a thick needle or awl over a flame for a few seconds and press it through the disc’s edge in one smooth motion; let it cool before handling. For mosaic shards, snap the disc inside a folded towel to contain fragments, then sand every cut edge with 120 grit paper until it stops catching on a fingernail. Sweep up shards immediately with a dustpan rather than a bare hand, and bin them in a taped-up box so nothing pokes through a bin bag later.
Safety checklist for any cutting method: glasses on, gloves on, work over a tray, sand every edge, and never cut towards your supporting hand.
Six CD craft recipes to build from start to finish
Each of these takes a shortlisted idea and turns it into a full, repeatable project.
1. Classic suncatcher Materials: one whole CD, fishing line, permanent markers or glass paint, a hole punch tool. Steps: clean the disc, decorate one side with paint or marker in a radial pattern, thread fishing line through the centre hole, knot securely, hang in a bright window. Time: 20 minutes plus drying. Skill level: beginner.
2. Mosaic plant pot Materials: a terracotta pot, six to eight broken CDs, tile adhesive, grout, a sponge. Steps: snap discs into small shards inside a towel, arrange the pattern on the pot dry first, glue pieces down leaving small gaps, let the adhesive cure overnight, apply grout with a spreader, wipe excess with a damp sponge before it sets. Time: 2 hours active work plus overnight cure. Skill level: intermediate. Because this piece lives outdoors, seal each shard with a thin clear acrylic spray before grouting; tutorials on outdoor mosaics consistently note that unsealed shards can have their reflective film lifted by wet grout.
3. Garden wind spinner Materials: several CDs, fishing line, a metal ring or sturdy stick, a drill or heated needle. Steps: make a small hole near the edge of each disc, thread them onto separate lengths of line at staggered heights, tie all lines to the central ring, hang from a branch or shepherd’s hook. Time: about thirty minutes. Skill level: beginner. This one doubles as a bird deterrent over vegetable beds.
4. Disco ball ornament Materials: a polystyrene ball, five to six CDs cut into small squares, strong glue, a ribbon loop. Steps: cut CDs into roughly 1cm squares with scissors, glue them edge to edge around the ball working in rows, leave gaps minimal, insert a ribbon loop into the top before the glue fully sets. Time: about one hour. Skill level: intermediate.
5. CD coasters Materials: whole CDs, felt or cork sheet, fabric glue or E6000, scissors. Steps: trace the CD outline onto felt or cork, cut it out, glue it to the label side of the disc, weight it flat while drying. Backing a CD with felt or cork is the standard fix for turning a slippery disc into something that actually protects a table surface. Time: about fifteen minutes plus drying. Skill level: beginner.
6. CD wall clock Materials: a decorated whole disc, a clock movement kit, hands, a small drill if the centre hole needs widening. Steps: decorate the disc face, fit the clock movement shaft through the centre hole, attach hands per the kit instructions, hang using the movement’s built-in hook. Time: about thirty minutes. Skill level: beginner.
For display, group suncatchers in threes at different window heights rather than spacing them evenly, which looks more natural. Mosaic pots and clocks both make solid handmade gifts if you finish the edges neatly and add a small backing label with the date.
Making CD crafts survive outdoors
Garden spinners and mosaic pots face rain, frost and UV that indoor pieces never see, and the wrong adhesive fails within a season.
- E6000: A flexible, waterproof craft adhesive that holds CD shards to ceramic or wood and stays put through temperature swings.
- Outdoor silicone sealant: Good for gap-filling around mounted discs but slower to cure than E6000.
- Clear acrylic spray: Thin protective coat for shards before grouting, guarding against the reflective film lifting.
- Marine varnish: Worth the extra cost on wooden mounting boards or spinner arms left outside year-round, since standard varnish breaks down faster under sun exposure.
Pre-seal shards before grouting rather than after; grout that’s already dried around unsealed plastic is far harder to fix. For mounting, use galvanised eye screws rather than nails, which rust and stain paintwork, and hang spinners high enough that they clear pets and inquisitive wildlife. If the piece sits somewhere accessible from the street, a simple twist-lock hanging method deters casual theft better than a basic hook.
Kid-friendly CD crafts and classroom ideas
Sharp plastic and children don’t mix, so the fix is straightforward: adults do the cutting, kids do everything else. No-heat variants and adult pre-cutting are widely recommended for classroom-safe suncatcher activities, and the same rule applies at home.
- Pre-cut and edge-sand any shards the night before, then let children handle only the smoothed pieces.
- Stick to whole-disc projects (suncatchers, clocks, fridge magnets) for under-eights to skip cutting entirely.
- Decorating with paint pens builds fine motor control and colour recognition in under 30 minutes.
- Pair the session with a nature theme, such as painting animal shapes onto discs, using ideas from The Zoofamily’s recycled art projects or its DIY nature ornament guide.
Finishing touches: paint, partial mosaics and natural pairings
A whole CD’s mirror shine isn’t always what a project wants, and knowing how to tone it down opens up more design options than leaving every disc glossy.
- Frosted glass spray or a light sand with fine paper dulls the shine for a softer, more matte look.
- Partial mosaics, where only a third of the disc is covered in shards, let some reflective surface show through for contrast.
- Combine cut CD pieces with driftwood, dried flowers or scrap fabric for a mixed-texture, nature-inspired finish rather than an all-plastic piece.
- A single coat of matte varnish calms glare without hiding colour, while gloss varnish amplifies both.
Pro Tip: If a spinner or suncatcher looks too “plastic disco ball” for your taste, paint the back of the disc rather than the front. The colour shows through softened by the clear layer on top, giving a stained-glass effect instead of a flat painted one.
Where to find patterns, sealants and further guidance
A few sources are worth bookmarking if you plan to make more than one or two pieces.
- Tutorial sites focused on mosaic technique and grouting, such as guides covering DIY CD mosaic backsplash methods, for step-by-step photo instructions.
- Sustainability-focused craft blogs, useful for suncatcher variations and colour theory between CDs and DVDs.
- Local hardware or craft shops for E6000, marine varnish and fine-grit sandpaper.
- If you’re adapting a pattern shared online rather than designing your own, check its licence terms; many community templates use a Creative Commons Attribution-NonCommercial-ShareAlike licence, which permits personal reuse but restricts commercial resale.
Why a stack of old discs is worth the effort
Sustainability groups increasingly frame upcycling as waste prevention rather than recycling in the traditional sense, and that distinction matters for CDs specifically, because they aren’t accepted in most household recycling bins anyway. Turning them into a suncatcher or a garden spinner keeps them out of landfill entirely, and repurposing old CDs costs next to nothing compared with buying decor from a shop.
What I find most underrated about this craft isn’t the environmental angle, it’s what it teaches a child about materials. A disc that once seemed disposable becomes something they made and can point to on a windowsill. That’s the same instinct behind Thezoofamily’s approach to nature-themed play: give a child a reason to look closer at the world instead of past it.
— ALAIN
Pair craft time with The Zoofamily’s activity ideas
There are other routes to filling an afternoon with your kids, from bought craft kits to organised workshops, but a box of old CDs and a bit of guidance costs almost nothing and teaches more. Thezoofamily designs animal-themed cameras, binoculars and activity-friendly gear that sit naturally alongside a craft session like this one, giving children something to photograph or explore once their suncatcher is hanging in the window. The nature connection extends beyond the craft table through initiatives that support environmental restoration.
If you’re planning a weekend of hands-on activities, browse Thezoofamily’s full range for gifts and gear that pair well with garden crafts, nature walks and classroom-style projects at home.
Sources
- HOW TO: Use Old CDs for Mosaic Craft Projects - DIY Kitchen Backsplash Tips and Tricks
- 10 reuse ideas for CDs and DVDs
- 12 Disc suncatcher crafts from old CDs
- How to make a CD suncatcher craft: a step-by-step guide - MadeByYouDIY
FAQ
What is the best thing to do with old CDs?
Suncatchers and coasters are the fastest, lowest-risk projects, needing only a whole disc and basic decorating supplies with no cutting required.
What can I do with unwanted CDs?
Beyond crafts, unwanted CDs can be broken down for mosaic tiles, strung into garden spinners, or backed with felt to become coasters, all of which keep them out of landfill.
What are some ways to use old CDs in the garden?
Wind spinners doubling as bird scarers, painted edging markers for plant rows, and mosaic-covered plant pots are the most practical outdoor uses, provided shards are sealed with a clear acrylic coat before grouting.
How do you cut old CDs for crafts?
Score the disc with a craft knife and snap it inside a folded towel, or soften it first with a hairdryer for 20 to 30 seconds before peeling or reshaping it, always wearing safety glasses and gloves.
Are CDs or DVDs better for craft projects?
DVDs tend to produce denser, richer colour in cut shards thanks to their tighter data tracks, making them the better choice for suncatchers and mosaics where sparkle matters most.